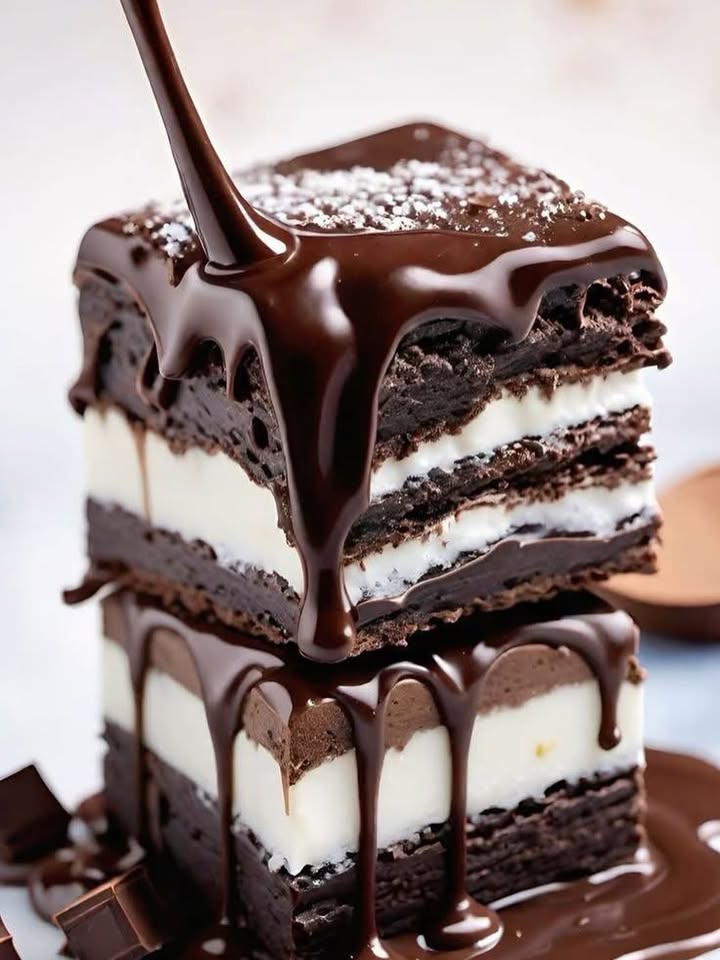
There’s something magical about slicing into a Decadent Marble Cake Delight and seeing those perfect swirls of vanilla and chocolate peeking back at you. I remember the first time I baked one for my daughter’s birthday—she was six, and her eyes lit up like she’d just discovered cake alchemy. Ever since, this recipe has been my secret weapon for birthdays, potlucks, and “just because” afternoons. Soft, moist, and bursting with flavor in every bite, this marble cake doesn’t just feed the belly—it feeds the soul. And the best part? It’s way easier to make than it looks!
The Sweet Story Behind the Decadent Marble Cake Delight
Marble cake traces its roots back to 19th-century Germany, where bakers began swirling two batters—usually vanilla and chocolate—into one loaf or bundt pan. The technique was born from frugality (using what you had) and a love for playful presentation. German immigrants brought it to America, where it became a staple in home kitchens and bake sales. Today, the Decadent Marble Cake Delight has evolved into a crowd-pleaser that feels both nostalgic and modern. My version? A little richer, a little softer, and packed with that “melt-in-your-mouth” texture you crave—thanks to a clever combo of butter and oil.
Why You’ll Fall in Love With This Marble Cake
This isn’t just any cake—it’s the Decadent Marble Cake Delight that delivers on every promise. The crumb is tender, never dry. The vanilla is warm and aromatic, while the chocolate swirls are deep and velvety. Plus, it’s a one-bowl wonder (well, almost—you’ll need two for the swirls!). It’s simple enough for a weeknight treat but fancy enough to impress guests. And let’s be real: that marble pattern? It makes you feel like a bakery pro, even if you’re baking in slippers and an old t-shirt!
Perfect Moments for a Decadent Marble Cake Delight
Keep this recipe handy—it shines in so many settings! Bring it to a weekend brunch, serve it with coffee after dinner, or let it steal the show at a birthday party. It’s also a thoughtful housewarming gift or a sweet “thinking of you” gesture. I’ve even packed thick slices in lunchboxes for school events. Honestly, there’s no wrong time for this cake. Rainy day? Marble cake. Good news to celebrate? Marble cake. Bad day? Double marble cake.
Ingredients for the Perfect Marble Cake
For the cake:
- 2 cups all-purpose flour
- 2 teaspoons baking powder
- 1/2 teaspoon salt
- 1/2 cup unsalted butter, softened
- 1/2 cup vegetable oil
- 2 cups granulated sugar
- 4 large eggs
- 1 tablespoon vanilla extract
- 1 cup whole milk
- 1/3 cup unsweetened cocoa powder
- 1/4 cup hot water
For the optional glaze:
- 1/2 cup unsalted butter, softened
- 2 cups powdered (icing) sugar
- 2–3 tablespoons whole milk
Easy Swaps and Substitutions
No whole milk? Use buttermilk or even almond milk—just avoid skim if you can; fat = flavor and moisture! Swap vegetable oil for melted coconut oil or canola oil. Butter must be real for best texture, but if you’re dairy-free, use plant-based butter (just check it’s softened properly). For eggs, try flax eggs (1 tbsp ground flax + 3 tbsp water per egg), though the crumb may be slightly denser. And if you’re watching sugar, coconut sugar works in the batter—but skip it in the glaze; it won’t dissolve smoothly.
How to Make Your Decadent Marble Cake Delight
Step 1
Preheat your oven to 180°C (350°F). Grease and flour a 9-inch bundt pan or a 9×13-inch baking dish—this is key to easy release later. I always use a little parchment at the bottom too, just in case. While the oven warms up, the kitchen fills with that calm, cozy energy that only baking brings. Take a deep breath. You’ve got this.
Step 2
In a medium bowl, whisk together the flour, baking powder, and salt. This “dry mix” needs to be lump-free and evenly blended, so don’t skip the whisking! Set it aside. Pro tip: sift the flour if it’s been sitting in your pantry for a while—it aerates the mix and gives your cake a lighter texture.
Step 3
In a large bowl, beat the softened butter, oil, and sugar until creamy and pale—about 3 to 4 minutes with a hand mixer. Add eggs one at a time, mixing well after each. Then stir in the vanilla. You’ll notice the batter turning glossy and smelling like pure comfort. This base is your vanilla dream—and it’s about to get a chocolate twin!
Step 4
Now, gently fold in the dry ingredients and milk in three alternating additions: dry → wet → dry → wet → dry. Start and end with dry. Mix just until combined—don’t overbeat! Overmixing develops gluten and leads to a tough cake. The batter should look smooth, thick, and velvety. Chef’s tip: use a spatula and fold from the bottom up for even mixing without air loss.
Step 5
Scoop out roughly half the batter into a separate bowl. To this portion, whisk in the cocoa powder and hot water until fully blended and smooth—it should look like rich chocolate pudding. The hot water “blooms” the cocoa, deepening its flavor. Now you’ve got two gorgeous batters: one golden vanilla, one deep chocolate brown.
Step 6
Drop large spoonfuls of both batters randomly into your prepared pan—don’t layer neatly! Then, take a butter knife or skewer and swirl gently in figure-eights. Just 3–4 swirls are enough—too much mixing muddles the marble effect. You want those bold, contrasting veins, not a muddy brown cake. I always whisper “be patient” to myself here—it’s harder than it looks!
Step 7
Bake for 50–60 minutes. The cake is done when a toothpick inserted near the center comes out clean or with a few moist crumbs (no wet batter!). The edges should pull slightly away from the pan, and your kitchen will smell like heaven. Pro tip: ovens vary—start checking at 45 minutes to avoid overbaking.
Step 8
Let the cake cool in the pan for 15 minutes, then transfer to a wire rack. If you’re using the glaze, whisk butter, powdered sugar, and milk until smooth and glossy. Drizzle generously over the cooled cake. The glaze adds sweetness and shine—but honestly, this cake is perfect naked too. Slice, serve, and watch faces light up!
Timing Is Everything
- Prep time: 20 minutes
- Bake time: 50–60 minutes
- Cooling time: 1 hour (for glaze to set)
- Total time: About 2 hours
Chef’s Secret for the Ultimate Marble Cake
My #1 trick? Use both butter AND oil. Butter gives flavor, oil keeps it moist for days. Most recipes choose one—but this combo is why my cake stays soft even on day three. Also, always dissolve cocoa in hot water—it unlocks its full chocolate potential. These two secrets make your Decadent Marble Cake Delight unforgettable.
Fun Fact About Marble Cake
Did you know? The term “marble cake” was first printed in an American cookbook in 1859! Back then, it was called “Harlequin Cake” because of its playful, patchwork look. Over time, “marble” stuck—thanks to its resemblance to veined stone. I love that this dessert has been bringing joy for over 160 years!
Tools You’ll Need
- 9-inch bundt pan or 9×13-inch rectangular pan
- Electric hand mixer or stand mixer
- Two mixing bowls (medium and large)
- Whisk and spatula
- Measuring cups and spoons
- Wire cooling rack
- Toothpick or cake tester
How to Store Your Marble Cake
At room temperature, your glazed or unglazed Decadent Marble Cake Delight stays fresh for up to 3 days. Just cover it loosely with foil or place it under a cake dome. The oil in the batter helps retain moisture, so it won’t dry out quickly like other cakes.
For longer storage, wrap individual slices tightly in plastic wrap and place them in an airtight container in the fridge. It’ll last up to 5 days. Bring to room temperature before serving—cold cake dulls the flavor!
Yes, you can freeze it! Wrap the whole unglazed cake (or slices) in two layers: plastic wrap, then aluminum foil. Freeze for up to 3 months. Thaw overnight in the fridge, then glaze fresh if desired. Freezing actually enhances the texture—just don’t skip the thawing step!
Top Tips for Marble Cake Mastery
- Use room-temperature eggs and butter—they blend smoother.
- Don’t over-swirl! Gentle figure-eights create the best pattern.
- Check doneness early—ovens run hot or cold.
- Let the cake cool before glazing, or the icing will melt right off.
- Sift cocoa powder to avoid lumps in the chocolate batter.
Stunning Ways to Serve Your Cake
- Dust with powdered sugar instead of glaze for a rustic look.
- Serve with a scoop of vanilla ice cream and chocolate shavings.
- Top with fresh berries for color and freshness.
- Drizzle with melted dark chocolate for extra decadence.
- Present on a vintage cake stand for old-school charm.
- Add edible gold flakes for a holiday-worthy finish.
Healthier Twists on the Classic Marble Cake
Love the marble magic but want a lighter touch? Try these creative, tasty alternatives:
1. Whole Wheat Marble Cake
Swap half the all-purpose flour for whole wheat pastry flour. It adds nuttiness and fiber without drying out the cake. Keep the oil for moisture!
2. Yogurt Marble Cake
Replace half the oil with plain Greek yogurt. You’ll get a tangy depth and extra protein—plus it stays incredibly moist.
3. Maple-Sweetened Version
Use 1 1/2 cups pure maple syrup instead of sugar. Reduce milk slightly (by 2 tbsp) to balance moisture. The flavor is earthy and rich.
4. Vegan Marble Cake
Use flax eggs, plant-based butter, and almond milk. Sweeten with coconut sugar. The cocoa swirl still shines!
5. Gluten-Free Marble Cake
Substitute a 1:1 gluten-free flour blend (like Bob’s Red Mill). Add 1/2 tsp xanthan gum if your blend doesn’t include it. Bake time may be 5 minutes shorter.
6. Mini Marble Loaves
Bake in mini loaf pans for gift-sized portions. Reduce bake time to 30–35 minutes. Wrap in cellophane for cute hostess gifts!
Common Mistakes to Avoid
Mistake 1: Overmixing the Batter
When you stir the batter too much after adding flour, you activate gluten—and that leads to a dense, tough cake instead of a soft, tender one. Always mix just until ingredients disappear. Use a spatula and fold gently. Pro tip: stop mixing when you still see a few streaks of flour—they’ll vanish as you add the milk.
Mistake 2: Skipping the Hot Water for Cocoa
Cold water won’t dissolve cocoa properly, leaving gritty bits and weak flavor. Hot water “blooms” the cocoa, releasing its full aroma and color. Always mix cocoa with hot (not boiling) water first, then stir into batter. This tiny step makes your chocolate swirl taste like a bakery version!
Mistake 3: Over-Swirling the Batters
It’s tempting to swirl again and again for a “perfect” pattern—but too much mixing blends the batters into one muddy color. You lose the dramatic contrast that makes marble cake special. Stick to 3–4 gentle passes with a knife. Less is more!
Mistake 4: Using Cold Ingredients
Cold butter or eggs won’t cream properly with sugar, leading to a lumpy or uneven batter. Always bring dairy and eggs to room temperature. If in a rush, place eggs in warm water for 10 minutes and microwave butter in 10-second bursts.
Mistake 5: Cutting Into the Cake Too Soon
I know—it smells amazing! But slicing while hot causes crumbling and ruins the swirls. Let it cool 15 minutes in the pan, then fully on a rack. Patience = perfect slices. Set a timer if you must!
Frequently Asked Questions
Can I make this marble cake without oil?
You can, but it won’t be as moist. Butter alone creates a richer flavor but dries out faster. The oil keeps the crumb tender for days. If you must skip oil, add 1/4 cup applesauce—but expect a slightly denser texture.
Why did my cake sink in the middle?
Sinking usually means underbaking or too much leavening. Make sure your baking powder is fresh (test by mixing 1 tsp with hot water—it should bubble immediately). Also, don’t open the oven door during the first 40 minutes—sudden temperature drops cause collapse.
Can I use Dutch-process cocoa powder?
Yes! Dutch-process cocoa is smoother and less acidic. It gives a deeper color and milder chocolate taste. Just know that natural cocoa reacts with baking powder for rise, while Dutch-process doesn’t—but since this recipe relies on baking powder alone, either works fine.
How do I make the glaze less sweet?
Reduce the powdered sugar to 1 1/2 cups and add a pinch of salt. You can also stir in 1/2 tsp vanilla or a splash of lemon juice to balance sweetness. Or skip the glaze entirely—the cake is delicious on its own!
Can I bake this in cupcake form?
Absolutely! Fill liners 2/3 full and bake for 18–22 minutes. Swirl each cup with a toothpick after filling. You’ll get adorable mini Decadent Marble Cake Delight cupcakes—perfect for parties!
Why is my marble pattern faint?
That happens if the batters are too similar in consistency or if you under-swirl. Make sure your chocolate batter is thick (thanks to cocoa + hot water) and your vanilla is lighter. Also, drop batters in big dollops—not thin streams—for bold contrast.
Can I freeze the cake with glaze?
It’s better to freeze without glaze. Frosting can become sticky or crack when thawed. Freeze the plain cake, then glaze fresh after thawing for best results and appearance.
What if I don’t have a bundt pan?
No problem! A 9×13-inch pan works great. Bake time may be slightly shorter (45–50 minutes). You can also use two 8-inch round pans for a layer cake—just reduce time to 30–35 minutes.
Is this cake suitable for nut allergies?
Yes! This recipe contains no nuts. Just check your cocoa powder and milk labels to ensure they’re processed in nut-free facilities if allergies are severe.
How do I know when it’s done baking?
Insert a toothpick near the center—it should come out clean or with a few moist crumbs (not wet batter). The cake should spring back when lightly pressed, and the edges will start pulling away from the pan. When in doubt, use an instant-read thermometer: 200–205°F (93–96°C) means it’s perfect.
Final Slice of Wisdom
Baking a Decadent Marble Cake Delight isn’t just about following steps—it’s about creating joy, one swirl at a time. Whether you’re a first-timer or a seasoned baker, this recipe meets you where you are and rewards you with a cake that’s soft, stunning, and deeply satisfying. So grab your mixing bowls, put on your favorite playlist, and let the magic happen. Your kitchen—and everyone who tastes it—will thank you.
Decadent Marble Cake Delight
Ingredients
Equipment
Method
- Preheat your oven to 180°C (350°F) and grease and flour a 9-inch bundt pan or a 9x13-inch baking dish.
- In a medium bowl, whisk together the flour, baking powder, and salt.
- In a large bowl, beat the softened butter, oil, and sugar until creamy and pale, about 3 to 4 minutes.
- Add eggs one at a time, mixing well after each, then stir in the vanilla.
- Gently fold in the dry ingredients and milk in three alternating additions: dry → wet → dry → wet → dry. Mix until just combined.
- Scoop out half the batter into a separate bowl and whisk in cocoa powder and hot water until smooth.
- Drop large spoonfuls of both batters randomly into the prepared pan and swirl gently with a butter knife or skewer.
- Bake for 50–60 minutes until a toothpick inserted near the center comes out clean or with a few moist crumbs.
- Let the cake cool in the pan for 15 minutes before transferring it to a wire rack. If using the glaze, whisk together the ingredients and drizzle over the cooled cake.