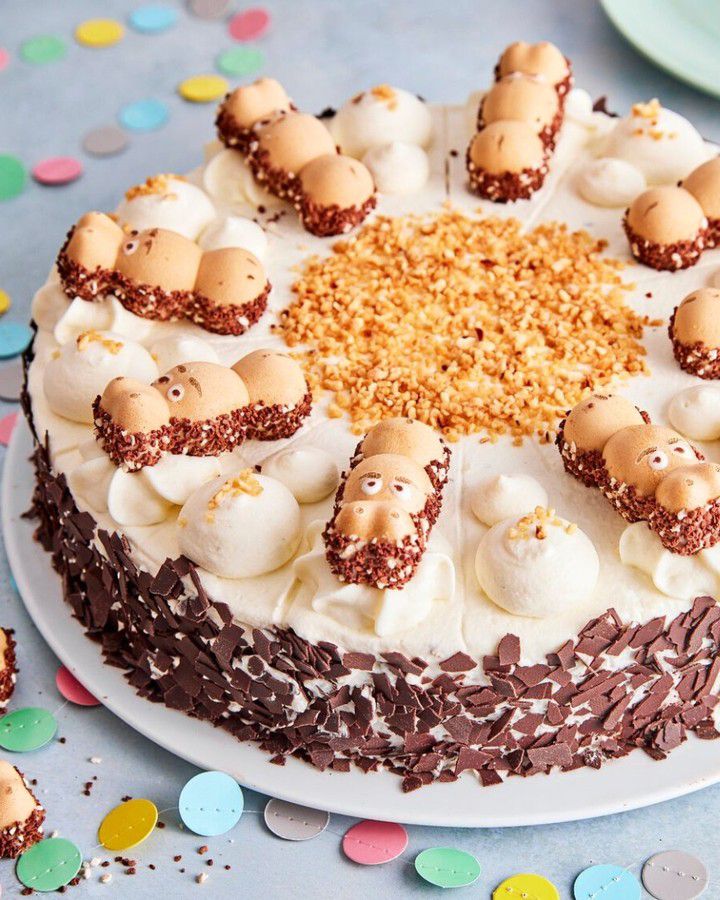
Have you ever seen a dessert so playful it made you smile before you even took a bite? That’s exactly what happened the first time I baked my Irresistibly Whimsical Hippo Cake Delight. My niece spotted it on the counter and squealed, “It looks like a hippo party!” And honestly? She wasn’t wrong. With its creamy layers, melted chocolate speckles, and those iconic Happy Hippo bars peeking out like little chocolate ears, this cake brings joy to any table. Over the years, it’s become my go-to for birthdays, surprise visits, and even “just because” afternoons. It’s not just a cake—it’s a memory-maker.
The Sweet Story Behind the Irresistibly Whimsical Hippo Cake Delight
This cake was born in my own kitchen during a rainy Sunday when I had a half-empty box of Happy Hippo bars and a craving for something fun. These whimsical chocolate-and-hazelnut treats—shaped like smiling hippos—have been a European favorite since the 1980s, especially beloved by kids (and kids at heart!). I wondered: what if I turned them into a cake? After three tries (and one slightly sunken middle), I nailed it. While there’s no ancient history or royal origin here, this dessert is a modern classic in my house—a joyful mash-up of childhood nostalgia and easy baking magic.
Why You’ll Absolutely Love This Irresistibly Whimsical Hippo Cake Delight
It’s fluffy, rich, and packed with melty chocolate surprises. The sponge is light as air, the cream is velvety with cocoa depth, and every bite hides crunchy-chewy bits of Happy Hippo bars. Best of all? It’s shockingly simple. No fancy piping, no temperamental tempering—just fold, layer, and chill. Plus, it’s a guaranteed crowd-pleaser. I’ve served it to skeptical teens and picky grandparents alike, and every single one asked for seconds. It’s the kind of recipe that makes you look like a pro, even if you just pulled your hair back with a spatula.
Perfect Occasions for Your Irresistibly Whimsical Hippo Cake Delight
This cake shines wherever joy is on the menu:
- Kids’ birthday parties (they’ll adore the hippo theme!)
- Family Sunday brunches
- Baby showers with a playful twist
- Surprise “thinking of you” gifts
- End-of-school-year celebrations
- “I just need chocolate” emergency moments
Ingredients You’ll Need
For the Sponge
- 7 medium eggs
- 100 g sugar
- 1 teaspoon vanilla extract
- 200 g wheat flour (Type 405)
- 1 teaspoon baking powder
- 100 g chocolate chips (or chopped chocolate)
- 50 g butter, melted and cooled
For the Cream Filling
- 7 Happy Hippo bars
- 500 ml heavy cream (whipping cream)
- 1 packet (about 7 g) gelatin powder
- 2 tablespoons cocoa powder
- 1 packet vanilla sugar (or 1 tsp vanilla extract)
For the Decoration
- 300 ml heavy cream
- 1 packet cream stabilizer (like “Sahnesteif”)
- 8 Happy Hippo bars
- 80 g chocolate chips
- 2 tablespoons crushed hazelnuts (or your favorite nut)
Easy Ingredient Swaps
No Happy Hippo bars nearby? Try these swaps:
- Happy Hippo bars → Nutella-filled sandwich cookies or chopped Kinder Happy Hippo alternatives
- Heavy cream → Coconut cream (for dairy-free, though texture may vary)
- Gelatin → Agar-agar (for vegetarians; follow package instructions)
- Wheat flour → Gluten-free flour blend (add ½ tsp xanthan gum if needed)
- Vanilla sugar → 1 tsp vanilla extract + 1 tbsp regular sugar
How to Make Your Irresistibly Whimsical Hippo Cake Delight
Step 1
Set your oven to 180°C (350°F) for conventional or 160°C (320°F) for fan-assisted. Line a 20–22 cm springform pan with parchment paper—don’t skip this; it saves your cake from sticking! Melt the butter gently in a small pan or microwave, then let it cool until just warm. That way, it won’t scramble your eggs later. As the oven hums to life, your kitchen already smells like promise—warm, buttery, and sweet.
Pro tip: Place a baking sheet on the rack below your cake. It catches drips and prevents burnt bottoms.
Step 2
Crack those eggs into a big bowl, add sugar and vanilla, and beat like you mean it—for a full 10 minutes! You want them pale, thick, and ribbony. This airiness is what gives your sponge its cloud-like lift. Sift flour and baking powder over the eggs, then fold gently with a spatula—no vigorous stirring! You’re hugging the batter, not wrestling it. Next, fold in the chocolate chips, then drizzle in the cooled butter and stir just until combined. Pour into your pan and smooth the top. Slide it into the oven and set a timer for 30 minutes.
Chef’s tip: Tap the pan lightly on the counter to pop big air bubbles—this keeps your cake even.
Step 3
While the cake cools, crush 7 Happy Hippo bars into chunky crumbs using a fork or pulse in a food processor (leave some texture—they’re the fun part!). Whip the 500 ml cream until stiff peaks form. Sprinkle the gelatin powder directly over the cream (no need to dissolve—it hydrates as you whip). Add cocoa and vanilla sugar, then gently fold in the hippo crumbs. The mixture turns deep brown with specks of caramel and nut—like edible confetti!
Pro tip: Chill your mixing bowl and beaters for 10 minutes before whipping cream. Cold = fluffier!
Step 4
Once the sponge is totally cool, slice it horizontally into two even layers. Place the bottom half inside a cake ring (or back in your springform pan for support). Spread the hippo cream evenly over it, then top with the second sponge layer. Gently press down so the layers bond. Pop the whole thing into the fridge for at least 60 minutes—this sets the cream and makes slicing clean and dreamy. I always peek after 45 minutes… just to admire it.
Chef’s tip: If your cake domes slightly, level it with a serrated knife before splitting—it’s worth the extra minute.
Timing at a Glance
- Prep time: 30 minutes
- Baking time: 30 minutes
- Chilling time: 60 minutes (minimum)
- Total time: 2 hours (mostly hands-off!)
Chef’s Secret Trick
Here’s my magic move: freeze the assembled cake for 20 minutes before adding the final cream layer. It locks the filling in place, so your sides stay neat and your hippo bars don’t slide off. Plus, a slightly chilled base means your whipped cream topping holds its shape like a dream.
A Fun Fact About This Cake
Happy Hippo bars were first created by the German brand Walter Ritter (yes, part of the Ritter Sport family!) as a playful snack shaped like the beloved animal. Their name comes from the German phrase “Glückliches Flusspferd”—happy hippo—and they’ve been making people grin since 1984. Turning them into a cake? That’s my little tribute to childhood joy.
Tools You’ll Need
- 20–22 cm springform pan
- Electric hand mixer or stand mixer
- Cake ring (optional but helpful)
- Spatula
- Serrated knife
- Parchment paper
- Small saucepan or microwave-safe bowl (for melting butter)
How to Store Your Irresistibly Whimsical Hippo Cake Delight
This cake is best enjoyed within 2–3 days and must be kept refrigerated. The cream filling is dairy-based, and the chocolate can soften at room temperature. Always cover it tightly with plastic wrap or store it in an airtight cake container to prevent it from absorbing other fridge smells (like last night’s garlic pasta—trust me, I learned that the hard way!).
If you’re prepping ahead, you can bake the sponge up to 2 days in advance. Wrap it in cling film and store at room temp. The cream filling? Make it fresh the day you assemble. Once fully built, the cake holds beautifully for 48 hours in the fridge—perfect for stress-free entertaining.
Freezing isn’t ideal due to the whipped cream, which can separate and weep upon thawing. But if you must, freeze the unfrosted cake layers wrapped in foil and plastic. Thaw overnight in the fridge before filling and decorating.
Top Tips for Success
- Use room-temperature eggs—they whip up fluffier!
- Don’t overmix after adding flour; it makes the cake tough.
- Chill your cake ring or springform pan before adding cream—it helps the sides stay tidy.
- Crush the Happy Hippo bars just before folding—they stay crisp longer.
- Decorate right before serving for maximum freshness.
Presentation Ideas That Wow
- Top with whole Happy Hippo bars standing upright like “ears”
- Drizzle with melted chocolate in zigzag patterns
- Sprinkle crushed hazelnuts around the rim for crunch
- Add edible silver pearls or gold dust for a festive touch
- Serve on a pastel-colored cake stand for a playful vibe
- Write “Smile!” or “Hippo Birthday!” with chocolate script
Healthier Twists on the Irresistibly Whimsical Hippo Cake Delight
Want a lighter version? Try these fun variations—still joyful, just a bit kinder to your waistline:
- Yogurt Cream Version: Swap half the heavy cream with Greek yogurt. It adds tang and protein while keeping the texture creamy.
- Whole Wheat Sponge: Replace half the white flour with whole wheat pastry flour for extra fiber (the sponge stays tender!).
- Coconut Whipped Cream: Use chilled coconut cream instead of dairy—great for vegans! Just pick dairy-free chocolate bars.
- Fruit-Infused Layer: Add a thin layer of raspberry jam between sponge and cream for a fruity zing.
- Reduced-Sugar Version: Use half the sugar in the sponge and opt for low-sugar Happy Hippo alternatives or homemade nut-chocolate bites.
- Protein-Powered Cream: Blend 1 scoop of chocolate protein powder into the cream filling for a post-workout treat that still feels indulgent.
Common Mistakes to Avoid
Mistake 1: Skipping the Egg-Beating Time
Many rush this step, thinking “a few minutes is enough.” But those 10 minutes of beating are non-negotiable—they create the air bubbles that make your sponge rise without yeast or extra leavening. If you under-beat, your cake turns dense and flat, like a sad pancake. Set a timer, put on a podcast, and whip until the mixture leaves a slow trail when you lift the beaters. That’s your sign it’s ready.
Mistake 2: Overmixing the Batter
Once you add flour, your job is to fold—not stir. Vigorous mixing develops gluten, which makes the cake rubbery instead of tender. Use a spatula, cut through the center, and flip the batter over itself gently. Stop as soon as no dry streaks remain. A few small lumps? Totally fine. Think of it like tucking in a baby—soft and careful.
Mistake 3: Adding Warm Butter to the Batter
If your melted butter is still hot, it can cook the eggs on contact, creating scrambled bits in your batter. Always let it cool until just warm to the touch—about 5–10 minutes. Test by dabbing a drop on your wrist; if it’s comfortable, it’s safe. This tiny pause saves your whole cake.
Mistake 4: Assembling a Warm Cake
Putting cream on a warm sponge = melty disaster. The heat softens the cream, making it slide off and turn soupy. Always let your cake cool completely on a wire rack—this can take 1–2 hours. Patience here means perfect layers later. If you’re in a hurry, pop it in the fridge for 30 minutes to speed things up.
Mistake 5: Not Chilling Long Enough
Sixty minutes is the bare minimum. If you slice too soon, the layers slide apart and the filling oozes out. For best results, chill for 2–3 hours, or even overnight. The flavors meld, the texture firms up, and every slice comes out picture-perfect. Trust me—your future self (and your Instagram feed) will thank you.
Frequently Asked Questions
Can I make this cake without gelatin?
Yes! While gelatin helps stabilize the cream, you can skip it if you’re serving immediately. However, the cream will be softer and may not hold its shape as well over time. For a vegetarian option, use agar-agar—mix 1 tsp with 2 tbsp cold water, heat until dissolved, cool slightly, then fold into the whipped cream.
Where can I buy Happy Hippo bars outside Europe?
They’re widely available in European supermarkets and online (Amazon, German/European food specialty stores). In the U.S., check World Market, international sections of larger grocery stores, or online retailers like Amazon or Yummy Bazaar. If unavailable, use similar hazelnut-chocolate sandwich cookies as a substitute.
Can I use a different pan size?
Absolutely! If using a larger pan (like 24 cm), the cake will be thinner—reduce baking time by 5–7 minutes. For smaller pans (18 cm), add 5–8 minutes. Always check doneness with a toothpick; it should come out clean or with a few moist crumbs.
Why did my cake sink in the middle?
This usually happens from under-beaten eggs, opening the oven too early, or too much leavening. Make sure your eggs are whipped full 10 minutes, avoid peeking before 25 minutes, and measure baking powder precisely. If it sinks slightly, don’t panic—just level it and proceed. No one will notice once it’s filled!
Can I prepare this cake the day before?
Yes! In fact, it’s better that way. Assemble and chill it overnight—the flavors deepen and the texture firms up beautifully. Just add the final whipped cream layer and decoration 1–2 hours before serving to keep it fresh and fluffy.
What if I don’t have a cake ring?
No problem! Use your springform pan as a mold. Assemble the cake inside it, chill, then release the sides just before decorating. It gives you clean, straight edges without needing extra tools.
Is this cake kid-friendly to make?
Very! Kids love crushing the Happy Hippo bars and folding them into cream. Just supervise oven use and sharp knives. It’s a fantastic weekend project that ends with a sweet reward—they’ll be proud to serve “their” hippo cake.
Can I use milk chocolate instead of dark chocolate chips?
Go for it! Milk chocolate makes the sponge sweeter and more mellow. Dark chocolate offers a richer contrast, but milk works great if you prefer a gentler flavor. Just avoid chocolate bars with fillings that might leak during baking.
How do I prevent the whipped cream from deflating?
Use very cold cream, a chilled bowl, and don’t over-whip. Stop the mixer as soon as stiff peaks form—those peaks should stand tall but still look glossy. Adding cream stabilizer (like Sahnesteif) also helps it stay firm for hours.
Can I make mini versions of this cake?
Yes! Use muffin tins or small tart pans to bake mini sponges. Adjust baking time to 15–18 minutes. Fill with cream and top with a half Happy Hippo bar for adorable individual desserts—perfect for parties!
Wrap-Up: Bring Joy to Your Table
The Irresistibly Whimsical Hippo Cake Delight isn’t just dessert—it’s a hug in cake form. With its tender crumb, chocolate-kissed cream, and playful hippo charm, it turns ordinary moments into celebrations. Whether you’re baking for a birthday, a friend in need of cheering up, or just yourself on a quiet Tuesday, this recipe delivers happiness on a plate. So grab those Happy Hippo bars, preheat your oven, and get ready to spread smiles—one slice at a time.
Irresistibly Whimsical Hippo Cake Delight
Ingredients
Equipment
Method
- Preheat your oven to 180°C (350°F) for conventional or 160°C (320°F) for fan-assisted. Line a 20–22 cm springform pan with parchment paper.
- Melt the butter gently and let it cool.
- In a bowl, beat the eggs, sugar, and vanilla for 10 minutes until pale and thick.
- Sift the flour and baking powder over the egg mixture and fold gently.
- Fold in the chocolate chips, drizzle in the cooled butter, and stir just until combined.
- Pour the batter into the prepared pan and smooth the top. Bake for 30 minutes.
- While the cake cools, crush 7 Happy Hippo bars into crumbs.
- Whip 500 ml of cream until stiff peaks form, then add gelatin, cocoa, and vanilla sugar.
- Fold in the crushed Happy Hippo bars into the whipped cream.
- Once cool, slice the sponge horizontally into two layers and place one layer in the ring.
- Spread the hippo cream filling on top of the first layer and place the second layer on top.
- Press down gently and refrigerate for at least 60 minutes.
- For decoration, whip 300 ml of cream with cream stabilizer and use to cover the cake.
- Decorate the cake with crushed hazelnuts, chocolate chips, and whole Happy Hippo bars.