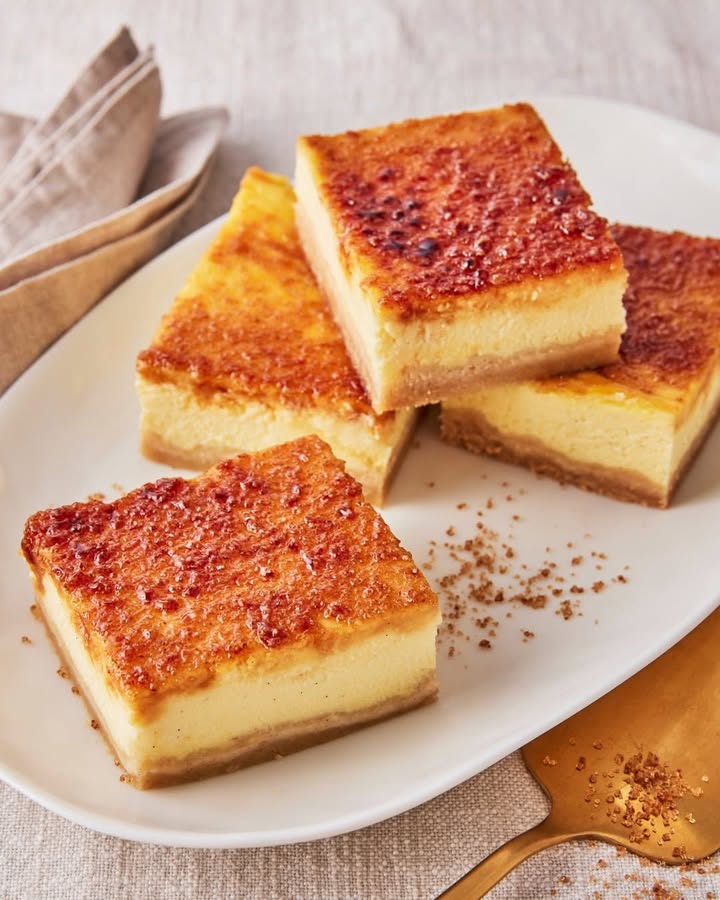
Decadent Crème Brûlée Delights That’ll Have Everyone Begging for Seconds
You know that moment when you take a bite of something so rich, so perfectly balanced between creamy and crunchy, that you actually stop mid-conversation? That’s exactly what happened the first time I served these crème brûlée cuts. My niece dropped her spoon, stared at the plate, and whispered, “Auntie… did you just invent heaven?” Nope, sweetie—I just combined two of my favorite things: a buttery shortbread base and the luxurious magic of crème brûlée, sliced into shareable squares. And now, I’m gifting you the recipe that’s become my go-to for impressing guests, calming birthday chaos, and treating myself after a long week.
The Sweet Story Behind These Crème Brûlée Delights
Crème brûlée itself hails from France—though the Brits, Spaniards, and even the English have claimed similar versions over the centuries. Traditionally, it’s a single ramekin of silky custard crowned with a glass-like caramel crust. But let’s be real: not everyone owns eight ramekins, and who wants to torch eight little desserts one by one? That’s where this genius twist comes in. By baking the custard over a crumbly shortbread base in a sheet pan, then slicing it like a cake, we get all the elegance—without the fuss. I tweaked the custard with mascarpone and quark (a nod to my German kitchen roots) for extra richness and a slight tang that cuts through the sweetness. It’s still crème brûlée—just friendlier, faster, and far more shareable.
Why You’ll Absolutely Love These Decadent Crème Brûlée Delights
First off, they taste like luxury but come together with pantry staples. The base is basically a spiced shortbread—think cinnamon, lemon zest, and vanilla sugar whispering sweetly beneath a cloud of velvet custard. Then there’s that **crack**—that unforgettable sound when your spoon breaks through the caramelized sugar. And thanks to the mascarpone and quark, the filling is richer than classic crème brûlée but still light enough that you’ll go back for a second slice (no judgment here). Plus, you can make it a day ahead! The flavors deepen overnight, and the crust stays perfectly crisp.
Perfect Moments for Serving These Crème Brûlée Cuts
Bring these to a brunch, and you’ll be the talk of the table. Serve them at a dinner party as a no-fail finale. They’re brilliant for baby showers (elegant but not fussy), holiday gatherings (hello, cinnamon and vanilla warmth!), or even just Tuesday night when your soul needs a hug. I once brought them to a potluck labeled “Mystery Squares”—they vanished in 10 minutes, and three people asked for the recipe before dessert plates were cleared.
Ingredients You’ll Need
For the Dough
- 375 g wheat flour (Type 405)
- 225 g granulated sugar
- 1 packet (about 8 g) Bourbon vanilla sugar
- ½ teaspoon salt
- 1 teaspoon finely grated lemon zest
- ½ teaspoon ground cinnamon
- 1 teaspoon baking powder
- 1 large egg (size M)
- 200 g soft unsalted butter, cut into small pieces
For the Cream and Caramel Crust
- 1–2 vanilla pods
- 750 ml heavy cream
- 750 ml whole milk
- 7 large eggs (size M)
- 5 large egg yolks (size M)
- 150 g granulated sugar
- 250 g mascarpone cheese
- 400 g lean quark (or substitute with full-fat Greek yogurt)
- 50 ml vanilla liqueur (optional, but lovely)
- 1 tablespoon cornstarch (for stability)
- Zest and juice of 1 organic lemon
- 80–100 g coarse brown sugar (for caramelizing the top)
Easy Swaps for Your Decadent Crème Brûlée Delights
No quark? Use full-fat Greek yogurt—it’s tangy and thick, just like quark. Don’t have vanilla pods? Use 2 tablespoons pure vanilla extract instead. No vanilla liqueur? Skip it or add 1 extra teaspoon of extract. Butter must be soft but not melted. And if you’re avoiding alcohol, just omit the liqueur—the custard won’t miss it. For a gluten-free version, swap the wheat flour with a 1:1 gluten-free baking blend (add ½ tsp xanthan gum if it doesn’t include any).
How to Make These Dreamy Crème Brûlée Cuts
Step 1: Make the Shortbread Base
In a large mixing bowl, combine the flour (reserve 3 tablespoons), sugar, vanilla sugar, salt, lemon zest, cinnamon, and baking powder. Whisk the egg with 2 tablespoons of water, then pour it into the dry ingredients along with the butter pieces. Use your fingers or a hand mixer on the lowest setting to mix until the dough breaks into small, crumbly pieces—about pea to walnut size. Dust the reserved tablespoon of flour over the crumbs and toss gently. You want a mix that’s sandy but clumps slightly when squeezed. Pro tip: Don’t overwork it—buttery crumbs should stay light and flaky.
Step 2: Press and Chill the Base
Butter a deep 30×40 cm (about 12×16 inch) baking sheet well. Dust the bottom lightly with the remaining 2 tablespoons of flour. Scatter the crumble mixture evenly, then press it firmly into the pan with your fingers or the back of a glass. Build a slight edge around the border to contain the custard. Pop it into the fridge for 30 minutes—this keeps the base from puffing up or shrinking during baking.
Step 3: Pre-Bake the Crust
Preheat your oven to 200°C (390°F) for top/bottom heat, or 180°C (350°F) if using convection. Bake the chilled base for 20–25 minutes until golden and dry to the touch. Let it cool completely in the pan. This step ensures your base stays crisp under the creamy custard—nobody wants a soggy bottom!
Step 4: Infuse the Custard
Split the vanilla pods lengthwise and scrape out the seeds. In a saucepan, combine the cream, milk, vanilla seeds, and pods. Warm over medium heat until it just starts to steam (don’t boil). Remove from heat, cover, and let steep for 5 minutes—this unlocks the full floral depth of the vanilla. Meanwhile, whisk the eggs, yolks, sugar, mascarpone, quark, vanilla liqueur (if using), cornstarch, lemon zest, and juice in a large bowl until smooth and velvety.
Step 5: Bake the Custard Layer
Strain the warm vanilla cream into the egg mixture, whisking constantly to prevent scrambling. Pour the custard over the cooled shortbread base. Bake at 160°C (320°F) with top/bottom heat (or 140°C/285°F convection) for 45–55 minutes, until the center jiggles slightly but the edges are set. Chef’s tip: Place the pan in a larger roasting tray filled with hot water (a water bath) for ultra-smooth custard—no cracks, no bubbles.
Step 6: Caramelize the Top
Once fully cooled (best chilled overnight), sprinkle the top evenly with coarse brown sugar. Use a kitchen torch to melt and caramelize the sugar until it forms a glossy, amber crust. No torch? Broil for 2–3 minutes—but watch like a hawk! Let the sugar harden for 5 minutes before slicing into squares with a hot knife for clean edges.
Timing Breakdown
- Prep time: 30 minutes
- Chilling time: 30 minutes (plus optional overnight for custard)
- Baking time: 25 min (base) + 50 min (custard) = 75 minutes
- Cooling time: 2 hours minimum (better overnight)
- Total time: About 4 hours (mostly hands-off)
Chef’s Secret Trick
For the **ultimate crème brûlée crunch**, use a mix of brown sugar and a pinch of white sugar on top. Brown sugar gives depth; white sugar gives that classic, glassy snap. And always caramelize just before serving—the crust softens if done too early.
Fun Fact About These Delights
Did you know that “crème brûlée” literally means “burnt cream”? Sounds dramatic, but that burnt sugar is the soul of the dessert. In my family, we call these “crack squares”—because that’s the sound everyone makes when they dig in. My grandmother used to say, “If it doesn’t crack, it’s not done right!”
Equipment You’ll Need
- Large mixing bowls
- Hand mixer or strong hands
- 30×40 cm deep baking sheet (rimmed)
- Saucepan
- Whisk and rubber spatula
- Kitchen torch (or broiler-safe pan)
- Sharp knife dipped in hot water for slicing
Storing Your Decadent Crème Brûlée Delights
These treats taste best when the caramel crust is fresh, so wait to torch the sugar until just before serving. However, the base and custard can be baked and chilled up to 2 days ahead. Cover the pan tightly with plastic wrap or foil and store in the fridge. The custard will firm up beautifully, and the flavors meld into something even richer.
If you’ve already caramelized the top, eat within 4–6 hours. The sugar crust absorbs moisture from the custard and turns sticky. But don’t worry—just scrape off the soft layer and re-torch with fresh sugar! Trust me, I’ve done this at 3 a.m. for a midnight craving, and it’s worth it.
Freezing? Not ideal. The custard can separate, and the shortbread base turns chewy when thawed. But if you must, freeze unbaked base and custard separately. Thaw overnight in the fridge, then bake and torch as directed.
Tips to Make Them Perfect Every Time
- Use room-temperature eggs—they blend smoother into the custard.
- Strain the custard twice for silkiness.
- Chill the baked custard uncovered for the first hour to prevent condensation.
- Coarse sugar = better crunch. Fine sugar burns too fast.
- Let slices rest 2 minutes after torching—this hardens the crust.
Presentation Ideas That Wow
- Arrange slices on a rustic wooden board with edible flowers.
- Dust with powdered sugar and lemon zest for contrast.
- Serve with a dollop of whipped cream and fresh berries.
- Drizzle with caramel sauce on the plate for extra decadence.
- Stack two small squares for mini “crème brûlée towers.”
Healthier Twists on These Decadent Crème Brûlée Delights
Want to lighten things up without losing the magic? Try these six smart spins:
- Low-Sugar Version: Use 150 g erythritol in the custard and skip the liqueur. Top with a light sprinkle of coconut sugar before torching.
- Dairy-Free Dream: Swap butter for coconut oil, use oat milk and coconut cream, and replace mascarpone with cashew cream. The texture stays lush!
- Protein-Powered: Mix 2 scoops of vanilla whey into the custard base. It thickens slightly but adds staying power—great for post-workout indulgence.
- Gluten-Free Base: Use certified GF flour + ½ tsp xanthan gum. The crumble works beautifully and tastes just as buttery.
- Summer Berry Swirl: Fold 100 g mashed raspberries into the custard before baking. The tartness balances the richness.
- Matcha Magic: Whisk 1 tablespoon matcha powder into the custard. The earthy note pairs surprisingly well with caramel and vanilla.
Common Mistakes to Avoid
Mistake 1: Skipping the Pre-Bake
If you pour custard onto raw dough, you’ll end up with a soggy, undercooked base that tastes floury. Always bake the shortbread crust first—it sets the stage for a crisp, flavorful foundation. Don’t rush this step; 25 minutes in the oven saves your dessert from disaster.
Mistake 2: Overbaking the Custard
Custard continues to cook as it cools. If you wait until the center is completely firm, it’ll turn rubbery. Pull it out when the middle still jiggles like Jell-O—it’ll set perfectly in the fridge. Use a water bath if you’re unsure; it gently steams the custard for foolproof results.
Mistake 3: Using Fine Sugar for the Crust
Granulated white sugar melts too fast and burns before forming that glassy layer. Coarse brown sugar (like turbinado or demerara) caramelizes slowly and evenly, giving you that satisfying crunch. Keep a jar of it just for crème brûlée—it’s a game-changer.
Mistake 4: Torch Too Early
If you caramelize the sugar hours before serving, humidity from the custard softens it into a sticky mess. Always torch right before guests arrive. Pro move: portion slices first, then torch individually for even browning.
Mistake 5: Overmixing the Dough
When you stir the butter into the flour, stop as soon as it forms crumbs. Overmixing develops gluten, making the base tough instead of tender. Think “sandy beach,” not “bread dough.” Your fingers are better than a mixer here—feel the texture!
Frequently Asked Questions
Can I make these without a kitchen torch?
Absolutely! Place the chilled dessert under a preheated broiler for 2–3 minutes. Watch it closely—brown sugar burns fast. Rotate the pan for even browning, and pull it out the second the sugar bubbles and turns amber. Let it cool 5 minutes to harden.
What’s the best substitute for quark?
Full-fat Greek yogurt works wonderfully—it’s thick, tangy, and widely available. Drain it in a cheesecloth for 1 hour if it’s runny. Ricotta blended until smooth is another option, though slightly grainier. Avoid low-fat versions—they lack richness.
Why did my custard crack?
Cracks usually mean the oven was too hot or there was no water bath. High heat causes the eggs to seize and puff, then collapse. Bake low and slow (160°C max) and consider a water bath—it creates steam that prevents surface drying and cracking.
Can I use light cream instead of heavy cream?
You can, but the custard won’t be as rich or velvety. Heavy cream (35% fat) gives that luxurious mouthfeel. If you must, use a 50/50 mix of light cream and whole milk—but don’t skip the mascarpone; it adds needed fat and body.
How long do these keep in the fridge?
With an unbrowned top, they last 2–3 days covered tightly. Once caramelized, eat within 6 hours for best texture. If the crust softens, scrape it off and re-torch with fresh sugar—it’s like getting a brand-new dessert!
Can I make a smaller batch?
Yes! Halve all ingredients and use a 20×30 cm (8×12 inch) pan. Bake times stay similar—just watch the custard closely. It’s perfect for two people or testing the recipe before a big event.
Is vanilla sugar necessary?
It adds depth, but you can replace it with 1 extra teaspoon of vanilla extract in the dough. Or make your own by blending 1 vanilla pod into 100 g sugar and letting it sit for a week. It’s worth the effort for future baking!
Why use both eggs and yolks?
Whole eggs give structure; yolks add silkiness and richness. The combo creates a custard that’s firm enough to slice but melts on the tongue. Skipping yolks makes it rubbery; skipping whites makes it too soft to hold its shape.
Can I add fruit to this?
Gently! Fold in 100 g of pureed berries or mango into the custard—just don’t add too much liquid. Or layer thin fruit slices (like figs or peaches) on the baked base before pouring custard. Avoid juicy fruits like watermelon—they’ll make everything soggy.
What if my base shrank during baking?
That means the butter was too warm or the dough was overworked. Always chill the pressed base for 30 minutes, and handle it minimally. Cold butter = less shrinkage. If it happens, just press it back into place while still warm.
Final Thoughts on These Unforgettable Crème Brûlée Cuts
These Decadent Crème Brûlée Delights are more than dessert—they’re a moment of calm, a reason to gather, a little celebration on a plate. They’ve won over picky eaters, wowed dinner guests, and become my secret weapon for turning an ordinary day into something special. The recipe may look long, but it’s all simple steps that come together like a well-rehearsed symphony. So grab your vanilla pods, preheat that oven, and get ready to hear that magical crack. Your kitchen—and your loved ones—will thank you.
Decadent Crème Brûlée Delights
Ingredients
Equipment
Method
- In a large mixing bowl, combine the flour (reserve 3 tablespoons), sugar, vanilla sugar, salt, lemon zest, cinnamon, and baking powder.
- Whisk the egg with 2 tablespoons of water, then pour it into the dry ingredients along with the butter pieces.
- Mix until the dough breaks into small, crumbly pieces—about pea to walnut size.
- Dust the reserved tablespoon of flour over the crumbs and toss gently, avoiding overworking it.
- Butter a deep 30x40 cm baking sheet and dust the bottom lightly with the remaining 2 tablespoons of flour.
- Scatter the crumble mixture evenly, then press it into the pan and build a slight edge around the border.
- Chill in the fridge for 30 minutes.
- Preheat the oven to 200°C (390°F) for top/bottom heat, or 180°C (350°F) for convection.
- Bake the base for 20–25 minutes until golden and dry to the touch, then let it cool completely.
- Split the vanilla pods lengthwise and scrape out the seeds. Combine the cream, milk, vanilla seeds, and pods in a saucepan and warm over medium heat until it just starts to steam.
- Let it steep for 5 minutes, then whisk the eggs, yolks, sugar, mascarpone, quark, vanilla liqueur (if using), cornstarch, lemon zest, and juice in a large bowl until smooth.
- Strain the warm vanilla cream into the egg mixture while whisking constantly, then pour the custard over the cooled base.
- Bake at 160°C (320°F) for 45–55 minutes until the center jiggles slightly but the edges are set.
- Once cooled, sprinkle the top with coarse brown sugar and caramelize using a kitchen torch.
- Let the sugar harden for 5 minutes before slicing into squares with a hot knife.