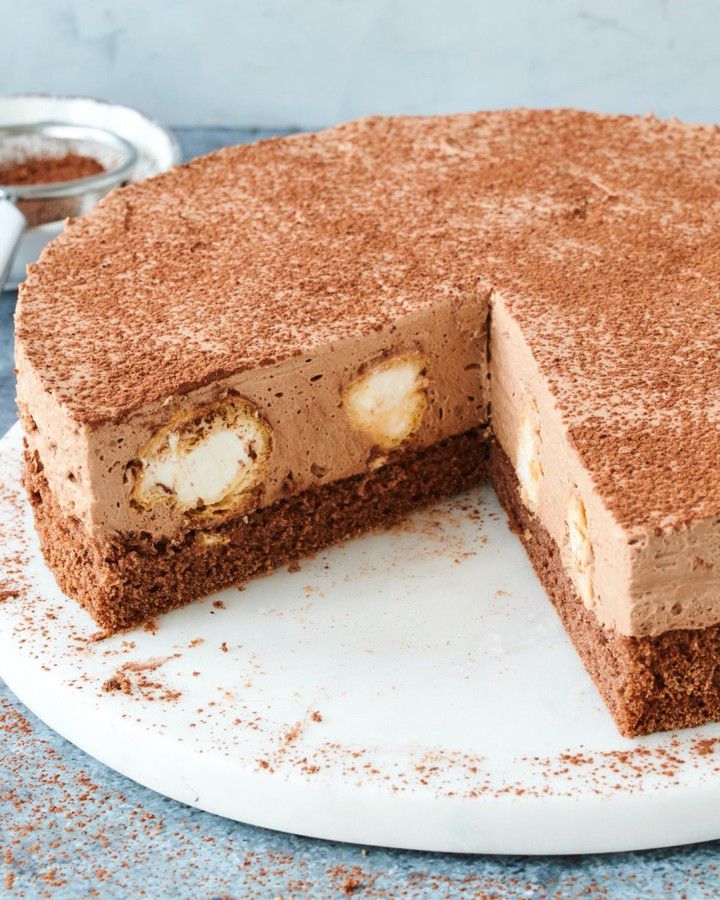
There’s something truly magical about a dessert that looks fancy but doesn’t demand fancy skills. I’ll never forget the first time I made this **Decadent Chocolate Comfort Cake**—my kids called it “cloud cake” because it’s so light, yet every bite melts like a chocolate dream. It’s not your average layer cake; it’s got a soft cocoa sponge, a silky chocolate mousse, and—here’s the fun part—little frozen cream puffs tucked inside like hidden treasures. My neighbor took one bite at a potluck and begged for the recipe before she’d even finished her slice. If you love chocolate that hugs your soul but don’t want to spend all day in the kitchen, this is your new go-to.
The Sweet Story Behind This Decadent Chocolate Comfort Cake
This cake is a German-inspired twist on the classic *Windbeutelkuchen*—literally “cream puff cake.” Traditionally, it uses store-bought or homemade cream puffs layered with custard or cream. But I swapped the custard for a rich chocolate mousse, and let me tell you: it’s a game-changer. Germans often enjoy this as a *Kaffee und Kuchen* (coffee and cake) treat on lazy afternoons, but my version leans into pure indulgence. Over the years, I’ve seen it evolve from a simple weekend dessert into a showstopper for birthdays and dinner parties. What I love most? It feels luxurious without being fussy—just good chocolate, good cream, and a little kitchen magic.
Why You’ll Fall Head Over Heels for This Chocolate Wind Bag Cake
This **Decadent Chocolate Comfort Cake** hits every sweet tooth craving: deep cocoa flavor, airy texture, and that surprise crunch of cream puffs. It’s easy enough for weeknights but elegant enough for celebrations. The sponge stays moist for days, and the mousse sets beautifully without gelatin overpowering the taste. Plus, it uses simple ingredients—no fancy molds or tempering required. I tested this recipe three times (okay, maybe more—my family didn’t complain!) until it was foolproof. The result? A cake that’s rich but not heavy, chocolatey but balanced, and always disappears fast.
Perfect Moments to Serve This Decadent Chocolate Comfort Cake
- Cozy Sunday afternoons with coffee or tea
- Birthday parties (kids adore the hidden cream puffs!)
- Dinner party finales—impress guests without stress
- Valentine’s Day or anniversary desserts (chocolate = love, right?)
- Potlucks or holiday gatherings (it travels well chilled)
Ingredients You’ll Need
For the Chocolate Mousse
- 200 g whole milk chocolate
- 100 g dark chocolate (50–70% cocoa)
- 250 ml whole milk
- 4 gelatin leaves (or 1 tbsp powdered gelatin)
For the Cocoa Sponge Dough
- 3 medium eggs
- 100 g granulated sugar
- 2 tablespoons hot water
- 1 pinch of salt
- 70 g wheat flour (Type 405 or all-purpose)
- 2 tablespoons unsweetened cocoa powder
- 2 tablespoons neutral oil (like sunflower or canola)
For Assembly
- 400 g heavy whipping cream (cold)
- 1 package (about 200 g) frozen cream puffs (Windbeutel), thawed slightly
- 1 tablespoon cocoa powder, for dusting
Smart Substitutions for Your Chocolate Comfort Cake
No whole milk chocolate? Use all dark chocolate (150 g total) for a deeper flavor. Dairy-free? Swap milk for oat or almond milk and use vegan chocolate + agar-agar instead of gelatin. Can’t find cream puffs? Mini marshmallows or crushed meringues work in a pinch (though the texture changes). For a lighter cake, replace half the oil with applesauce—but don’t skip it entirely, or the sponge dries out.
How to Make Your Decadent Chocolate Comfort Cake
Step 1: Craft the Silky Chocolate Mousse
Chop the milk and dark chocolate into small pieces and place them in a heatproof bowl. Heat the milk in a saucepan until it just starts to simmer—don’t let it boil over! Pour the hot milk over the chocolate and let it sit for 1 minute, then stir gently until smooth and glossy. Meanwhile, soak the gelatin leaves in cold water for 5 minutes (or bloom powdered gelatin in 2 tbsp cold water). Squeeze out excess water from the gelatin, then stir it into the warm chocolate mixture until fully dissolved. Cover and chill for at least 1 hour, or until thickened but not set.
Step 2: Prep Your Pan and Oven
Preheat your oven to 180°C (350°F) for top/bottom heat, or 160°C (320°F) if using convection. Line the bottom of a 26 cm (10-inch) springform pan with parchment paper—no need to grease the sides, as the batter climbs better on bare metal. This ensures your sponge rises evenly and releases cleanly later. I once skipped the parchment and spent 10 minutes prying cake off the pan—lesson learned!
Step 3: Whip Up the Cocoa Sponge
In a large bowl, beat the eggs, sugar, hot water, and salt with an electric mixer on high for 3 full minutes. The mixture should triple in volume and turn pale and fluffy—this is what gives the cake its airy lift. Sift together the flour and cocoa powder, then gently fold them into the egg mixture using a spatula (don’t stir—fold! Keep that air in). Finally, drizzle in the oil and fold just until combined. Pour into your prepared pan, smooth the top, and bake for 25–30 minutes. The cake is done when it springs back lightly when touched. Let it cool completely in the pan—rushing this step causes cracks.
Step 4: Assemble the Mousse Layers
Once the chocolate mixture is thick (like cold pudding), give it a quick whisk with a hand mixer to make it smooth. In another bowl, whip the cold cream to stiff peaks—chill your bowl and beaters first for faster results. Gently fold half the whipped cream into the chocolate, then fold in the rest until no streaks remain. Spread half of this mousse evenly over the cooled sponge. Don’t press down—just let it glide on like velvet.
Step 5: Add the Cream Puffs and Finish
Take your cream puffs (Windbeutel) straight from the freezer—they should be firm but not rock-hard. Press them gently into the mousse layer, spacing them evenly. Then spoon the remaining mousse over the top, covering the puffs completely. Smooth the surface with a spatula, then dust lightly with cocoa powder. Chill the cake for at least 2 hours (preferably 4) to set fully. Pro tip: Run a knife around the springform edge before releasing—it prevents messy sides.
Timing at a Glance
- Prep time: 30 minutes
- Bake time: 30 minutes
- Chill time: 3–4 hours (including mousse cooling)
- Total time: About 4.5 hours (mostly hands-off!)
Chef’s Secret: The Fluff Factor
The secret to an ultra-light sponge? Room-temperature eggs and whipping them long enough. Cold eggs won’t fluff up, and under-whipping = dense cake. Set your eggs out 30 minutes before baking. And never open the oven door during the first 20 minutes—sponges hate drafts!
Fun Fact About This Comfort Cake
Did you know cream puffs (Windbeutel) got their name because they’re as light as a puff of wind? In Germany, bakeries sell them by the dozen for desserts like this. My grandma used to say, “Good cake doesn’t shout—it whispers.” This one whispers in chocolate.
Necessary Equipment
- 26 cm (10-inch) springform pan
- Electric hand mixer
- Heatproof bowl
- Spatula
- Parchment paper
- Whisk
How to Store Your Decadent Chocolate Comfort Cake
Keep the cake covered in the refrigerator for up to 3 days. Press plastic wrap directly onto the cut surface to prevent drying and odor absorption. The mousse stays silky, and the cream puffs soften slightly—some say that’s even better!
Not planning to eat it all? Slice it before storing. Individual portions freeze beautifully for up to 1 month. Wrap each slice tightly in plastic, then foil. Thaw in the fridge overnight—never at room temperature, or the mousse weeps.
Avoid storing near strong-smelling foods like onions or fish. Chocolate absorbs odors fast! I learned this the hard way after my “mystery flavor” cake incident. Lesson: always use an airtight container.
Tips and Advice for Best Results
- Use high-quality chocolate—it’s the star!
- Don’t overmix the sponge batter; fold gently.
- Chill your mixing bowl before whipping cream.
- Let the cake rest 10 minutes after baking before removing from pan.
- Dust cocoa through a fine sieve for even coverage.
Beautiful Ways to Present This Cake
- Top with fresh raspberries or edible gold flakes for glam
- Drizzle with melted white chocolate in zigzags
- Serve on vintage plates with a dollop of crème fraîche
- Garnish with mint leaves for color contrast
- Pair with a shot of espresso for the ultimate dessert duo
Healthier Twists on This Decadent Chocolate Comfort Cake
Want to lighten it up without losing joy? Try these smart swaps:
1. Dark Chocolate Power Version
Use 100% dark chocolate (70%+) for antioxidants and less sugar. The bitterness balances beautifully with sweet cream puffs. Add a pinch of sea salt to the mousse for depth.
2. Gluten-Free Cocoa Sponge
Replace wheat flour with a 1:1 gluten-free blend (like Bob’s Red Mill). Add ¼ tsp xanthan gum if your blend doesn’t include it. The texture stays tender.
3. Lower-Sugar Celebration Cake
Cut sugar in the sponge to 70 g and use sugar-free chocolate. Sweeten the mousse lightly with monk fruit or erythritol. Kids won’t miss the extra sugar!
4. Vegan Wind Bag Delight
Use vegan chocolate, coconut milk, agar-agar (1 tsp instead of gelatin), and coconut cream whipped with aquafaba. Top with baked choux pastry made from plant milk.
5. Protein-Packed Post-Workout Dessert
Add unflavored collagen or chocolate protein powder to the mousse (1–2 scoops). Use Greek yogurt whipped into the cream for extra protein and tang.
6. Fruit-Infused Chocolate Comfort
Layer fresh strawberries or orange zest between the sponge and mousse. The acidity cuts the richness—my summer favorite!
Common Mistakes to Avoid
Mistake 1: Overmixing the Sponge Batter
When you stir the flour and cocoa too hard or too long, you knock out all the air you worked so hard to whip into the eggs. That leads to a flat, dense cake instead of a cloud-like sponge. Always fold with a spatula using gentle, sweeping motions from the bottom up. Stop as soon as no dry streaks remain—even a few specks of flour are better than overmixing.
Mistake 2: Skipping the Gelatin Rest Time
If you rush the mousse and don’t let the chocolate-gelatin mix cool properly before adding whipped cream, the heat can melt the cream and ruin the texture. The mixture should be thick like mayonnaise—cool to the touch but not set. Patience here means perfect layers later.
Mistake 3: Using Warm Cream for Whipping
Cold cream whips faster and holds stiffer peaks. Room-temperature cream just turns soupy. Always chill your cream, bowl, and beaters for 15 minutes before starting. If your kitchen is warm, place the bowl over ice while whipping.
Mistake 4: Pressing Cream Puffs Too Deep
If you shove the Windbeutel all the way to the sponge, they sink and make the bottom soggy. Gently press them just halfway into the first mousse layer so they’re secure but still lifted. This keeps the texture light and the layers distinct.
Mistake 5: Cutting the Cake Too Soon
Even if it’s set, a warm knife or impatient slicing smears the mousse. Chill for a full 4 hours if you can. Use a hot, dry knife—dip it in boiling water, wipe clean, then slice. Clean cuts every time!
Frequently Asked Questions
Can I make this cake without gelatin?
Yes! Use agar-agar (a plant-based gelatin substitute). Mix 1 teaspoon agar-agar powder with 2 tablespoons cold water, bring to a boil, simmer 1 minute, then stir into the hot chocolate milk. It sets firmer, so let it cool slightly more before folding in cream. The texture will be a bit more jelly-like but still delicious.
Where can I buy cream puffs (Windbeutel)?
In the U.S., look for frozen cream puffs in the bakery or dessert aisle of grocery stores like Trader Joe’s, Aldi, or Walmart. European markets often carry them too. If unavailable, make mini choux pastry puffs or use store-bought éclairs (remove filling). Don’t use filled cream puffs—they make the cake too wet.
Can I use chocolate chips instead of bar chocolate?
Bar chocolate melts smoother and has better flavor. Chocolate chips contain stabilizers that can make the mousse grainy. If you must use chips, choose high-quality ones (like Ghirardelli) and stir gently over low heat. Still, bar chocolate is worth the extra effort!
Why did my sponge cake crack on top?
Overbeating the eggs or too-high oven heat causes cracks. Whip eggs just until fluffy (3 minutes max), and bake at the correct temperature. Also, avoid opening the oven early—sudden temperature drops make cakes collapse or crack. A slight dome is normal; it flattens as it cools.
How far in advance can I make this cake?
You can assemble it up to 2 days ahead. Store covered in the fridge. The sponge stays moist, and the mousse firms beautifully. Don’t dust with cocoa until serving—it can get soggy. If making components separately, bake sponge 1 day ahead and mousse 1 day ahead, then assemble day-of.
Can I use a different pan size?
Yes, but adjust baking time. A 20 cm (8-inch) pan needs 35–40 minutes; a 28 cm (11-inch) pan takes 20–25 minutes. The cake should spring back when touched. For best results, stick to springform—it releases cleanly without flipping.
Is this cake kid-friendly?
Absolutely! My kids call it “chocolate cloud cake.” The hidden cream puffs feel like a treasure hunt. Use milk chocolate for milder flavor, and skip the dark chocolate if preferred. It’s a hit at birthday parties—just cut into small squares for little hands.
Why is my mousse lumpy?
Lumps mean the chocolate wasn’t fully melted or the gelatin didn’t dissolve completely. Always pour hot milk over finely chopped chocolate and stir until silky. If using powdered gelatin, bloom it properly in cold water first, then dissolve in warm (not boiling) liquid.
Can I freeze the whole cake?
Yes! Wrap the fully assembled (but undusted) cake tightly in plastic and foil. Freeze up to 1 month. Thaw overnight in the fridge, then dust with cocoa before serving. Freezing makes cream puffs extra soft—some people prefer that texture!
What’s the best chocolate for the mousse?
A mix of milk and dark chocolate gives balanced sweetness and depth. Look for brands with real cocoa butter (not “chocolate-flavored coating”). My go-tos: Lindt, Callebaut, or Ghirardelli. Avoid supermarket baking bars with added oils—they don’t melt smoothly.
Final Slice of Wisdom
This **Decadent Chocolate Comfort Cake** isn’t just dessert—it’s a hug on a plate. Whether you’re baking for a crowd or treating yourself after a long week, it delivers joy in every layer. It’s forgiving, flexible, and always impressive. So grab your whisk, pull out that springform pan, and let the chocolate magic happen. And when someone asks, “Did you really make this?”—just smile and say, “Yep. Want the recipe?”
Decadent Chocolate Comfort Cake
Ingredients
Equipment
Method
- Chop the milk and dark chocolate and place in a heatproof bowl.
- Heat the milk in a saucepan until it just starts to simmer.
- Pour the hot milk over the chocolate and let sit for 1 minute, then stir until smooth.
- Soak the gelatin in cold water for 5 minutes, then dissolve it in the warm chocolate mixture.
- Cover and chill the chocolate mixture for at least 1 hour or until thickened.
- Preheat your oven to 180°C (350°F) and line the bottom of a 26 cm (10-inch) springform pan with parchment paper.
- In a large bowl, beat the eggs, sugar, hot water, and salt with an electric mixer on high for 3 minutes.
- Sift the flour and cocoa powder together, then fold them into the egg mixture gently.
- Drizzle in the oil and fold just until combined, then pour into the prepared pan.
- Bake for 25–30 minutes until the cake springs back when touched. Let it cool in the pan.
- Once the chocolate mixture is thick, whisk it to smooth it out.
- Whip the cold cream to stiff peaks in a chilled bowl.
- Fold half the whipped cream into the chocolate, then fold in the rest until smooth.
- Spread half of the mousse evenly over the cooled sponge.
- Gently press the cream puffs into the mousse layer, then spoon the remaining mousse over them.
- Dust the top with cocoa powder and chill for at least 2 hours to set.