There’s something magical about the smell of chocolate filling your kitchen—it’s like a warm hug from the oven! I remember the first time I made this Indulgent Chocolate Bliss Cake for my niece’s birthday. She took one bite, rolled her eyes back, and said, “Auntie, this is heaven.” And honestly? She was right. This cake isn’t just chocolatey—it’s spongy, moist, and packed with rich flavor that lingers on your tongue like a sweet symphony. Whether you’re a baking newbie or a seasoned pro, this recipe delivers every single time.
A Slice of Chocolate History
Chocolate cake wasn’t always the go-to dessert we know today. Back in the 18th century, chocolate was mostly sipped as a bitter drink. It wasn’t until the 1800s—when Dutch chemist Coenraad van Houten invented cocoa powder—that chocolate found its way into cakes. Over time, home bakers started experimenting, and by the 1930s, chocolate cake was a staple in American households. My version? It’s a love letter to tradition with a modern twist—melty layers, deep cocoa notes, and just the right crumb. I’ve tweaked it for years, testing everything from milk chocolate to dark, until my kitchen smelled like a Parisian patisserie!
Why You’ll Absolutely Love This Indulgent Chocolate Bliss Cake
This isn’t just another chocolate cake—it’s your new secret weapon for impressing guests, soothing bad days, or celebrating small wins (like surviving Monday!). It’s incredibly moist thanks to the melted chocolate and butter combo. The crumb is light yet rich, and the vanilla-cocoa duo gives it that bakery-style depth. Plus, it’s surprisingly simple—no fancy techniques, just honest ingredients doing their thing. Every slice feels like a treat, but the recipe? It’s as humble as your favorite apron.
Perfect Moments for This Chocolate Dream
- Birthday parties (kids and adults go wild for it)
- Anniversary dinners (pair with coffee or red wine)
- Rainy Sunday baking sessions
- Last-minute dessert emergencies (yes, it’s that reliable!)
- “Just because” gifting—wrap slices in parchment and tie with twine
Ingredients for Your Indulgent Chocolate Bliss Cake
- 2 cups of wheat flour
- 100 g of black (dark) or milk chocolate
- 1 cup of granulated sugar
- 1 cup of milk
- 200 g of butter
- 3 eggs
- 2 tablespoons of cocoa powder
- 2 tablespoons vanilla extract
- 1 teaspoon baking powder
- Molten chocolate (for filling and decoration)
Smart Swaps & Substitutions
Don’t have an ingredient? No panic! Here’s how to adapt:
- Butter: Swap with coconut oil or vegan butter for a dairy-free version.
- Milk: Almond, oat, or soy milk work beautifully.
- Wheat flour: Use a 1:1 gluten-free flour blend if needed.
- Granulated sugar: Coconut sugar or fine brown sugar adds a caramel hint.
- Eggs: Try flax eggs (1 tbsp ground flax + 3 tbsp water per egg).
How to Make the Perfect Indulgent Chocolate Bliss Cake
Step 1: Warm Up the Oven
Start by preheating your oven to 180°C (350°F). This gives it time to reach the perfect baking temperature so your cake rises evenly from the start. While it heats, grease and lightly flour your cake pan—this prevents sticking and saves your masterpiece from a tragic tear. I always use a round 8-inch pan for that classic tall look, but a square pan works too!
Step 2: Melt Chocolate and Butter Together
Chop your chocolate into small pieces—it melts faster and smoother. In a heatproof bowl over simmering water (a water bath), add the butter and chocolate. Stir gently until glossy and fully melted, about 4–5 minutes. Don’t rush this! The aroma will fill your kitchen with pure comfort. Pro tip: Remove the bowl before everything’s fully melted—the residual heat finishes the job without burning.
Step 3: Whip Eggs and Sugar into Clouds
In a large mixing bowl, crack in the eggs and add the sugar. Beat with an electric mixer on medium-high for 4–5 minutes until the mixture turns pale, thick, and almost foamy. You’ll know it’s ready when you lift the beaters and the ribbon of batter holds its shape for a second. This step adds air and gives your cake that dreamy spongy texture!
Step 4: Fold in the Chocolate Love
Now, gently pour the warm (not hot!) melted chocolate-butter mix into the egg-sugar clouds. Use a spatula and fold in slow, wide strokes to keep the air in. The batter will turn a deep, velvety brown—like melted truffles. Don’t overmix; just blend until no streaks remain. This keeps the cake tender instead of dense.
Step 5: Add Flavor Boosters
Sprinkle in the cocoa powder, baking powder, and vanilla extract. Fold again until just combined. The vanilla adds warmth, the cocoa deepens the chocolate soul, and the baking powder? It’s your tiny lift assistant. Chef’s tip: Sift the cocoa and baking powder first to avoid clumps—smooth batter, happy cake!
Step 6: Alternate Flour and Milk
Now, the gentle dance begins. Add flour in three parts, alternating with milk in two parts. Start and end with flour. Mix just until you see no dry spots. Overmixing here = tough cake. Imagine you’re tucking the ingredients into bed—soft and calm. The batter should be smooth, glossy, and pour like thick cream.
Step 7: Bake to Perfection
Pour the batter into your prepared pan. Tap it lightly on the counter to pop air bubbles. Bake 30–40 minutes. The top should spring back when touched, and a toothpick inserted in the center comes out clean (or with a few moist crumbs—no wet batter!). Pro tip: Rotate the pan halfway through for even browning, especially if your oven runs hot on one side.
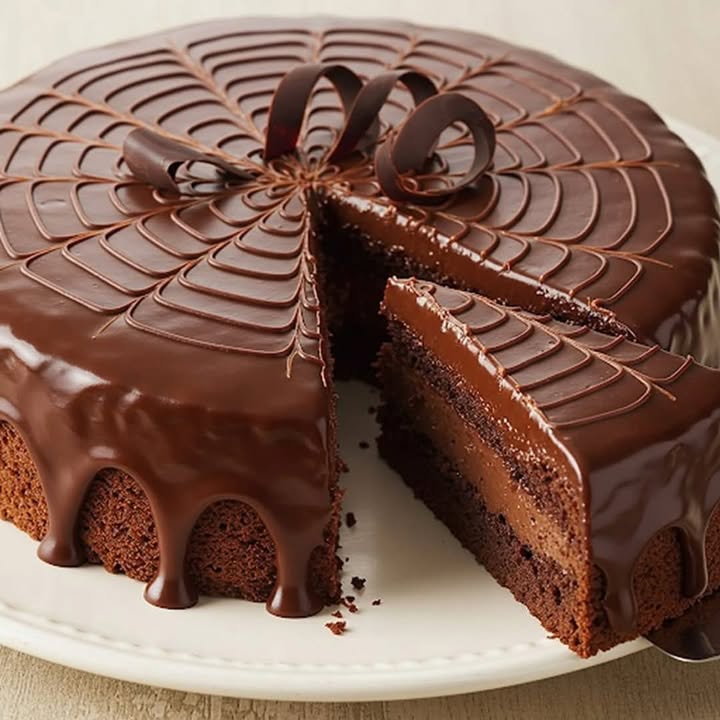
Step 8: Fill and Decorate with Molten Magic
Let the cake cool completely on a wire rack—this is non-negotiable! If you slice it warm, it’ll crumble. Once cold, use a serrated knife to level and split it in half horizontally. Drizzle warm molten chocolate between layers, then pour more over the top. Let it drip down the sides for that bakery-style drip effect. Add chocolate shavings, berries, or edible flowers for flair!
Timing Breakdown
- Prep time: 20 minutes
- Baking time: 35 minutes (average)
- Cooling time: 1–2 hours (patience pays!)
- Total time: About 2.5 hours (mostly hands-off)
Chef’s Secret for Maximum Moisture
Here’s my golden trick: add 1 tablespoon of instant espresso powder
Fun Fact About Chocolate Cake
During World War II, bakers in Britain used beetroot or carrots in chocolate cakes to stretch limited cocoa supplies—this led to the creation of chocolate beet cake! Today, we bake for joy, not rationing, but that creativity lives on in recipes like ours, where every bite celebrates abundance.
Essential Tools You’ll Need
- Mixing bowls (large and medium)
- Electric hand mixer or stand mixer
- Heatproof bowl for melting chocolate
- 8-inch round cake pan
- Parchment paper
- Spatula and whisk
- Toothpick or cake tester
- Serrated knife (for slicing layers)
How to Store Your Indulgent Chocolate Bliss Cake
At room temperature: Keep the cake in an airtight container for up to 2 days. The molten chocolate topping may soften slightly, but the crumb stays perfect. I cover mine with a large inverted bowl if I don’t have a cake dome.
In the fridge: For longer storage (up to 5 days), refrigerate it. Wrap well to prevent absorbing odors. Bring to room temp 30 minutes before serving—cold cake dulls chocolate flavor!
Freezing for later: Wrap unfrosted cake layers tightly in plastic, then foil. Freeze up to 3 months. Thaw overnight in the fridge, then decorate. I always bake extra layers on weekends for future “emergency chocolate therapy”!
Extra Tips for Baking Success
- Use room-temperature eggs—they blend smoother.
- Weigh ingredients for accuracy (especially flour).
- Don’t open the oven door before 25 minutes—drafts cause sinking!
- Let cake cool in pan 10 minutes before transferring to rack.
Beautiful Ways to Serve It
- Dust with powdered sugar and fresh raspberries
- Serve with a scoop of vanilla bean ice cream
- Drizzle with salted caramel for a sweet-salty twist
- Top with edible gold flakes for fancy celebrations
- Pair with a glass of cold milk or espresso
Healthier Twists on the Indulgent Chocolate Bliss Cake
Want the joy without the guilt? Try these lighter spins:
- Avocado Chocolate Cake: Replace half the butter with mashed ripe avocado. It adds creaminess and healthy fats—no one will guess!
- Almond Flour Version: Swap wheat flour for almond flour for a low-carb, grain-free option. Add 1/4 tsp xanthan gum for structure.
- Maple-Sweetened Cake: Use pure maple syrup instead of sugar. Reduce milk slightly to balance moisture.
- Black Bean Chocolate Cake: Blend 1 can rinsed black beans into the batter—it adds protein and fudgy texture.
- Yogurt-Infused Cake: Mix in 1/2 cup Greek yogurt for extra tang and tenderness.
- Mini Mug Cake: Halve the recipe and bake in a mug for a single serving in 90 seconds (microwave-friendly!)
Common Mistakes to Avoid
Mistake 1: Overmixing the Batter
Overmixing develops gluten in the flour, turning your tender cake into a rubbery hockey puck. This often happens when adding flour—people think “well mixed” means smooth like soup. But cake batter should look slightly lumpy! Use a spatula and fold gently until just combined. Pro tip: Stop mixing when you still see a few streaks of flour—they’ll disappear as the cake bakes.
Mistake 2: Cutting the Cake Too Soon
That warm chocolate aroma tempts you to slice right away—but hot cake crumbles. The structure needs time to set as it cools. Cutting too early ruins your layers and makes filling messy. Always wait at least 1 hour, ideally 2. If you’re in a rush, pop it in the fridge for 30 minutes to speed things up.
Mistake 3: Using Cold Ingredients
Cold eggs or milk won’t blend well with melted chocolate, causing the butter to seize and creating a grainy texture. Always use room-temp ingredients—they emulsify smoothly for a silky batter. Take eggs and milk out 30–60 minutes before baking. If forgot? Place eggs in warm water for 5 minutes.
Mistake 4: Skipping the Oven Preheat
Tossing batter into a cold oven leads to uneven rising and a dense bottom. The first 10 minutes of baking are critical for lift. Preheating ensures your cake starts cooking at the right temp from second one. Use an oven thermometer—many ovens run hot or cold!
Mistake 5: Wrong Chocolate Choice
Using chocolate chips instead of baking chocolate is a trap! Chips contain stabilizers that don’t melt smoothly, leaving waxy bits. Stick to high-quality dark (70%) or milk chocolate bars, chopped finely. Cheap chocolate = dull flavor and greasy texture. Splurge here—it’s worth it!
Frequently Asked Questions
Can I make this cake dairy-free?
Absolutely! Swap butter for vegan butter or coconut oil, and use plant-based milk like almond or oat. Choose dairy-free chocolate (many dark chocolates are naturally dairy-free—check labels). The texture stays moist, and the flavor remains rich. I’ve served it to vegan friends who said it was “even better than regular!”
How do I know when the cake is done?
Insert a toothpick or skewer into the center. If it comes out clean or with a few moist crumbs (not wet batter), it’s ready. The edges should pull slightly from the pan, and the top will spring back when lightly pressed. Don’t rely solely on time—ovens vary! Start checking at 30 minutes.
Can I use only cocoa powder instead of chocolate?
You can, but it changes the texture. Melted chocolate adds fat and richness that cocoa alone can’t replicate. If you must, add 2 extra tablespoons of butter and 1/4 cup extra sugar to compensate. For best results, stick to the original combo—it’s what makes this cake so spongy and decadent.
Why did my cake sink in the middle?
Sinking usually means underbaking, too much leavening, or opening the oven too early. Baking powder expands the cake, but if it’s not set by then, it collapses. Ensure your baking powder is fresh (test by adding a spoonful to hot water—it should fizz immediately). And never open the oven before the 25-minute mark!
Can I double the recipe?
Yes, but use two separate pans—don’t double everything in one bowl. Large volumes bake unevenly. Mix two batches or halve the doubled batter into two 8-inch pans. Bake time may increase slightly (check at 40 minutes). I do this for parties and freeze one layer for later!
What’s the best chocolate for melting?
Use high-quality chocolate with at least 60% cocoa solids for dark, or real milk chocolate (avoid “chocolate-flavored” bars). Brands like Ghirardelli, Lindt, or Valrhona melt beautifully and taste luxurious. Chop it small for even, smooth melting. Cheap chocolate often contains palm oil, which doesn’t blend well.
Can I make cupcakes with this recipe?
Definitely! Fill cupcake liners 2/3 full and bake at 180°C (350°F) for 18–22 minutes. This recipe makes about 12 cupcakes. Cool completely before drizzling with molten chocolate. Kids love these for lunchbox treats—just skip the filling if packing ahead.
How do I melt chocolate without burning it?
Use a water bath (double boiler): simmer water in a pot, place a heatproof bowl on top (not touching water), and stir chocolate gently. Remove before it’s fully melted—the heat finishes the job. Never microwave without stirring every 20 seconds! Burnt chocolate turns grainy and bitter.
Can I add nuts or fruit?
Yes! Fold in 1/2 cup chopped walnuts, pecans, or chocolate chips at the end. For fruit, use dried cherries or orange zest—they pair wonderfully with chocolate. Avoid fresh fruit—it adds too much moisture and can make the cake soggy. Toast nuts first for extra crunch and flavor.
Why is my cake dry?
Dryness usually comes from overbaking or too much flour. Measure flour correctly: spoon into cup and level off—don’t scoop! Bake just until done, then remove. Also, ensure you’re using full-fat butter and milk—they carry moisture. If your kitchen is very dry (low humidity), reduce flour by 1–2 tablespoons next time.
Your New Go-To Chocolate Cake
This Indulgent Chocolate Bliss Cake isn’t just dessert—it’s a mood lifter, a crowd-pleaser, and your ticket to feeling like a baking hero. With its spongy crumb, intense chocolate depth, and glossy molten layers, it’s earned a permanent spot in my recipe binder (right next to my grandma’s apple pie!). So grab your mixing bowl, melt that chocolate, and let your kitchen fill with joy. One slice—and you’ll understand why this cake is pure magic. Go ahead… you deserve it!
Indulgent Chocolate Bliss Cake
Ingredients
Equipment
Method
- Preheat your oven to 180°C (350°F), and grease and lightly flour your cake pan.
- Chop chocolate into small pieces and melt it with butter in a heatproof bowl over simmering water, stirring until glossy and melted.
- In a large bowl, beat eggs and sugar with an electric mixer on medium-high for 4-5 minutes until pale and thick.
- Gently fold the melted chocolate-butter mixture into the egg-sugar mixture.
- Add cocoa powder, baking powder, and vanilla extract; fold until just combined.
- Alternate adding flour in three parts with milk in two parts, starting and ending with flour; mix until barely combined.
- Pour the batter into the prepared pan and bake for 30-40 minutes until a toothpick comes out clean.
- Cool the cake on a wire rack, then level and split it in half horizontally. Drizzle molten chocolate between layers and pour more on top.