A No-Bake Dessert Dad Will Actually Ask For Twice
If you’ve ever tried to impress your dad with a fancy dessert and ended up with a burnt oven timer and a frown, this one’s for you. Meet the **Decadent Oreo Icebox Cake Delight**—a creamy, dreamy, no-bake masterpiece that’s as easy to make as it is to love. I first whipped this up for Father’s Day when my husband groaned about “another fruit salad.” One bite, and he was texting his buddies: “Y’all gotta try this.” No oven. No stress. Just big, bold Oreo flavor layered with clouds of whipped cream—and maybe a little extra caramel for good measure. It’s the sweetest way to say “I love you, big.”
Where Did This Icebox Cake Come From?
Icebox cakes date back to the early 1900s, when home refrigerators (once called “iceboxes”) became common. Clever cooks discovered that layering cookies with whipped cream and chilling them overnight created a soft, cake-like texture—no baking required. Oreo cookies, introduced in 1912, were a natural fit. Over time, this humble dessert evolved into a party favorite, especially for holidays and summer gatherings. Today, the **Decadent Oreo Icebox Cake Delight** is a modern twist—richer, creamier, and packed with nostalgia in every bite.
Why You’ll Love This Decadent Oreo Icebox Cake Delight
This recipe is a triple win: it’s ridiculously easy, looks like you spent hours, and tastes like a cross between an Oreo milkshake and cheesecake. The cream is light but luscious, the cookies soften into fudgy layers, and that caramel drizzle? Pure magic. Plus, it’s **no-bake**, so your kitchen stays cool—even in July. I’ve made it for birthdays, BBQs, and even midnight cravings. Every time, it disappears faster than I can say “Save a slice for me!”
Perfect for Every Big (and Small) Celebration
This **Decadent Oreo Icebox Cake Delight** shines at:
- Father’s Day brunch
- Backyard BBQs
- Birthday parties
- Game night desserts
- “Just because I love you” surprises
It’s especially great when you need a showstopper but don’t want to sweat over a stove. I once brought it to my dad’s poker night—by the end of the game, the cake was gone and he was bragging it was his “secret dessert weapon.”
Ingredients for Your No-Bake Oreo Dream
- For the creamy layers:
- 2 packages of Oreo cookies (one whole, one crushed)
- 2 cups very cold heavy whipping cream
- 200 g cream cheese (optional but recommended for extra richness)
- ½ cup powdered sugar (also called “glass sugar”)
- 1 teaspoon vanilla extract
- To decorate:
- Whole Oreos
- Crushed Oreos
- Caramel sauce
Easy Substitutions That Still Shine
Don’t have cream cheese? Skip it—the cake will still be delicious, just a bit lighter. Use coconut cream for a dairy-free version. Swap powdered sugar for maple syrup (reduce cream slightly to balance moisture). Gluten-free Oreos work great too. And if you’re out of caramel, melted chocolate or even crushed peanuts add a fun twist.
Step-by-Step Guide to Your Cake
Step 1: Whip the Cream to Cloud-Like Perfection
Pour your very cold heavy cream into a large bowl. Beat it on medium-high until soft peaks form—those gentle curves that hold their shape but still flop over slightly. In another bowl, beat the cream cheese with powdered sugar and vanilla until smooth and creamy, like sweetened silk. Then, gently fold the whipped cream into the cream cheese mixture using a spatula. Be kind—don’t overmix, or you’ll lose that airy lightness. The result? A pillowy, vanilla-kissed cream that smells like a birthday party.
Pro tip: Chill your mixing bowl and beaters for 10 minutes before starting. Cold tools = faster whipping.
Step 2: Layer Like a Dessert Architect
Grab a 9-inch springform pan or a deep square dish. Start with a single layer of whole Oreos—nestle them side by side like tiny chocolate tiles. Spoon a generous layer of cream over the cookies, smoothing it with a spatula until it’s even and velvety. Repeat: cookies, cream, cookies, cream. End with a thick layer of cream on top—it’s your canvas for decoration. The layers should look like a chocolatey lasagna, but sweeter and way more fun.
Chef’s tip: Press the Oreos gently into the cream as you go—they’ll soften better and won’t slide around.
Step 3: Let It Chill (Patience, Grasshopper!)
Cover the cake tightly with plastic wrap, pressing it directly onto the surface to prevent a skin from forming. Pop it into the fridge for at least 6 hours—but ideally overnight. This is when the magic happens: the cookies soak up moisture from the cream and soften into fudgy, cake-like layers. The flavors meld, the texture transforms, and your kitchen fills with whispers of vanilla and cocoa. Don’t rush this step—it’s the secret to that “icebox cake” texture.
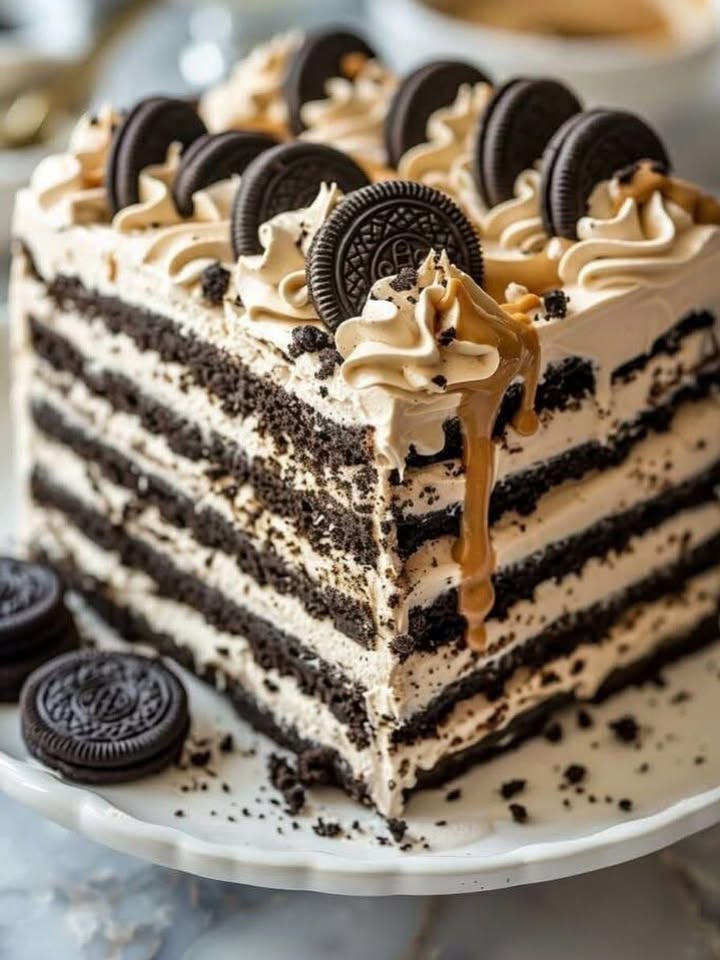
Step 4: Decorate Like You Mean It
Just before serving, go wild! Arrange whole Oreos on top in a circle or a playful pattern. Sprinkle crushed cookies over the edges for crunch. Then, drizzle warm caramel sauce in zigzags or swirls until it drips down the sides like liquid gold. The contrast of cool cream, soft cookies, and sticky-sweet caramel is pure joy. I always step back and admire it for a full 10 seconds before slicing—it’s that pretty.
Timing at a Glance
- Prep time: 15 minutes
- Chill time: 6 hours (or overnight)
- Total time: 6 hours 15 minutes
- Servings: 8–10
Chef’s Secret: The Double-Chill Trick
For an extra-firm, slice-clean cake, freeze the assembled dessert for 1 hour after chilling, then move it back to the fridge for 30 minutes before serving. This gives you perfect, neat slices without squishing the layers.
Fun Fact: Oreos Were Inspired by Another Cookie
The original Oreo design was inspired by the Hydrox cookie—but Oreos quickly outshone them with their creamy filling and clever marketing. Today, they’re the world’s best-selling cookie, and no wonder: that chocolate-meets-vanilla combo is timeless.
What You’ll Need
- 9-inch springform pan or 8×8-inch dish
- Electric mixer or whisk
- Spatula
- Plastic wrap
- Measuring cups and spoons
How to Store Your Decadent Oreo Icebox Cake Delight
Keep your cake covered in the fridge for up to 5 days. Press plastic wrap directly onto the surface to prevent drying and absorption of other fridge smells. It actually tastes better on day 2—the cookies soften even more, and the flavors deepen into something truly luxurious.
Can you freeze it? Yes! Wrap the entire cake (or individual slices) tightly in plastic, then in foil. Freeze for up to 2 months. Thaw overnight in the fridge, then bring to room temperature for 15 minutes before serving. The texture stays surprisingly smooth.
Avoid storing it near strong-smelling foods like onions or fish. Even though it’s covered, the cream can pick up odors. And never leave it out at room temperature for more than 2 hours—dairy + heat = not a good combo.
Tips to Make It Even Better
- Use real butter Oreos for deeper flavor.
- Toast the crushed cookies lightly for a nutty note.
- Add a pinch of sea salt to the caramel drizzle for balance.
- Run your knife under hot water before slicing for clean cuts.
Presentation Ideas That Wow
- Serve in mason jars for individual portions.
- Top with edible gold flakes for a “dad’s VIP” vibe.
- Surround the plate with mini Oreos and chocolate shavings.
- Spell out “DAD” with piped cream or chocolate sauce.
Healthier (But Still Delicious) Twists
Want a lighter version without losing the fun? Try these smart swaps—each keeps the spirit of the Decadent Oreo Icebox Cake Delight alive:
- Yogurt-Oreo Layer Cake: Swap heavy cream for full-fat Greek yogurt and cream cheese. It’s tangy, creamy, and packed with protein.
- Vegan Chocolate Dream: Use dairy-free Oreos, coconut cream, and cashew cream cheese. Sweeten with agave.
- Protein-Packed Dad Cake: Add unflavored collagen or vanilla protein powder to the cream layer. Dad gets dessert and a boost!
- Low-Sugar Oreo Delight: Use sugar-free Oreos and monk fruit sweetener. Still sweet, fewer guilt points.
- Fruit-Swirled Version: Layer in fresh strawberries or bananas between the cookies. Adds freshness and color.
- Gluten-Free Celebration Cake: Gluten-free chocolate cookies (like Glutino) work perfectly. Just ensure they’re sturdy enough to layer.
Common Mistakes to Avoid
Mistake 1: Using Warm Cream
Heavy cream must be cold—straight from the fridge—to whip properly. If it’s warm, it’ll turn greasy or won’t hold peaks. I learned this the hard way when my cream collapsed into buttery soup. Always chill your cream, bowl, and beaters for best results. Tip: Store your cream in the back of the fridge, where it’s coldest.
Mistake 2: Skipping the Chill Time
Rushing the refrigeration step means crunchy cookies and separated layers. The magic happens as the cookies absorb moisture and soften. If you cut in too soon, it’ll fall apart like a sad cookie pile. Trust the process—overnight is ideal. Set a reminder on your phone if you must!
Mistake 3: Overmixing the Cream
Once you fold the whipped cream into the cream cheese, stop as soon as it’s combined. Overmixing deflates the air and makes the filling dense. Think of it like folding egg whites—you want to keep it light and airy. Use a gentle hand and a spatula, not a mixer.
Mistake 4: Using a Shallow Dish
A deep pan (like a springform) gives you tall, impressive layers. A shallow dish spreads the filling too thin, and the cake won’t hold its shape. I once used a pie plate—ended up with a tasty but flat mess. Go for at least 2.5 inches deep.
Mistake 5: Adding Caramel Too Early
Caramel sauce can seep into the cream and make it soggy if added before serving. Always drizzle it right before you slice. If you prep it ahead, store the caramel separately and warm it gently before use.
FAQ: Your Top Questions, Answered
Can I make this without cream cheese?
Yes! The cake will be lighter and less rich, but still delicious. Just whip the cream with powdered sugar and vanilla, and layer as usual. It’ll be more like a classic icebox cake—airy and sweet. For extra body, add 2 tablespoons of instant pudding mix to the cream before whipping.
How far in advance can I make this?
You can make it up to 3 days ahead. In fact, it’s better on day 2! The longer it chills, the more the cookies soften and the flavors blend. Just keep it covered tightly in the fridge. If you’re making it for a party, the night before is perfect.
Can I use store-bought whipped cream?
Not recommended. Canned whipped cream is too airy and watery—it won’t hold the layers together. Homemade whipped cream (or stabilized with cream cheese) gives the structure and richness this cake needs. Plus, it tastes 10 times better.
Why are my layers sliding apart?
This usually happens if the cream isn’t stiff enough or the cake wasn’t chilled long enough. Make sure your whipped cream holds soft peaks before folding. And never rush the chill time—6 hours minimum. A springform pan also helps keep everything snug.
Can I use other cookies?
Absolutely! Try chocolate graham crackers, mint Oreos, or even peanut butter cookies. Just keep the same layering method. The flavor will change, but the no-bake magic stays the same. I’ve even used Biscoff cookies for a caramel-spiced version!
Is this kid-friendly to make?
Yes! Kids love crushing cookies, layering, and decorating. It’s a great hands-on dessert project. Just supervise the mixing part. My 8-year-old calls it “Dad’s Happy Cake” and helps every time—it’s become our special tradition.
How do I get clean slices?
Use a sharp knife and dip it in hot water before each cut. Wipe it clean between slices. This melts through the cream smoothly without dragging crumbs. A springform pan also makes removal easier—just release the sides and slice right on the base.
Can I add alcohol to this?
For adults, yes! A tablespoon of bourbon, Kahlúa, or amaretto in the cream adds depth. Just don’t overdo it—it can affect the setting. I add a splash of coffee liqueur for a “mocha Oreo” twist that my dad loves.
Why is my cream grainy?
Graininess usually means the cream cheese wasn’t fully softened or the cream was over-whipped. Always soften cream cheese to room temperature before mixing. And stop whipping the cream as soon as soft peaks form—don’t wait for stiff peaks.
Can I make mini versions?
Yes! Layer the ingredients in muffin tins or small glasses. Chill as usual, then top with mini Oreos and a dot of caramel. Perfect for parties or portion control. I make these for my dad’s work potlucks—they disappear in minutes.
Make This for Dad—He’ll Never Forget It
This **Decadent Oreo Icebox Cake Delight** isn’t just dessert—it’s a hug in cake form. No oven, no fuss, just pure, chocolatey joy that says “You’re the best, Dad.” Whether it’s his birthday, Father’s Day, or just a Tuesday, this cake delivers big flavor with zero stress. So grab those Oreos, whip up some cream, and get ready for the smiles (and seconds) that follow. Trust me—he’ll ask for the recipe… and maybe a lifetime supply.
Decadent Oreo Icebox Cake Delight
Ingredients
Equipment
Method
- Pour very cold heavy cream into a large bowl and beat on medium-high until soft peaks form.
- In another bowl, beat cream cheese with powdered sugar and vanilla until smooth.
- Gently fold the whipped cream into the cream cheese mixture using a spatula.
- Grab a 9-inch springform pan or deep square dish and layer whole Oreos side by side.
- Spoon a layer of cream over the cookies, smoothing it evenly.
- Repeat the layering with cookies and cream, ending with a thick layer of cream on top.
- Cover the cake tightly with plastic wrap and refrigerate for at least 6 hours or overnight.
- Before serving, decorate with whole Oreos, crushed cookies, and warm caramel sauce.