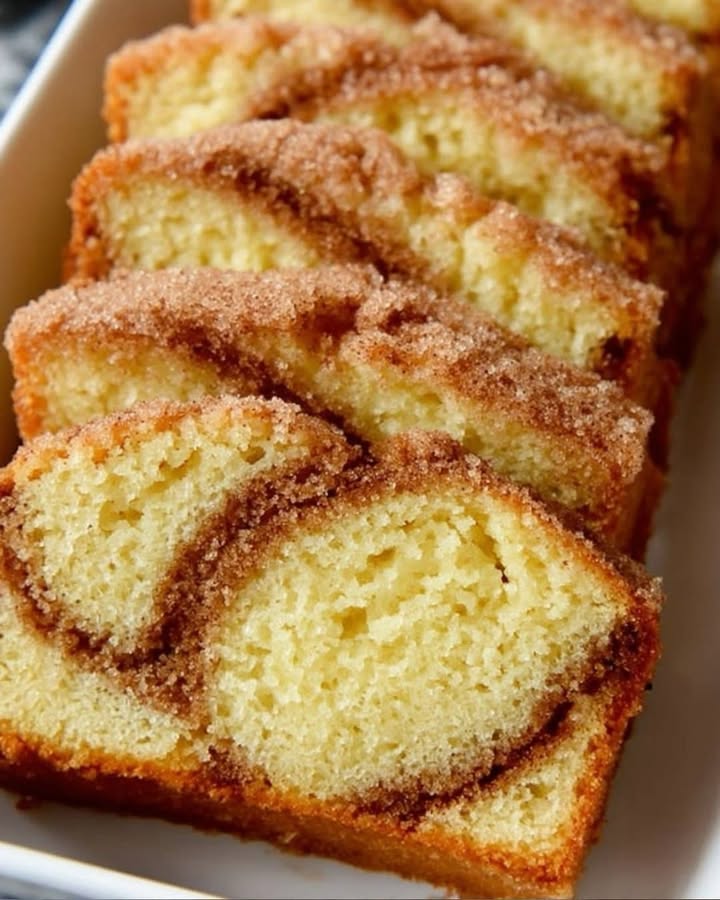
There’s something magical about walking into a kitchen filled with the warm, cozy scent of cinnamon. It instantly makes you feel at home—even if you’re just visiting! I remember the first time I baked this Cinnamon Swirl Bliss Easy Recipe. My kids came running from their rooms like little cinnamon-seeking missiles, and my husband took three slices before dinner was even served. That’s how good it is. Soft, spongy, and swirled with that golden-brown cinnamon sugar magic—it’s like a hug in cake form.
The Story Behind Cinnamon Swirl Bliss Easy Recipe
Cinnamon swirl baked goods have been loved for generations, especially in American and European kitchens. While cinnamon itself hails from Sri Lanka and was once worth more than gold, it found its sweet spot in swirl breads, buns, and cakes during the 20th century. Home bakers loved how a simple twist of cinnamon sugar could turn basic batter into something extraordinary. This recipe? It’s my kitchen-tested twist on that classic idea—designed for busy days when you still want to serve something that feels homemade with love. I’ve tweaked it over years of coffee mornings, school bake sales, and late-night cravings until it came out perfectly fluffy every single time.
Why You’ll Love This Cinnamon Swirl Bliss Easy Recipe
This isn’t just another cake—it’s your new go-to comfort treat. The crumb is feather-soft, almost cloud-like, with pockets of cinnamon warmth that melt on your tongue. It’s sweet but not sugary, rich but not heavy. Best of all? It’s incredibly easy. No fancy techniques, no waiting for dough to rise, and no weird ingredients hiding in your pantry. You probably already have everything you need. Plus, it fills your house with that irresistible aroma—trust me, your neighbors will start wondering what you’re baking!
Perfect Moments for Cinnamon Swirl Bliss
Whether it’s a lazy Sunday breakfast with fresh coffee, a midweek study snack, or a sweet ending to a simple dinner—this cake fits right in. I’ve served it at birthday brunches (paired with fresh berries and whipped cream), packed slices in lunchboxes, and even gifted it to new neighbors in cute parchment-wrapped bundles. It’s also a hit at potlucks and holiday gatherings. Basically, if there’s coffee involved, this cake belongs there.
Ingredients for Cinnamon Swirl Bliss Easy Recipe
- For the batter:
- 2 cups all-purpose wheat flour
- 1 cup granulated sugar
- 1 teaspoon baking powder
- ½ teaspoon salt
- 2 large eggs
- 1 cup milk
- ½ cup melted butter
- 1 teaspoon vanilla extract
- For the cinnamon swirl:
- ½ cup packed brown sugar
- 1 tablespoon ground cinnamon
- 2 tablespoons melted butter
Easy Substitutions
Don’t have all the ingredients? No problem! Here’s how to adapt:
- Use whole wheat flour for half the all-purpose flour for a nuttier taste.
- Swap regular milk for almond, oat, or soy milk—your cake will still be tender.
- No butter? Use melted coconut oil or a neutral oil like canola.
- Prefer less sugar? Reduce granulated sugar to ¾ cup and use light brown sugar.
How to Make Cinnamon Swirl Bliss Easy Recipe
Step 1
In a large mixing bowl, whisk together the flour, sugar, baking powder, and salt until everything is evenly combined. This dry mix forms the foundation of your cake’s soft texture—make sure there are no lumps! I always give it a quick stir with a fork to break up any clumps in the sugar or flour. Pro tip: Sifting isn’t necessary here, but if your flour’s been sitting a while, a quick fluff with a spoon helps.
Step 2
In a separate bowl, beat the eggs lightly, then add the milk, melted butter, and vanilla extract. Stir until smooth and creamy—it should look like a light custard. The melted butter should be warm, not hot, or it might cook the eggs. I like to let mine cool for 2 minutes after microwaving. This liquid mix brings moisture and richness, so take your time to blend it well!
Step 3
Pour the wet ingredients into the dry ingredients and stir gently with a spatula or wooden spoon until just combined. Don’t overmix! The batter should be thick, smooth, and slightly glossy—with a few tiny lumps okay. Overmixing makes the cake dense instead of spongy. I stop as soon as I don’t see any streaks of flour. That’s your ticket to fluffiness!
Step 4
Grease a 9×5-inch loaf pan (or line it with parchment paper). Pour half of the batter into the pan and spread it evenly with the back of a spoon. This base layer holds everything together, so make sure it’s level. Then, prepare your cinnamon swirl mixture by mixing brown sugar, cinnamon, and melted butter until it looks like wet sand. Sprinkle it evenly over the batter—don’t worry if it looks generous. More swirl = more joy!
Step 5
Carefully pour the remaining batter over the cinnamon layer. It might not cover everything completely, and that’s fine! Use a spoon or spatula to gently spread it as evenly as possible without mixing the layers. The goal is to trap that cinnamon goodness in the center. Don’t press too hard—you want those dramatic swirl pockets to shine through after baking.
Step 6
Now for the fun part! Take a butter knife or a toothpick and swirl it through the batter in gentle figure-eight motions. Just 3–4 passes are enough—this creates those beautiful marbled veins of cinnamon. Don’t overdo it, or you’ll blur the layers into one muddy color. I always tell my kids this is where the “magic” happens—and they love helping with this step!
Step 7
Bake in a preheated oven at 180°C (350°F) for 40–45 minutes. The cake is ready when the top is golden brown and a toothpick inserted into the center comes out clean—no wet batter sticking to it. If the top is browning too fast, loosely tent it with foil after 30 minutes. Let it cool in the pan for 10 minutes before transferring to a wire rack. Patience here is key—it firms up as it cools!
Chef’s Tip
For extra moisture and flavor depth, add a pinch of nutmeg or cardamom to the cinnamon swirl mix. It’s subtle but adds warmth that makes people ask, “What’s your secret?”
Timing Breakdown
- Prep time: 15 minutes
- Cook time: 45 minutes
- Resting/cooldown time: 30 minutes
- Total time: About 1 hour 30 minutes
Chef’s Secret for Ultimate Softness
Replace ¼ cup of the milk with sour cream or plain yogurt. This adds tenderness and a slight tang that balances the sweetness—plus, it keeps the cake moist for days! I started doing this after a rainy-day baking experiment, and now I never go back.
Fun Fact About Cinnamon
Did you know cinnamon was once used as a luxury gift in ancient Rome? Emperors burned it at funerals to show off their wealth! Today, it’s a pantry staple—but in this cake, it still feels like a little luxury in every bite.
What You’ll Need
- 9×5-inch loaf pan
- Mixing bowls (2)
- Whisk or fork
- Spatula
- Measuring cups and spoons
- Butter knife or toothpick (for swirling)
- Wire cooling rack
How to Store Cinnamon Swirl Bliss
Keep your cake fresh and soft by storing it properly. At room temperature, wrap it tightly in plastic wrap or place it in an airtight container. It stays moist and delicious for up to 3 days—perfect for those “just one more slice” moments.
If you need it to last longer, refrigerate it for up to 1 week. But bring it to room temperature before serving—cold cake loses its spongy charm. I like to warm a slice for 10 seconds in the microwave with a pat of butter on top. Heaven!
You can also freeze the whole loaf or individual slices for up to 3 months. Wrap tightly in plastic, then place in a freezer bag. Thaw at room temperature for 2–3 hours. It tastes almost as fresh as day one—ideal for holiday prep or surprise guests!
Tips to Make It Even Better
- Use room-temperature eggs and milk for a smoother batter.
- Toast the cinnamon lightly in a dry pan for 30 seconds to intensify its aroma.
- Add chopped pecans or walnuts to the swirl for crunch.
- Drizzle with a simple glaze (powdered sugar + milk) for a bakery-style finish.
Ways to Serve It Beautifully
- Slice and place on vintage china with a sprig of mint.
- Serve warm with a scoop of vanilla ice cream for dessert.
- Stack mini slices on a tiered stand for brunch parties.
- Wrap individual portions in parchment and twine as edible gifts.
Healthier Twists on Cinnamon Swirl Bliss
Want to lighten things up without losing flavor? Try one of these smart swaps:
- Whole Grain Version: Replace half the flour with whole wheat or oat flour. Adds fiber and a nutty depth.
- Reduced-Sugar Cake: Use ¾ cup sugar total and swap brown sugar for coconut sugar in the swirl.
- Dairy-Free Option: Use almond milk and coconut oil—still soft and fragrant.
- Protein Boost: Add 2 tablespoons of unflavored protein powder to the dry mix (reduce flour slightly).
- Gluten-Free Bliss: Use a 1:1 gluten-free flour blend—works beautifully with this moist batter.
- Fruit Swirl: Mix ½ cup applesauce into the batter and add diced apples to the cinnamon layer.
Common Mistakes to Avoid
Mistake 1: Overmixing the Batter
When you stir the wet and dry ingredients too much, you develop gluten, which turns your soft cake into a tough, rubbery loaf. Mix only until the flour disappears—lumps are fine! The batter should look shaggy, not smooth like pancake mix. Pro tip: Use a spatula, not a mixer, and fold gently.
Mistake 2: Skipping the Greased Pan
Even if you think your pan is “non-stick,” this cake needs proper greasing or parchment lining. Without it, you’ll lose half your loaf when trying to remove it. I learned this the hard way—my first attempt stuck like glue! Always butter the pan and dust with flour, or line it fully with parchment.
Mistake 3: Cutting Too Soon
Hot cake = crumbly disaster. Let it cool 10 minutes in the pan, then transfer to a rack for at least 20 more. Cutting too early causes it to fall apart and lose its beautiful swirl pattern. Set a timer—it’s worth the wait!
Mistake 4: Using Cold Ingredients
Cold butter or eggs can cause the batter to separate or bake unevenly. Bring everything to room temperature first. If you forget, warm the milk slightly and let eggs sit in warm water for 5 minutes. This ensures a uniform, tender crumb.
Mistake 5: Too Much Swirl Pressure
When swirling, less is more. Dragging the knife too deeply or too many times blends the layers into a uniform brown mess. Stick to 3–4 gentle figure-eights just on the surface. That way, you get dramatic, marbled ribbons in every slice.
Frequently Asked Questions
Can I make this cake in a different pan?
Yes! You can bake it in an 8×8-inch square pan or even as muffins. For muffins, fill cups ¾ full and bake at 180°C for 18–22 minutes. The swirl method stays the same—just add cinnamon sugar to the center of each muffin before topping with more batter. Keep an eye on bake time, as smaller pans cook faster.
Why did my cake sink in the middle?
Several reasons: opening the oven too early, underbaking, or too much leavening. Make sure your baking powder is fresh (test by mixing 1 tsp with hot water—if it bubbles, it’s good). Don’t open the oven before 30 minutes, and always use the toothpick test. A slight dip is normal, but a big crater means it needs more time.
Can I use dark brown sugar instead of light?
Absolutely! Dark brown sugar has more molasses, so it adds a deeper, almost caramel-like flavor to the swirl. It also makes the swirl slightly moister. I actually prefer it—it gives the cake a richer taste that pairs wonderfully with coffee or tea. Just pack it firmly when measuring.
Is this recipe kid-friendly to make?
Very! My 7-year-old helps mix the batter and does the swirling. It’s a great way to teach measuring and gentle mixing. Just supervise around the hot oven. Kids love seeing the cinnamon layer and getting to “create art” with the swirl. Plus, they’re more likely to eat something they helped make!
Can I add nuts or fruit?
Yes! Fold ½ cup chopped pecans or walnuts into the batter for crunch. Or layer thin apple slices under the cinnamon swirl for a fall-inspired twist. Just pat fruit dry to avoid extra moisture. Avoid juicy berries—they’ll sink and make the cake soggy.
How do I know when it’s done baking?
The top should be golden brown and spring back when lightly pressed. Most reliably, insert a toothpick into the center—it should come out clean or with a few dry crumbs (not wet batter). If your oven runs hot or cold, use an oven thermometer for accuracy. Better to bake 5 minutes longer than underbake!
Can I make it ahead for a party?
Definitely! Bake it the night before and store it wrapped at room temperature. It actually tastes better the next day as flavors meld. If you’re adding a glaze, do it the morning of serving so it stays shiny and fresh. I’ve made this for baby showers and teacher appreciation week—it’s always a hit.
Why is my swirl not showing up?
This usually happens if you over-swirled or poured the top batter too thickly. Make sure your cinnamon mix is evenly sprinkled and that you only do light swirls. Also, let the cake cool completely before slicing—warm cake hides the marbling. Use a sharp serrated knife for clean cuts.
Can I use oil instead of butter?
Yes! Substitute ½ cup melted butter with ⅓ cup neutral oil like canola or vegetable. The cake will be slightly less rich but still soft. Butter gives the best flavor and texture, but oil works in a pinch—especially if you’re dairy-free.
Does this freeze well?
Yes, beautifully! Wrap the cooled cake tightly in plastic wrap, then in foil or a freezer bag. It keeps for up to 3 months. Thaw at room temperature for 2–3 hours. I’ve frozen slices individually so I can grab one for my morning coffee—like homemade convenience!
Final Slice of Joy
This Cinnamon Swirl Bliss Easy Recipe is more than just a cake—it’s a little daily celebration. Whether you’re baking for one or sharing with ten, it delivers comfort, simplicity, and that unforgettable cinnamon-kissed aroma. Give it a try this weekend. Your kitchen (and your heart) will thank you. And hey—save me a slice!
Cinnamon Swirl Bliss Easy Recipe
Ingredients
Equipment
Method
- In a large mixing bowl, whisk together the flour, sugar, baking powder, and salt until well combined.
- In a separate bowl, beat the eggs lightly and add the milk, melted butter, and vanilla extract; stir until smooth and creamy.
- Pour the wet ingredients into the dry ingredients and stir gently until just combined, being careful not to overmix.
- Grease a 9x5-inch loaf pan or line it with parchment paper, then pour half of the batter into the pan and spread evenly.
- Prepare the cinnamon swirl mixture by mixing brown sugar, cinnamon, and melted butter until it resembles wet sand, then sprinkle it over the batter.
- Pour the remaining batter over the cinnamon mixture and gently spread without mixing the layers.
- Swirl through the batter with a butter knife or toothpick in gentle figure-eight motions to create a marbled effect.
- Bake in a preheated oven at 180°C (350°F) for 40–45 minutes or until golden brown and a toothpick inserted comes out clean.
- Let it cool in the pan for 10 minutes before transferring to a wire rack to cool completely.