Why This Classic Cherry Delight Will Steal Your Heart
Picture this: a creamy, dreamy dessert that’s as easy to make as it is delightful to eat. That’s exactly what you get with this Deliciously Easy Cherry Cream Dessert. I first stumbled upon this recipe during a family potluck. My aunt brought it, and within minutes, the dish was empty. Everyone raved about how the buttery crust, silky cream layer, and sweet-tart cherry topping came together in perfect harmony. I knew I had to recreate it—and after a few tweaks, I made it my own. Now, it’s a staple at every holiday dinner, birthday bash, or even a random Tuesday night when we need a little pick-me-up.
A Little History Behind This Sweet Treat
This dessert feels like a modern classic, but its roots are tied to no-bake desserts from the mid-20th century. Back then, homemakers were all about simplicity and convenience, using pantry staples like graham crackers and canned pie filling. Over time, recipes like this one evolved into crowd-pleasers that balance nostalgia with fresh flavors. When I tested this recipe, I loved how the Cool Whip added a light, airy texture while the cherry pie filling brought a burst of fruity brightness. It’s proof that sometimes, the best dishes are the ones that don’t try too hard.
Why You’ll Fall Head Over Heels for This Recipe
There’s so much to love here! First, it’s almost impossible to mess up. Even if you’re new to baking, this recipe is forgiving and fun. The combination of textures—crunchy crust, velvety cream, and juicy cherries—is downright addictive. Plus, it’s quick to whip up (pun intended!). In under 15 minutes of active prep time, you’ll have a dessert that looks like it came straight from a bakery. And let’s not forget the flavor: sweet, tangy, and just the right amount of indulgent. It’s a total win-win.
Perfect Occasions for This Decadent Dessert
This Deliciously Easy Cherry Cream Dessert is perfect for any occasion—or no occasion at all! Bring it to a summer barbecue, where its cool creaminess will be a refreshing treat. Serve it at Thanksgiving or Christmas for a festive twist on traditional pies. It’s also a hit at potlucks, baby showers, or even as a surprise for your book club. Honestly, though, you don’t need an excuse. Sometimes, a lazy Sunday afternoon calls for a slice of this beauty alongside a cup of coffee or tea.
What You’ll Need: Ingredients List
- For the Crust:
- 7 tablespoons unsalted butter, melted
- 1 cup graham cracker crumbs (about 9 whole crackers)
- 3 tablespoons granulated sugar
- For the Filling:
- 8 ounces cream cheese, softened
- 1 cup powdered sugar
- 1 teaspoon pure vanilla extract
- 1 container (8 ounces) Cool Whip
- 1 can (21 ounces) cherry pie filling
Substitution Options for Every Pantry
Not everyone has the exact ingredients on hand, and that’s okay! Swap out the graham cracker crumbs for crushed digestive biscuits or even crushed shortbread cookies. If you’re out of Cool Whip, homemade whipped cream works beautifully—just beat heavy cream with a bit of sugar until stiff peaks form. For a dairy-free version, use vegan butter, dairy-free cream cheese, and coconut whipped cream. Feel free to experiment with other pie fillings, like blueberry or peach, if cherries aren’t your thing.
Step 1: Making the Perfect Crust
The foundation of this dessert is its buttery, crunchy crust. Start by microwaving the butter for about 30 seconds until fully melted. In a medium bowl, mix the melted butter with graham cracker crumbs and granulated sugar. The mixture should resemble wet sand and hold together when pressed. Transfer it to a greased 8×8-inch baking dish and press it firmly into the bottom. Pro tip: Use the back of a spoon or a flat-bottomed glass to get an even layer. Set it aside while you tackle the filling.
Step 2: Crafting the Creamy Filling
Now comes the fun part—the luscious cream layer! Grab your electric mixer and beat the softened cream cheese until it’s smooth and creamy. Add the powdered sugar and vanilla extract, mixing until everything is well combined. Next, gently fold in the Cool Whip. Be careful not to overmix; you want to keep that light, airy texture. Once blended, spread the filling evenly over the crust using a spoon or offset spatula. Take a moment to admire the contrast between the golden crust and the snowy white cream—it’s already looking good!
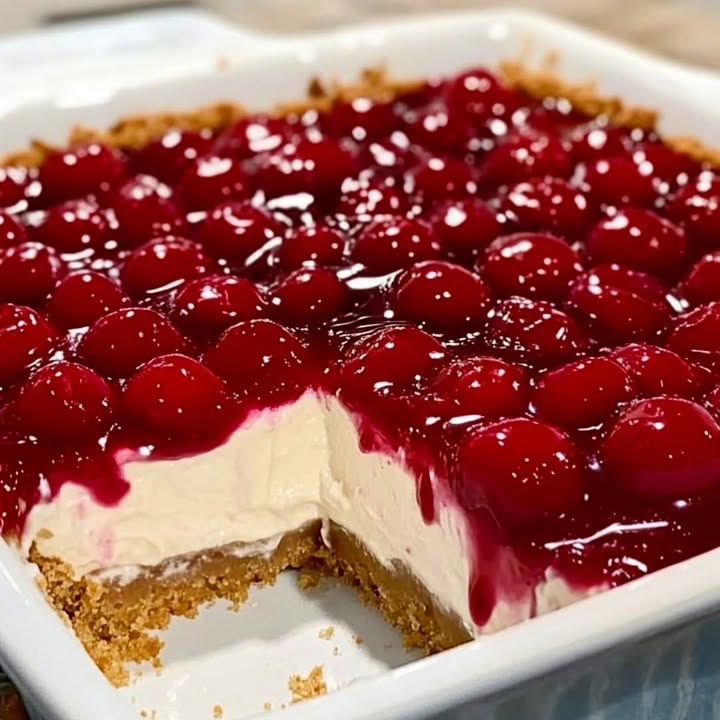
Step 3: Adding the Cherry Topping
Finally, it’s time to crown your masterpiece with vibrant cherry pie filling. Spoon the cherries evenly over the cream layer, spreading them gently to cover the surface. The deep red color against the creamy white backdrop is stunning. Chef’s tip: If you want to take it up a notch, sprinkle a pinch of lemon zest over the cherries for a hint of brightness. Pop the dish into the fridge and let it chill for at least 2 hours—or better yet, overnight. Patience pays off here, as chilling allows the flavors to meld and the layers to set perfectly.
Timing Breakdown for Success
Let’s talk timing so you know what to expect. Prep time is about 15 minutes, which includes melting the butter, mixing the crust, preparing the filling, and assembling the layers. There’s no cooking time since this is a no-bake dessert. However, resting time is crucial—plan for at least 2 hours in the fridge, though overnight yields the best results. Total time? Around 3 hours, but most of that is hands-off chilling. Trust me, it’s worth the wait!
Chef’s Secret to Elevating This Dessert
Here’s a little secret: toast the graham cracker crumbs lightly before mixing them with the butter and sugar. This step adds a subtle nutty flavor that takes the crust to the next level. Simply spread the crumbs on a baking sheet and bake them at 350°F for 5–7 minutes, keeping a close eye to avoid burning. Let them cool slightly before proceeding with the recipe. Your taste buds will thank you!
An Intriguing Fact About Cherries
Did you know that Michigan produces about 75% of the tart cherries grown in the U.S.? These tiny gems are packed with antioxidants and have been linked to reducing inflammation. So while this dessert might feel indulgent, those cherries are doing their part to keep things balanced. Fun fact: Cherries are also one of the few natural sources of melatonin, which helps regulate sleep. Maybe that’s why this dessert always leaves me feeling happy and relaxed!
Necessary Equipment for Effortless Prep
You won’t need anything fancy to make this Deliciously Easy Cherry Cream Dessert. A medium mixing bowl, a large mixing bowl, an electric mixer, a spatula, and an 8×8-inch baking dish are the essentials. If you don’t have an electric mixer, a whisk and some elbow grease will do the trick. For pressing the crust, a flat-bottomed glass or measuring cup is super helpful. Simple tools, amazing results.
Storage Tips for Lasting Freshness
Storing leftovers is a breeze. Cover the dish tightly with plastic wrap or transfer slices to an airtight container. Keep it in the fridge, where it will stay fresh for up to 3 days. The crust may soften slightly over time, but the flavors will continue to develop. If you’re making this ahead of time, assemble everything except the cherry topping and add it just before serving to maintain the best texture.
If you live in a warm climate, consider freezing individual portions. Wrap each slice in plastic wrap and place them in a freezer-safe bag. They’ll keep for up to a month. Just thaw in the fridge overnight before enjoying. Freezing ensures you always have a sweet treat ready to go.
Lastly, resist the urge to leave this dessert at room temperature for too long. Dairy-based dishes like this one are best kept chilled to prevent spoilage. A cooler or insulated bag is handy if you’re transporting it to a gathering.
Tips and Advice for Perfection
To ensure your dessert turns out flawless, start with softened cream cheese. Leave it out on the counter for 30 minutes before using, or give it a quick zap in the microwave (in 10-second intervals). This makes blending smoother and prevents lumps. Another tip: grease your baking dish generously. A nonstick spray or a light coating of butter ensures the crust doesn’t stick.
When folding in the Cool Whip, go slow and steady. Overmixing can deflate the airy texture, leaving you with a denser filling. Finally, don’t rush the chilling process. Allowing the dessert to rest lets the layers firm up and the flavors harmonize.
Presentation Ideas to Wow Your Guests
Serve this dessert straight from the pan for a rustic look, or cut it into neat squares and arrange them on a platter. Garnish with a sprig of mint or a dusting of powdered sugar for a touch of elegance. For special occasions, drizzle a bit of chocolate sauce or caramel over the top. Individual servings in clear glasses or jars create a trendy, layered effect that’s sure to impress. Don’t forget to pair it with a scoop of vanilla ice cream for extra decadence!
Healthier Alternatives to Satisfy Every Palate
Want to lighten up this dessert without sacrificing flavor? Here are six variations to try:
- Gluten-Free Option: Use gluten-free graham crackers or almond flour for the crust.
- Low-Sugar Version: Substitute monk fruit sweetener for granulated and powdered sugar.
- Vegan Delight: Swap in dairy-free cream cheese, butter, and whipped topping.
- Fresh Fruit Twist: Replace canned cherries with fresh berries macerated in a bit of sugar and lemon juice.
- Protein-Packed: Mix protein powder into the cream cheese filling for a muscle-building boost.
- Keto-Friendly: Use almond flour, erythritol, and full-fat cream cheese to keep carbs low.
Mistake 1: Skipping the Chilling Time
Rushing through the chilling process is a common mistake. Without enough time in the fridge, the layers won’t set properly, leading to a sloppy presentation. To avoid this, plan ahead and allow at least 2 hours for chilling. Overnight is ideal for maximum flavor and stability. Pro tip: Place the dish near the back of the fridge, where it’s coldest, to speed things along.
Mistake 2: Overmixing the Filling
Overmixing the cream cheese filling can ruin its light, fluffy texture. When folding in the Cool Whip, be gentle and stop as soon as everything is incorporated. If you notice the mixture becoming dense, you’ve gone too far. Practical tip: Use a rubber spatula instead of a mixer for this step to maintain control.
Mistake 3: Using Cold Cream Cheese
Cold cream cheese is difficult to blend smoothly, resulting in lumpy filling. Always let your cream cheese sit at room temperature for 30 minutes before starting. Alternatively, microwave it briefly (in 10-second bursts) to soften it quickly. Smooth filling equals happy eaters!
Mistake 4: Not Greasing the Pan
Forgetting to grease the baking dish can lead to a stubborn crust that refuses to release. Nonstick spray or a light coating of butter ensures easy removal. Pro tip: Line the pan with parchment paper for extra insurance, especially if you’re serving this dessert outside the dish.
Mistake 5: Adding Too Much Liquid to the Crust
While melted butter helps bind the crust, adding too much can make it soggy. Stick to the recipe measurements and mix until the crumbs resemble wet sand. If the mixture seems too dry, add a teaspoon of water at a time—not more butter. A firm, compact crust is key to holding everything together.
FAQs About This Irresistible Dessert
Can I use fresh cherries instead of canned?
Absolutely! Fresh cherries can elevate the dish, but they require a bit more work. Pit and halve the cherries, then simmer them with sugar and a splash of lemon juice until they release their juices and thicken slightly. Cool completely before using.
How long does this dessert last in the fridge?
Stored in an airtight container, this dessert stays fresh for up to 3 days. After that, the crust may soften, but it’s still safe to eat. For longer storage, freeze individual portions for up to a month.
Can I make this recipe gluten-free?
Yes! Swap the graham cracker crumbs for gluten-free alternatives like almond flour or crushed gluten-free cookies. The rest of the recipe remains the same, ensuring a delicious treat for everyone.
What can I substitute for Cool Whip?
If you prefer not to use Cool Whip, homemade whipped cream is a great alternative. Beat heavy cream with a tablespoon of sugar until stiff peaks form, then fold it into the cream cheese mixture.
Is this dessert suitable for vegans?
With a few tweaks, it can be! Use dairy-free cream cheese, butter, and whipped topping. Check labels to ensure all ingredients are plant-based. The result is just as tasty as the original.
Can I prepare this dessert ahead of time?
Definitely! Assemble everything except the cherry topping and refrigerate. Add the cherries just before serving to keep the colors vibrant and the textures distinct. This method keeps the dessert looking and tasting fresh.
Why is my crust falling apart?
A crumbling crust usually means there wasn’t enough butter or the mixture wasn’t pressed firmly enough. Make sure to compact the crumbs tightly into the pan and chill the crust before adding the filling.
Can I use a different pie filling?
Of course! Blueberry, peach, or apple pie filling would work beautifully. Choose based on your preference or what’s in season for a personalized twist.
Can I double the recipe?
Yes, simply double all the ingredients and use a 9×13-inch baking dish. Adjust the chilling time slightly, as larger portions may take longer to set. Perfect for feeding a bigger crowd!
How do I prevent the layers from mixing?
To keep the layers distinct, chill the crust briefly before adding the filling. Spread the cream cheese layer evenly and gently spoon the cherry topping on top. Avoid overhandling once assembled.
A Dessert Worth Every Bite
This Deliciously Easy Cherry Cream Dessert is more than just a recipe—it’s a celebration of simple pleasures. Whether you’re whipping it up for a special occasion or just because, it’s bound to bring smiles to everyone who tries it. With its creamy filling, buttery crust, and jewel-like cherry topping, it’s a dessert that proves good food doesn’t have to be complicated. So grab your ingredients, gather your loved ones, and enjoy the magic of this timeless treat. Happy baking!
Deliciously Easy Cherry Cream Dessert
Ingredients
Equipment
Method
- Microwave the butter for about 30 seconds until fully melted.
- In a medium bowl, mix the melted butter with graham cracker crumbs and granulated sugar until it resembles wet sand.
- Transfer the mixture to a greased 8x8-inch baking dish and press it firmly into the bottom.
- Beat the softened cream cheese in a large mixing bowl until smooth and creamy.
- Add powdered sugar and vanilla extract to the cream cheese, mixing until well combined.
- Gently fold in the Cool Whip until just incorporated.
- Spread the cream filling evenly over the crust with a spoon or offset spatula.
- Spoon the cherry pie filling evenly over the cream layer.
- Chill the dessert in the fridge for at least 2 hours, or overnight for best results.