Indulge in Heavenly Chocolate Layers: A Cake That Steals Hearts
Let me tell you a little secret: this cake once made my brother cry. Not sad tears—happy ones! He’d just gotten a promotion and I surprised him with this **decadent chocolate cake**, layered like a dream and drenched in glossy ganache. One bite, and he whispered, “This tastes like love.” And honestly? It really does. If you’ve ever craved a dessert that’s rich, fluffy, moist, and impossibly chocolatey—this is your sign to bake it today.
A Slice of Chocolate History with a Modern Twist
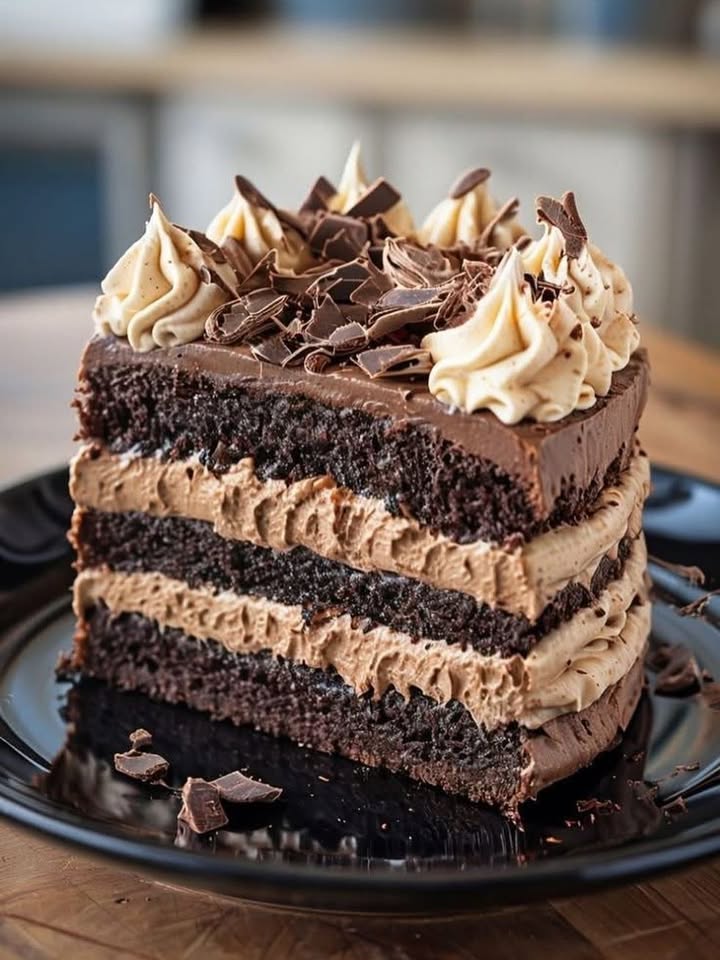
Chocolate cake has been around since the 1800s, but it wasn’t always this luxurious. Early versions used Dutch-processed cocoa and were dense, almost fudgy. Over time, bakers began adding coffee (yes, coffee!) to deepen the chocolate flavor without making it taste like coffee. My version? It’s a love letter to that tradition—but with a **silky chocolate mousse** and **shiny dark chocolate ganache** that’ll have your guests thinking you trained in Paris. I’ve tweaked this recipe over three birthdays, two anniversaries, and one very rainy Sunday—until it was *just right*.
Why You’ll Absolutely Love This Recipe
This isn’t just another chocolate cake. It’s **three soft, spongy layers** that melt on your tongue, wrapped in clouds of chocolate mousse and sealed with a velvety ganache. The hot coffee? It doesn’t make it bitter—it makes the chocolate *sing*. Plus, it’s surprisingly easy to make! No fancy techniques, no temperamental ingredients. Just honest, bold flavor and that “wow” factor that makes people ask, “Did you really make this yourself?” (Spoiler: You will!)
Perfect for Every Celebration (Even “Just Because”)
Need a showstopper for a birthday? Done. Anniversary? Absolutely. Valentine’s Day? Oh, honey, yes. But honestly, my favorite time to bake this is on a random Tuesday when the kids are cranky and my coffee’s gone cold. One slice of this cake, and suddenly the world feels softer. Serve it at dinner parties, holiday gatherings, or as a sweet apology after you’ve eaten the last cookie. It works every time.
Ingredients You’ll Need
For the Cake (3 layers):
- 1¾ cups all-purpose flour
- ¾ cup unsweetened cocoa powder
- 2 cups granulated sugar
- 2 teaspoons baking soda
- 1 teaspoon baking powder
- 1 teaspoon salt
- 2 large eggs
- 1 cup buttermilk (or 1 cup milk + 1 tablespoon vinegar, let sit 5 minutes)
- ½ cup vegetable oil
- 1 cup hot brewed coffee (not boiling—just hot!)
For the Chocolate Mousse:
- 2 cups very cold heavy cream
- 1 cup semi-sweet chocolate, melted and cooled
- 1 teaspoon vanilla extract
For the Ganache & Decoration:
- 200g (7 oz) dark chocolate, chopped
- ½ cup heavy cream
- Extra chocolate chips and reserved mousse for rosettes
Easy Ingredient Swaps (Because Life Happens)
- No buttermilk? Mix milk + vinegar or lemon juice and wait 5 minutes.
- Out of coffee? Use hot water—but the chocolate flavor won’t be as deep.
- Dairy-free? Use plant-based milk + vinegar, coconut oil, and dairy-free chocolate.
- Egg allergy? Try a flax egg (1 tbsp ground flax + 3 tbsp water per egg).
- No semi-sweet chocolate? Use dark or milk chocolate—but adjust sweetness as needed.
Step-by-Step Guide to Chocolate Bliss
Step 1: Bake the Cake Layers
Preheat your oven to 175°C (350°F). Grease three 8-inch round cake pans and line the bottoms with parchment paper. In a big bowl, whisk together flour, cocoa powder, sugar, baking soda, baking powder, and salt. In another bowl, beat eggs, buttermilk, oil, and hot coffee until smooth. Pour wet into dry and mix just until combined—don’t overmix! The batter will be thin, and that’s perfect. Divide evenly into pans. Bake 25–30 minutes until a toothpick comes out clean. Let cool 10 minutes in pans, then turn out onto racks to cool completely. Pro tip: Wrap cooled layers in plastic and chill for 30 minutes—they’re easier to frost when firm!
Step 2: Whip Up the Chocolate Mousse
Chill your mixing bowl and beaters for 10 minutes—cold tools = fluffier cream. Beat the cold heavy cream until soft peaks form. In a separate bowl, melt the semi-sweet chocolate (microwave in 20-second bursts, stirring between) and let cool to room temperature. Gently fold the melted chocolate into the whipped cream, then add vanilla. Fold until smooth and glossy—no streaks! This mousse should be light, airy, and rich all at once. Chef’s tip: Don’t rush the fold! Use a spatula and go slow to keep the air in.
Step 3: Assemble with Love
Place one cake layer on a serving plate or cake stand. Spread a generous layer of mousse on top—about 1 cup. Add the second layer, more mousse, then the third. Use an offset spatula to spread mousse over the sides too, creating a “crumb coat” that seals in crumbs. Smooth it as best you can, then pop the cake into the fridge for at least 1 hour. This sets the mousse and makes ganache application dreamy. Pro tip: Use a lazy Susan if you have one—it makes smoothing edges so much easier!
Step 4: Pour on the Ganache
Heat the ½ cup cream in a small saucepan until it just starts to simmer (don’t boil). Pour it over the chopped dark chocolate in a heatproof bowl. Let it sit 2 minutes, then stir gently from the center outward until smooth and shiny. Let the ganache cool slightly—it should be pourable but not hot. Pour it over the chilled cake, letting it drip down the sides. Then, grab your pastry bag (fitted with a star tip) and pipe mousse rosettes on top. Sprinkle with chocolate chips for that bakery-worthy finish. Chef’s tip: If ganache is too thick, warm it slightly. Too thin? Let it cool longer.
Timing at a Glance
- Prep time: 30 minutes
- Bake time: 30 minutes
- Chill time: 1–2 hours (for mousse + ganache set)
- Total time: About 2.5 hours (but mostly hands-off!)
Chef’s Secret: The Coffee Trick
Here’s my #1 secret: **always use hot coffee**. Even if you hate coffee! It doesn’t add coffee flavor—it unlocks the chocolate’s hidden depth, making it richer, smoother, and more complex. I’ve tested this with water, milk, even espresso… and hot coffee wins every time. Just make sure it’s not boiling when you add it, or you’ll cook the eggs.
Fun Fact About This Cake
Did you know cocoa powder is naturally acidic? That’s why we use both baking soda (which reacts with acid) and baking powder (which works on its own). Together, they give the cake a perfect rise and tender crumb. Science in the kitchen—my favorite kind of magic!
Necessary Equipment
- Three 8-inch round cake pans
- Parchment paper
- Hand mixer or stand mixer
- Offset spatula
- Pastry bag with star tip (optional but fun!)
- Heatproof mixing bowls
- Cake turntable (helpful but not essential)
How to Store Your Decadent Chocolate Cake
This cake is best served within 2 days. Store it covered in the fridge—it’s essential because of the dairy in the mousse and ganache. Place it in an airtight cake container or cover loosely with plastic wrap. The cold actually enhances the chocolate flavor and keeps the layers moist.
Can you freeze it? Yes! But only the unfrosted cake layers. Wrap each cooled layer tightly in plastic, then foil, and freeze for up to 2 months. Thaw in the fridge overnight before assembling. Never freeze the full cake—the mousse and ganache will separate and turn grainy.
If you’ve already assembled the whole cake, leftovers will keep in the fridge for up to 3 days. Bring slices to room temperature for 15 minutes before serving—they’ll taste fresher and richer.
Top Tips for Next-Level Results
- Weigh your flour for accuracy (1¾ cups ≈ 220g).
- Sift cocoa powder to avoid lumps.
- Don’t skip cooling the cake layers—warm cakes melt the mousse!
- Use high-quality chocolate—it makes a huge difference.
- Chill your cake between layers for cleaner cuts when serving.
Stunning Presentation Ideas
- Drizzle with salted caramel before serving.
- Top with fresh berries for color and freshness.
- Gold leaf flakes for a luxe touch.
- Serve on a cake stand with vintage plates.
- Write a message in melted white chocolate.
- Dust with edible glitter for birthdays.
Healthier (But Still Delicious!) Alternatives
Want to lighten it up? Try these ideas—still satisfying, just a little kinder to your wellness goals.
1. Whole Wheat Chocolate Cake
Swap half the all-purpose flour for whole wheat pastry flour. It adds fiber and a nutty depth without drying out the cake.
2. Avocado Chocolate Mousse
Replace heavy cream with blended ripe avocado + cocoa powder + maple syrup. It’s creamy, green, and secretly healthy!
3. Coconut Oil & Almond Milk Version
Use melted coconut oil and unsweetened almond milk + vinegar. Pairs beautifully with dark chocolate.
4. Lower-Sugar Cake
Cut sugar to 1½ cups and add ¼ cup applesauce for moisture. The coffee still makes it taste rich.
5. Vegan Decadent Layers
Use flax eggs, oat milk, vegan chocolate, and coconut cream. Yes, it can still be indulgent!
6. Single-Serve Mug Cake
Mix 2 tbsp flour, 2 tbsp cocoa, 2 tbsp sugar, pinch of baking powder, 3 tbsp milk, 1 tbsp oil, and 2 tbsp hot coffee. Microwave 90 seconds. Top with a spoon of mousse!
Common Mistakes to Avoid
Mistake 1: Overmixing the Cake Batter
When you mix the batter too long after adding flour, you develop gluten—and that leads to a tough, rubbery cake instead of soft layers. Always mix just until no dry streaks remain. The batter should look smooth but still thin. Pro tip: Use a whisk for dry ingredients and a spatula for folding—gentle hands win every time!
Mistake 2: Using Warm Chocolate in the Mousse
If your melted chocolate is still hot when folded into whipped cream, it’ll melt the cream and turn your mousse into soup. Always let it cool to room temperature—it should feel neutral to the touch. Test by dipping a clean finger: if it’s warm, wait. If it’s cool, go!
Mistake 3: Skipping the Chill Time
Rushing to pour ganache on a warm or room-temp cake? The ganache will slide right off! The mousse needs to be firm to support that glossy top coat. Refrigerate for at least 1 hour—it’s the secret to professional-looking results.
Mistake 4: Using Boiling Coffee
Boiling coffee can cook the eggs in your batter, leading to scrambled bits and an off texture. Heat coffee until it’s steaming (like hot tea), then let it sit 2 minutes before adding. Your cake will stay tender and velvety.
Mistake 5: Decorating Too Soon
If you pipe rosettes before the ganache sets, they’ll sink or slide. Wait until the ganache is matte and firm to the touch (about 20–30 minutes at room temp). Patience = pretty cake!
Frequently Asked Questions
Can I make this cake ahead of time?
Absolutely! Bake and cool the layers 1–2 days ahead; store wrapped at room temp. Assemble and frost the day before serving. Keep refrigerated, and bring to room temp 30 minutes before slicing for best texture and flavor.
Why does my cake dome in the middle?
Oven heat can cause the center to rise faster. To prevent doming, tap pans firmly after filling to release air bubbles, and bake in the center rack. If domes form, level them with a serrated knife once cooled—save the scraps for cake pops!
Can I use milk chocolate instead of dark for ganache?
You can, but milk chocolate is sweeter and softer. It won’t set as firmly and may drip too much. For best results, stick with 60–70% dark chocolate. It’s rich, stable, and balances the sweet mousse perfectly.
How do I get smooth ganache?
Chop chocolate finely so it melts evenly. Use heavy cream (not half-and-half). Don’t stir immediately—let it sit 2 minutes to melt the chocolate gently. Then stir slowly from the center outward until glossy. No lumps, no graininess!
What if my mousse deflates?
This usually happens when chocolate is too warm or you overmix. Fold gently with a spatula—don’t beat! And always chill your bowl and cream first. Cold cream holds air better, giving you that cloud-like texture.
Can I use instant coffee?
Yes! Dissolve 1–2 teaspoons of instant coffee in 1 cup hot water. It’s a great shortcut and still deepens the chocolate flavor beautifully. Just avoid “coffee substitutes”—they won’t deliver the same magic.
How many servings does this cake make?
This 3-layer 8-inch cake serves 12–16 people, depending on slice size. For parties, cut thin slices—they’re rich! Each bite is packed with flavor, so smaller pieces go a long way.
Why is my cake dry?
Dry cake usually means overbaking or too much flour. Use a toothpick test—when it comes out with a few moist crumbs (not wet batter), it’s done. Also, spoon flour into your measuring cup and level it—don’t scoop!
Can I make this gluten-free?
Yes! Use a 1:1 gluten-free flour blend (like Bob’s Red Mill). Keep everything else the same. The texture will be slightly denser but still moist and chocolatey—my gluten-free friends love it!
What’s the best way to cut clean slices?
Use a sharp, thin-bladed knife. Dip it in hot water, wipe dry, then slice. Clean the blade between cuts. This prevents dragging and keeps layers intact. Cold cake also slices cleaner than room-temp.
Indulge in Heavenly Chocolate Layers—You Deserve It!
Life is too short for boring desserts. This **decadent chocolate cake** is more than a recipe—it’s a hug on a plate, a celebration in every bite, and proof that joy can be baked. Whether you’re baking for someone special or just treating yourself after a long week, this cake delivers luxury, comfort, and that “I can’t believe I made this!” pride. So grab your mixing bowls, put on your favorite playlist, and let your kitchen smell like chocolate heaven. You’ve got this—and your future self (and everyone you share it with) will thank you.
Indulge in Heavenly Chocolate Layers
Ingredients
Equipment
Method
- Preheat your oven to 175°C (350°F) and grease three 8-inch round cake pans.
- In a bowl, whisk together flour, cocoa powder, sugar, baking soda, baking powder, and salt.
- In another bowl, beat eggs, buttermilk, oil, and hot coffee until smooth.
- Pour wet ingredients into dry ingredients and mix until just combined.
- Divide the batter evenly into the pans and bake for 25–30 minutes until a toothpick comes out clean.
- Let the cakes cool in pans for 10 minutes, then turn onto racks to cool completely.
- Chill the cooled layers in plastic for 30 minutes before frosting.
- Chill mixing bowl and beaters, then beat cold heavy cream until soft peaks form.
- Fold melted and cooled chocolate into the whipped cream with the vanilla until smooth.
- Place one cake layer on a serving plate and spread a generous layer of mousse on top.
- Add the second layer, more mousse, and then the third; spread mousse to coat the sides.
- Chill the cake for at least 1 hour to set the mousse.
- Heat ½ cup cream in a saucepan until simmering, then pour over chopped chocolate.
- Let sit for 2 minutes, then stir until smooth and shiny. Allow to cool slightly.
- Pour the ganache over the chilled cake and pipe mousse rosettes on top; add chocolate chips for decoration.