Why This Melting Coconut Chocolate Delight Will Steal Every Bite
If you’ve ever taken a bite of cake and felt like your taste buds just got hugged by a cloud of chocolate, coconut, and toasted nuts—you’ve probably met a Classic German Chocolate Cake. This one? Oh, it’s next level. I made it for my neighbor’s birthday last summer, and she literally cried happy tears. “It’s like my grandma’s kitchen in every forkful,” she said. That’s the magic of this Melting Coconut Chocolate Delight: it’s rich, tender, and packed with that legendary coconut-walnut glaze that melts right into your soul. And yes—it’s easier to make than you think!
The Sweet Story Behind the Melting Coconut Chocolate Delight
Fun fact: German Chocolate Cake isn’t actually German! It’s named after Sam German, an American chocolatier who created a special dark baking chocolate for Baker’s Chocolate Company in the 1850s. The cake itself didn’t become famous until the 1950s, when a recipe using “German’s Sweet Chocolate” was published in a Dallas newspaper—and the rest is dessert history. Over time, home bakers swapped the original chocolate for cocoa powder (like we do here) and focused on that irresistible coconut-pecan (or walnut!) glaze. Today, this coconut chocolate cake is a staple at family reunions, potlucks, and “I-just-need-comfort” nights. And honestly? It always wins.
Why You’ll Fall in Love With This Recipe
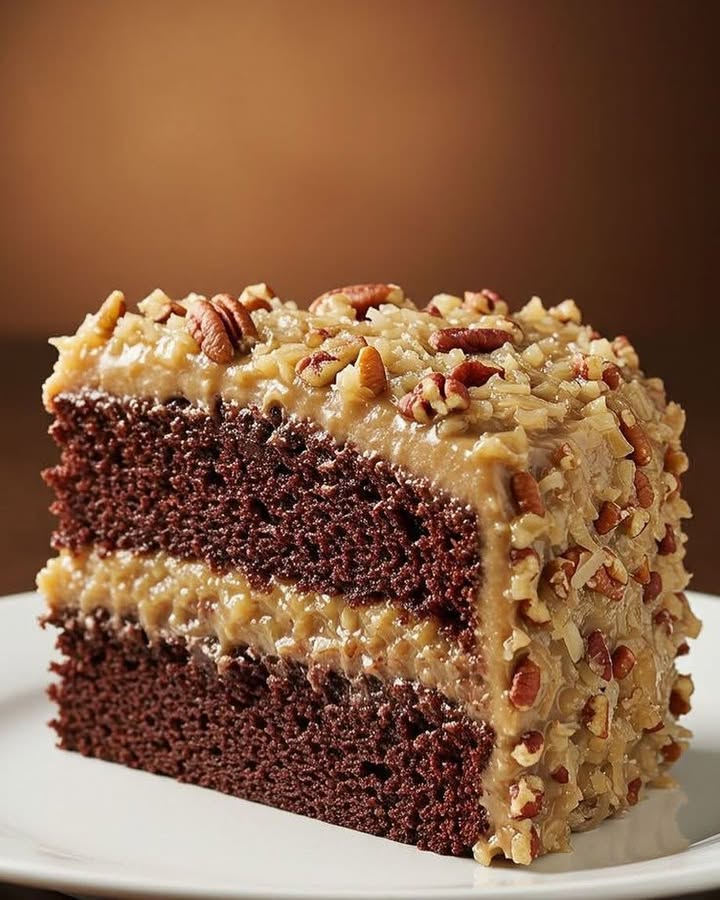
This isn’t just any cake. It’s **moist**, almost pudding-like in the center, with a deep chocolate flavor that’s not too sweet. Then comes the glaze—**creamy, nutty, and studded with toasted coconut** that softens just enough to melt on your tongue. It’s simple enough for a weekend bake, but fancy enough to serve at a dinner party. Plus, it keeps beautifully, so you can make it a day ahead and watch your guests swoon. My kids call it “the cake that disappears before the candles are blown out.”
Perfect Moments for Your Melting Coconut Chocolate Delight
This cake shines anywhere joy is needed:
- Birthday celebrations (it’s my go-to for milestone ages)
- Thanksgiving or Christmas dessert spreads
- “Just because” Sunday afternoons with coffee
- Bringing comfort to a friend in need
- Impressing your in-laws (works every time!)
Ingredients You’ll Need
For the Chocolate Cake:
- 1 cup hot water
- ¾ cup unsweetened cocoa powder
- 1 cup buttermilk (or milk serum)
- 2 cups all-purpose flour
- 2 cups granulated sugar
- 1 teaspoon baking soda
- 1 teaspoon baking powder
- 1 teaspoon salt
- 4 large eggs
- 1 cup vegetable oil
- 1 tablespoon vanilla extract
For the Coconut and Nut Glaze:
- 1 can (12 oz) evaporated milk
- 1 cup packed brown sugar
- ½ cup unsalted butter
- 4 egg yolks
- 2 cups sweetened shredded coconut
- 1 cup chopped walnuts (or pecans)
- 1 teaspoon vanilla extract
Easy Substitutions
No buttermilk? Mix 1 cup milk + 1 tablespoon lemon juice or vinegar. Let sit 5 minutes.
Allergic to nuts? Skip them or use toasted sunflower seeds for crunch.
Prefer dairy-free? Use coconut milk instead of evaporated milk and vegan butter.
No eggs? Try flax eggs (1 tbsp ground flax + 3 tbsp water per egg) for the cake—but keep yolks in the glaze for richness.
Step-by-Step Preparation
Step 1: Bake the Chocolate Cake
Start by whisking cocoa powder into hot water until smooth—this unlocks the deepest chocolate flavor. In a big bowl, combine flour, sugar, baking soda, baking powder, and salt. In another bowl, beat eggs, oil, buttermilk, and vanilla. Pour the wet mix into the dry, then gently fold in the cocoa mixture until just combined. Don’t overmix! Pour into two greased 9-inch round pans. Bake at 180°C (350°F) for 30–35 minutes, or until a toothpick comes out clean. Let cool completely before frosting—this is key! Pro tip: Wrap warm cakes in plastic while cooling to lock in moisture.
Step 2: Make the Coconut-Walnut Glaze
In a medium saucepan, whisk together evaporated milk, brown sugar, butter, and egg yolks. Cook over medium heat, stirring constantly, until the mixture thickens enough to coat the back of a spoon (about 8–12 minutes). You’ll see it turn from pale yellow to a rich caramel tone. Remove from heat and stir in coconut, chopped walnuts, and vanilla. Let it cool to room temperature—it will thicken more as it sits. Chef’s tip: Toast the coconut and nuts lightly in a dry pan first for extra aroma!
Step 3: Assemble Your Melting Coconut Chocolate Delight
Place one cake layer on a serving plate. Spoon a generous amount of the cooled glaze over it—let it drip down the sides just a little for that “homemade” charm. Top with the second layer and spread the rest of the glaze over the top. No need to frost the sides; this cake is meant to be rustic and inviting. If you’re feeling fancy, press extra chopped nuts around the edges. Chill for 1 hour before serving to let the glaze set slightly. But trust me—**it’s just as good at room temperature**!
Timing at a Glance
- Prep time: 25 minutes
- Cook time: 35 minutes
- Glaze cooling time: 45 minutes
- Assembly & chilling: 1 hour (optional but recommended)
- Total time: About 2 hours 45 minutes
Chef’s Secret
For the most **velvety crumb**, use room-temperature eggs and buttermilk. Cold ingredients can cause the batter to seize and bake unevenly. Also, don’t skip sifting the cocoa—it prevents lumps and makes the cake extra smooth.
Fun Fact About This Classic
The original 1957 recipe from the Dallas Morning News used German’s Sweet Chocolate, but today, fewer than 5% of bakers use it. Most rely on cocoa powder for convenience—and honestly, the flavor is just as rich! Plus, using evaporated milk in the glaze gives it that nostalgic, ultra-creamy texture that canned coconut just can’t replicate.
Tools You’ll Need
- Two 9-inch round cake pans
- Electric mixer or whisk
- Medium saucepan
- Wooden spoon or silicone spatula
- Cooling rack
- Offset spatula (optional, for neat glaze spreading)
How to Store Your Melting Coconut Chocolate Delight
Store the cake covered at room temperature for up to 2 days—it actually gets more moist over time! Just keep it away from direct sunlight or heat sources.
For longer storage, refrigerate in an airtight container for up to 5 days. The glaze firms up a bit when cold, so let slices sit out for 15 minutes before serving for that perfect melt-in-your-mouth bite.
Want to freeze it? Assemble the cake without the glaze, wrap layers tightly in plastic and foil, and freeze for up to 2 months. Thaw overnight in the fridge, then make fresh glaze and assemble. The texture stays spot-on!
Pro Tips for the Best Results
- Toast your nuts and coconut for 5 minutes at 175°C (350°F) for deeper flavor.
- Don’t rush the glaze—stir constantly to avoid scrambled eggs!
- Use a serrated knife to slice cleanly through the nutty layers.
- Double the glaze if you love extra filling—this recipe is generous but not overwhelming.
Beautiful Presentation Ideas
- Dust with powdered sugar and top with whole toasted coconut flakes.
- Drizzle with melted dark chocolate in a zigzag pattern.
- Serve with a scoop of vanilla bean ice cream on the side.
- Garnish with edible gold leaf for a holiday showstopper.
- Stack on a vintage cake stand with fresh mint leaves for contrast.
Healthier Twists on This Classic
Love the flavor but want a lighter version? Try these six smart swaps:
- Whole Wheat Wonder: Replace half the all-purpose flour with whole wheat pastry flour. Keeps the texture tender while adding fiber.
- Less Sugar, More Flavor: Reduce sugar to 1½ cups in the cake and use coconut sugar in the glaze—it’s lower on the glycemic index.
- Oil-Free Option: Swap vegetable oil for unsweetened applesauce (1:1 ratio). The cake stays moist but has less fat.
- Gluten-Free Joy: Use a 1:1 gluten-free flour blend. Many taste nearly identical to regular flour these days.
- Protein-Packed Glaze: Add 2 tablespoons of unflavored collagen or whey protein to the glaze—it thickens naturally and adds nutrition without changing taste.
- Dairy-Free Dream: Use canned coconut milk (full-fat) instead of evaporated milk and vegan butter. The glaze becomes even more tropical!
Common Mistakes to Avoid
Mistake 1: Skipping the Cake Cooling Step
If you try to glaze a warm cake, the filling will slide right off—or worse, melt into a puddle. Always let layers cool completely on a rack. I learned this the hard way when my first attempt ended up looking like a chocolate landslide! Pro tip: Speed up cooling by placing pans in the fridge for 20 minutes—but don’t wrap them until they’re warm, not hot.
Mistake 2: Overmixing the Batter
Mixing too much after adding flour develops gluten, which makes the cake tough instead of tender. Stop as soon as no dry streaks remain. I gently fold with a spatula for the last few strokes—it keeps the crumb soft and airy, perfect for that melting coconut chocolate delight experience.
Mistake 3: Not Stirring the Glaze Constantly
Egg yolks + heat = scrambled eggs if you’re not careful. Stir the glaze nonstop with a wooden spoon, scraping the bottom and corners. It should look like thick custard, not curds. If you see lumps, strain it through a sieve—better safe than sorry!
Mistake 4: Using Sweetened Coconut Without Adjusting Sugar
Most shredded coconut is already sweetened. If you add extra sugar to the glaze, it can become cloying. Stick to the recipe’s sugar amount unless you’re using unsweetened coconut—then you might need a touch more.
Mistake 5: Cutting the Cake Too Soon
Even if you chill it, wait at least 1 hour before slicing. The glaze needs time to set so each layer stays intact. Rushing leads to messy, crumbly slices. Patience = perfect portions!
Frequently Asked Questions
Can I make this cake in a 9×13 pan?
Yes! Pour the batter into a greased 9×13-inch pan and bake for 35–40 minutes. The glaze will cover the top completely—just spread it while the cake is cool. You’ll get a sheet cake version that’s perfect for potlucks or feeding a crowd. Just note the texture will be slightly denser than layered rounds, but still wonderfully moist and full of that signature coconut-nut goodness.
Can I use pecans instead of walnuts?
Absolutely! In fact, traditional German chocolate cake often uses pecans. Walnuts add a slightly earthier, bolder crunch, but pecans are sweeter and more buttery. Use whichever you prefer—or even a mix! Just make sure they’re fresh; stale nuts can ruin the whole experience. Toast them lightly for 5 minutes in a dry skillet to bring out their natural oils and aroma.
Why is my glaze too runny?
It likely didn’t cook long enough. The glaze should thicken to a pudding-like consistency on the stove—it will keep thickening as it cools. If it’s still too thin after cooling, return it to low heat and cook another 3–5 minutes, stirring constantly. Never add flour or cornstarch; that changes the texture and makes it gummy. Patience and steady heat are your best friends here.
Can I make this cake ahead of time?
Yes, and it’s actually better the next day! The flavors meld, and the cake becomes even more moist. Bake and assemble it up to 24 hours in advance. Store it covered at room temperature if your kitchen isn’t too warm, or in the fridge if it’s hot. Just take it out 30 minutes before serving so the glaze softens slightly and the chocolate flavor really shines.
Is buttermilk necessary?
Buttermilk adds tenderness and a subtle tang that balances the sweetness. If you don’t have it, make a quick substitute: add 1 tablespoon of lemon juice or white vinegar to 1 cup of milk, stir, and let sit for 5–10 minutes until it thickens slightly. Whole milk works best, but even 2% is fine. Don’t skip the acid—it activates the baking soda for a better rise.
Can I use coconut oil instead of vegetable oil?
You can, but it will add a subtle coconut flavor that might overpower the chocolate. If you love that tropical note, go for it! Use refined coconut oil for neutral taste, or unrefined for a stronger coconut aroma. Just make sure it’s liquid (not solid) when you add it to the batter. I’ve tried both, and while it’s delicious, I prefer vegetable oil for a cleaner chocolate base.
How do I prevent the cake from sticking to the pan?
Grease your pans well with butter or nonstick spray, then line the bottoms with parchment paper. After baking, let the cake cool in the pan for 10 minutes, then run a knife around the edges and invert onto a rack. This combo almost guarantees a clean release. I’ve never lost a layer since I started using parchment—it’s a game-changer for delicate cakes like this one.
Can I double the recipe?
Yes, but mix the batter in two batches. Most home mixers can’t handle double the volume without spilling or uneven mixing. Also, bake in separate pans—don’t pour into one huge pan. Doubling the glaze is fine in one pot, just use a larger saucepan to avoid boil-overs. I’ve made triple batches for weddings, and it always wows!
Why is it called German chocolate cake if it’s not German?
It’s named after Sam German, an American who developed a sweet baking chocolate for Baker’s in 1852. The cake became popular in the U.S. in the 1950s after a recipe using “German’s Sweet Chocolate” went viral (in newspaper form!). No European origin—just a happy accident of naming! Today, most bakers use cocoa powder, but the name stuck because it’s so iconic.
Can I make this cake without eggs?
For the cake, you can use flax or chia eggs (1 tbsp ground + 3 tbsp water per egg). But the glaze relies on egg yolks for richness and structure—without them, it won’t thicken properly. If you must avoid eggs entirely, try a vegan custard base using cornstarch and plant milk, but know it won’t be the same classic texture. I’d recommend keeping the yolks for authenticity!
Final Slice of Joy
This Melting Coconut Chocolate Delight isn’t just a cake—it’s a memory-maker. Whether you’re baking it for a birthday, a holiday, or just because Tuesday deserves chocolate, it delivers comfort in every bite. It’s the kind of dessert that gets passed around with “Oh my gosh, you HAVE to try this!” and leaves empty plates and full hearts. So tie on your apron, grab those mixing bowls, and get ready to hear the sweetest sound: the happy silence of people too busy enjoying your cake to say a word. Save this recipe, share it with someone you love, and let the applause begin!
Melting Coconut Chocolate Delight
Ingredients
Equipment
Method
- Whisk cocoa powder into hot water until smooth.
- In a bowl, combine flour, sugar, baking soda, baking powder, and salt.
- In another bowl, beat eggs, oil, buttermilk, and vanilla.
- Pour wet mix into dry ingredients and gently fold in cocoa mixture until just combined.
- Pour into two greased 9-inch round pans and bake at 180°C (350°F) for 30–35 minutes or until a toothpick comes out clean.
- Let cakes cool completely before frosting.
- In a medium saucepan, whisk evaporated milk, brown sugar, butter, and egg yolks over medium heat until thickened (about 8–12 minutes).
- Stir in coconut, chopped walnuts, and vanilla; let cool to room temperature.
- Place one cake layer on a serving plate and spoon half of the glaze over it.
- Top with the second layer and spread remaining glaze over the top.
- Chill for 1 hour before serving to let the glaze set slightly.