Why These Tropical Pineapple Tartlets Delight Are a Must-Try
There’s something magical about the combination of buttery pastry and sweet, tangy pineapple filling. I first made these Tropical Pineapple Tartlets Delight for a family gathering last summer, and let me tell you—they disappeared faster than I could say “pineapple.” The tropical twist paired with a crispy crust is simply irresistible. Whether you’re baking for a bake sale, a holiday party, or just because, this recipe will make you the star of the show.
The Sweet History Behind Pineapple Tartlets
Pineapple desserts have long been a staple in tropical regions, where the fruit symbolizes warmth and hospitality. In many cultures, pineapple is considered a sign of welcome, making it the perfect ingredient for sharing. My grandma used to make a version of these tartlets when I was little, but hers were more rustic—just a dollop of jam on store-bought pastry. I’ve modernized the recipe by using fresh pineapple and adding a decorative lattice top. Trust me, once you try this homemade version, there’s no going back!
Why You’ll Love This Recipe
This recipe is a winner for so many reasons. First, the flavors are bold yet comforting—a perfect balance of sweetness and acidity. Second, it’s surprisingly simple to make, even if you’re not a seasoned baker. And finally, these tartlets look like they came straight from a fancy bakery, but they’re totally doable at home. Plus, they’re versatile! Serve them warm or cold, as a dessert or a snack. Everyone who tries them falls in love.
Perfect Occasions to Bake These Tartlets
These Tropical Pineapple Tartlets Delight are perfect for any occasion. Bring them to a potluck, and watch them vanish within minutes. They’re also ideal for holidays like Christmas or Easter, where their golden crust and tropical flair add a festive touch. Need a gift for a friend? Package them in a cute box with a ribbon, and you’ve got a thoughtful homemade present. Honestly, any day is a good day to bake these beauties.
Ingredients
Here’s what you’ll need to create these delightful tartlets:
For the Dough:
- 400 g of wheat flour
- 200 g of cold butter, cubed
- 100 g of sugar
- 1 egg + 1 yolk
- 1 tsp vanilla essence
- 1 pinch of salt
- 2–4 tbsp cold water (if needed)
For the Pineapple Filling:
- 1 ripe pineapple (about 600 g)
- 150 g of sugar
- 2 tbsp lemon juice
- 2 tbsp cornstarch dissolved in water
- Optional: vanilla or cinnamon for extra flavor
Substitution Options
If you’re missing an ingredient or want to experiment, here are some swaps:
- Butter: Use margarine or coconut oil for a dairy-free option.
- Pineapple: Canned pineapple works fine if fresh isn’t available.
- Sugar: Swap white sugar for brown sugar for a deeper flavor.
- Cornstarch: Arrowroot powder is a great alternative.
Preparation Section
Step 1: Make the Dough
Start by mixing the flour, sugar, and salt in a large bowl. Add the cold butter cubes and rub them into the dry ingredients using your fingertips. You’re aiming for a sandy texture—it should feel like damp beach sand. Next, beat the egg and yolk together, then mix them into the dough along with the vanilla essence. Knead gently until the dough comes together. If it feels too dry, add a splash of cold water, one tablespoon at a time. Wrap the dough in plastic wrap and chill it in the fridge for 30 minutes. Pro tip: Keep everything cold to ensure a flaky crust.
Step 2: Prepare the Pineapple Filling
Peel and dice the pineapple into small chunks. In a saucepan, combine the pineapple, sugar, and lemon juice. Cook over medium heat for about 10 minutes, stirring occasionally, until the pineapple softens and releases its juices. Stir in the dissolved cornstarch and cook for another 5 minutes until the mixture thickens. Remove from heat and let it cool completely. Pro tip: Taste the filling and adjust the sugar or add a pinch of cinnamon if desired.
Step 3: Assemble the Tartlets
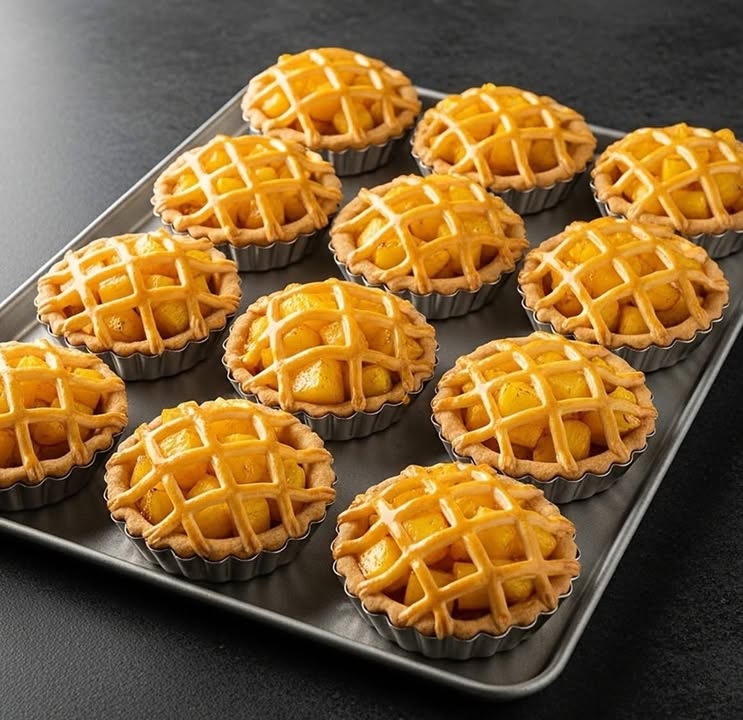
Preheat your oven to 180°C (350°F). Roll out the chilled dough on a lightly floured surface and cut it into circles slightly larger than your tartlet molds. Press the dough gently into the molds, trimming any excess. Spoon the cooled pineapple filling into each shell. For a decorative touch, cut thin strips of dough and weave them into a lattice pattern on top. Brush the tops with a mix of egg yolk and a sprinkle of sugar for a shiny finish.
Step 4: Bake to Golden Perfection
Bake the tartlets for 25–30 minutes, or until the crust turns a beautiful golden brown. Keep an eye on them to avoid over-baking. Once done, let them cool slightly before removing them from the molds. The aroma of buttery pastry mingling with sweet pineapple is enough to make anyone drool. Chef’s tip: Let the tartlets cool completely before storing to prevent sogginess.
Timing
Here’s how long each stage takes:
- Prep time: 45 minutes (including chilling)
- Cooking time: 30 minutes
- Resting time: 30 minutes
- Total time: 1 hour 45 minutes
Chef’s Secret
To enhance the pineapple filling, simmer it with a small piece of vanilla pod or a sprinkle of ground cinnamon. These subtle additions elevate the flavor without overpowering the natural sweetness of the fruit.
Extra Info
Did you know that pineapples are a symbol of friendship and hospitality? That’s why they’re often featured in desserts meant to be shared. It’s no wonder these tartlets bring people together!
Necessary Equipment
You’ll need the following tools to make these tartlets:
- Tartlet molds or a muffin tin
- Rolling pin
- Saucepan
- Pastry brush
- Sharp knife or pizza cutter
Storage
Once cooled, store the tartlets in an airtight container at room temperature for up to 2 days. If you live in a humid climate, keep them in the fridge to maintain their crispiness. For longer storage, freeze the unbaked tartlets. Simply assemble them, place them on a tray, and freeze until solid. Then transfer them to a freezer bag and bake directly from frozen, adding a few extra minutes to the cooking time.
When reheating, pop them in the oven at 150°C (300°F) for 5–10 minutes to refresh the crust. Avoid microwaving, as it can make the pastry soggy.
For gifting, wrap individual tartlets in parchment paper and place them in a decorative box. They’ll stay fresh and look adorable.
Tips and Advice
Here are some tips to make your tartlets shine:
- Use very cold butter for the dough to achieve a flaky texture.
- Don’t skip chilling the dough—it makes rolling easier and prevents shrinkage.
- Make the filling ahead of time to save effort on baking day.
Presentation Tips
Dust the tartlets with powdered sugar for an elegant touch. Arrange them on a platter with fresh mint leaves or edible flowers for a pop of color. Serve them alongside a dollop of whipped cream or a scoop of vanilla ice cream for an extra indulgent treat.
Healthier Alternative Recipes
Want to lighten up this recipe? Try these variations:
- Gluten-Free Option: Substitute wheat flour with almond flour or a gluten-free blend.
- Low-Sugar Version: Reduce the sugar in the filling and use a sugar substitute like stevia.
- Vegan Twist: Replace butter with vegan margarine and use flax eggs instead of regular eggs.
- Fruit Swap: Experiment with mango or peach filling for a different tropical vibe.
- Whole Grain Pastry: Use whole wheat flour for a nuttier flavor and added fiber.
- No-Bake Option: Skip the oven and use a pre-made cookie crust topped with pineapple filling.
Common Mistakes to Avoid
Mistake 1: Overworking the Dough
Over-kneading the dough can make it tough instead of tender. Handle it as little as possible and stop kneading once it holds together. Practical tip: Chill the dough immediately after mixing to relax the gluten.
Mistake 2: Skipping the Chilling Step
Chilling the dough ensures it rolls out smoothly and bakes evenly. Skipping this step can lead to a sticky mess and uneven results. Practical tip: Pop the dough back in the fridge if it starts feeling too soft while rolling.
Mistake 3: Overfilling the Tartlets
Too much filling can bubble over during baking, creating a sticky cleanup. Leave a small gap between the filling and the top edge of the crust. Practical tip: Use a teaspoon to measure the filling for consistency.
Mistake 4: Underbaking the Crust
An underbaked crust will be pale and soggy. Bake until the edges turn golden brown for the best texture. Practical tip: Rotate the tray halfway through baking for even browning.
FAQ
Can I use canned pineapple?
Absolutely! Just drain it well and reduce the sugar slightly since canned pineapple is often sweeter. Fresh pineapple adds a brighter flavor, but canned works in a pinch.
How do I know when the filling is ready?
The filling should thicken and coat the back of a spoon. If it’s still runny, cook it a bit longer. Remember, it will thicken further as it cools.
What size tartlet molds should I use?
Standard tartlet molds are about 3 inches wide. If you don’t have molds, a muffin tin works just as well.
Can I freeze the tartlets?
Yes! Freeze unbaked tartlets on a tray, then transfer them to a bag. Bake them straight from frozen, adding 5–10 extra minutes to the cooking time.
Why is my dough cracking?
Cracking usually happens if the dough is too dry. Add a tiny splash of cold water and knead gently until smooth. Don’t overdo it, though!
Do I have to make a lattice top?
Nope! A simple round of dough over the filling works fine. The lattice is just for fun and presentation.
How long do these tartlets last?
They stay fresh for up to 2 days at room temperature or 4 days in the fridge. Store them in an airtight container to keep them crisp.
Can I add spices to the filling?
Definitely! Cinnamon, nutmeg, or cardamom pairs beautifully with pineapple. Start with a pinch and adjust to taste.
What if I don’t have cornstarch?
Arrowroot powder or tapioca starch are excellent substitutes. Mix them with water before adding to the filling.
Why is my crust soggy?
Sogginess often happens if the filling isn’t cooled before assembling. Always let the filling cool completely to prevent steam from softening the crust.
Final Thoughts
These Tropical Pineapple Tartlets Delight are a celebration of flavor, texture, and creativity. Whether you’re baking for loved ones or treating yourself, they’re sure to bring joy. So grab your apron, roll up your sleeves, and let the magic of pineapple transport you to the tropics—one bite at a time!
Tropical Pineapple Tartlets Delight
Ingredients
Equipment
Method
- Mix the flour, sugar, and salt in a large bowl.
- Rub in the cold butter cubes until the mixture resembles sandy texture.
- Beat the egg and yolk together and mix into the dough with the vanilla essence.
- Knead gently until the dough comes together, adding cold water if necessary.
- Wrap the dough in plastic wrap and chill it in the fridge for 30 minutes.
- Peel and dice the pineapple into small chunks.
- In a saucepan, combine pineapple, sugar, and lemon juice; cook over medium heat for about 10 minutes.
- Stir in the dissolved cornstarch and cook for another 5 minutes until thickened; let cool.
- Preheat your oven to 180°C (350°F).
- Roll out the dough and cut circles slightly larger than your tartlet molds.
- Press the dough into the molds and spoon the cooled pineapple filling into each shell.
- Optionally, create a lattice pattern on top with strips of dough.
- Brush the tops with a mix of egg yolk and sprinkle with sugar.
- Bake for 25–30 minutes until golden brown.
- Let cool slightly before removing from molds.