Have you ever walked into your abuela’s kitchen and been greeted by the cozy scent of warm cinnamon and creamy rice simmering on the stove? That’s the magic I’m bringing you today—with a twist! This no-oven, cookie-crumb-bottomed Creamy Rice Cake Bliss is my go-to dessert when I want to wrap my family in comfort without turning on the oven (especially in summer!). I first tried making it for my niece’s birthday—she’s gluten-sensitive but loves anything creamy and sweet—and guess what? Everyone asked for the recipe!
The Sweet Story Behind Creamy Rice Cake Bliss
Rice pudding has been a humble hero in kitchens across Europe, Latin America, and the Middle East for centuries. In Spain, it’s called arroz con leche, often served warm with a dusting of cinnamon. In Mexico, it’s enriched with condensed milk and served chilled. What I’ve done here is give that beloved tradition a modern no-bake make-over: layering it onto a buttery Maria cookie crust and setting it with just a touch of gelatin for that perfect sliceable texture. No oven needed—just patience and love (and maybe a little extra cinnamon for drama).
Why You’ll Fall in Love with This Creamy Rice Cake Bliss
This dessert is pure comfort in a slice. It’s creamy, cool, and just sweet enough. The rice stays tender but not mushy, the base gives a satisfying crunch, and that hint of lemon zest? Pure sunshine. Plus, it’s incredibly forgiving—if you forget to stir for a minute, no big deal! Kids adore it, guests are impressed, and you feel like a kitchen wizard without breaking a sweat. Best of all? It’s fridge-set, so it actually tastes better the next day.
Perfect Moments for Your No-Oven Rice Cake
- Summer potlucks (no oven = no kitchen sweat!)
- Family Sunday dinners
- Birthday celebrations (elegant yet easy)
- “I need dessert but I’m exhausted” emergencies
- Bringing to a sick friend—it feels like a hug!
Ingredients You’ll Need
- 1 liter (4 cups) whole milk
- 200 g (about 1 cup) short- or medium-grain white rice
- 150 g (¾ cup) granulated sugar
- 1 cinnamon stick
- 1 strip of lemon peel (about 2 inches, no white pith!)
- 1 packet (7 g) unflavored gelatin
- 200 ml (¾ cup + 2 tbsp) heavy cream, cold
- 150 g (about 12–15) Maria cookies (or graham crackers)
- 80 g (⅓ cup) unsalted butter, melted
Easy Ingredient Swaps
- Milk: Use oat or almond milk for a lighter version (but whole milk gives the creamiest result).
- Rice: Arborio or paella rice works beautifully. Avoid long-grain—it won’t get creamy!
- Sugar: Swap with coconut sugar or maple syrup (reduce by 25%).
- Cookies: Graham crackers, digestive biscuits, or gluten-free butter cookies all work.
- Gelatin: Use agar-agar (1 tsp) for a vegan option—dissolve in hot milk before adding.
How to Make Your Creamy Rice Cake Bliss
Step 1: Make the Cookie Crust
Grab your Maria cookies and pop them into a zip-top bag. Crush them with a rolling pin until they’re fine crumbs—think wet sand, not gravel. Mix with melted butter until the crumbs glisten. Press this mixture firmly into the bottom of a 7–8 inch (18–20 cm) springform pan. Don’t skip pressing hard—this keeps your base from crumbling later! Slide it into the fridge while you work on the filling. Pro tip: Use the bottom of a glass to press evenly. Smooth, compact, and ready for magic!
Step 2: Cook the Creamy Rice Base
Pour the milk into a heavy-bottomed pot. Toss in the cinnamon stick and lemon peel. Let it warm over medium heat until tiny bubbles form around the edges—don’t boil yet! Stir in the rice, then lower the heat to a gentle simmer. Now, stir often (every few minutes) for 30–40 minutes. You’ll see the milk thicken, the rice plump up, and your kitchen fill with a dreamy, citrusy-cinnamon aroma. The rice should be tender but still hold its shape. Chef’s tip: Keep the lemon peel large so it’s easy to fish out later!
Step 3: Sweeten and Enrich
Once the rice is cooked, stir in the sugar and cold heavy cream. Let it bubble softly for 5 more minutes—this melds the flavors and adds luxurious richness. Then, with tongs or a spoon, remove the cinnamon stick and lemon peel. Discard them (or sniff them one last time—they smell like dessert heaven!). At this point, your mixture should coat the back of a spoon lightly. Don’t rush this step; that extra simmer time locks in creaminess.
Step 4: Add the Gelatin
While the rice mixture is still hot, bloom the gelatin: sprinkle it over 3 tablespoons of cold water in a small bowl. Let it sit 2–3 minutes until spongy. Then, microwave for 10 seconds or warm over a double boiler until dissolved (it should be liquid, not lumpy). Slowly pour it into the hot rice mixture, whisking constantly. This is the secret to your no-bake set! Mix until fully blended—you shouldn’t see streaks. The gelatin won’t change the flavor, just the texture.
Step 5: Assemble and Chill
Pour the warm rice mixture over your chilled cookie crust. Gently tap the pan on the counter to settle any air bubbles. Let it cool at room temperature for 30–45 minutes—this prevents condensation under the crust. Then, cover loosely with plastic wrap (don’t let it touch the surface!) and refrigerate for at least 4 hours, or ideally overnight. Patience, my friend! That chill time transforms it from soup to sliceable Creamy Rice Cake Bliss.
Step 6: Decorate and Serve
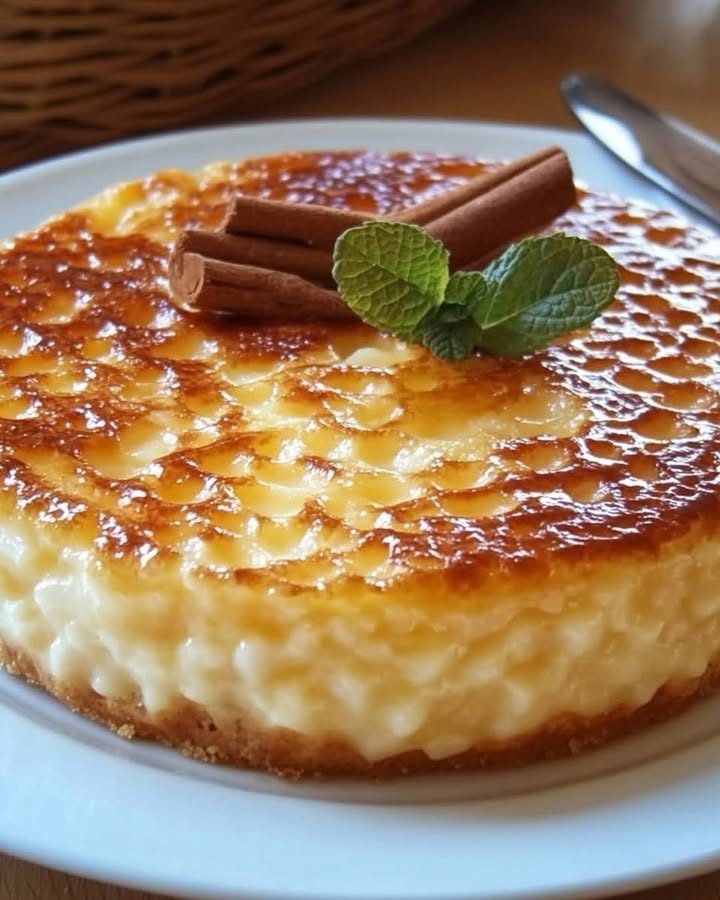
Run a knife around the edge of the pan, then release the springform. Place your cake on a pretty plate. Now, have fun! Dust with ground cinnamon, sprinkle with lemon zest, or even top with a few cookie crumbles for crunch. Serve chilled with a smile—this dessert tastes like love and lazy Sundays.
Timing Breakdown
- Prep time: 20 minutes
- Cooking time: 45 minutes
- Chilling time: 4 hours (or overnight)
- Total time: 5 hours (mostly hands-off!)
- Servings: 8 generous portions
Chef’s Secret for Extra Creaminess
Here’s my grandma’s trick: after cooking the rice, let it cool slightly before adding the cream. Cold cream hitting hot rice creates a silky emulsion that stays smooth even after chilling. Also, don’t skip the lemon peel—it cuts through the richness and keeps every bite bright!
Fun Fact About Rice Pudding
In medieval Spain, rice pudding was considered medicinal! Monks believed it soothed the stomach and calmed the nerves. Today, we just know it soothes cravings and calms tantrums (kids or adults!). Fun twist: in Norway, they hide a whole almond in their rice pudding—find it, and you get a prize!
Tools You’ll Need
- Springform pan (7–8 inch / 18–20 cm)
- Heavy-bottomed saucepan
- Rolling pin or food processor (for crumbs)
- Whisk
- Measuring cups and spoons
- Plastic wrap
How to Store Your Creamy Rice Cake Bliss
Keep your rice cake covered tightly in the fridge. Press plastic wrap directly on the surface to prevent a skin from forming. It stays fresh and delicious for up to 4 days. The flavors actually meld and deepen over the first 24 hours—so day two is often better than day one!
Don’t freeze this dessert. The gelatin and dairy don’t hold up well after thawing—you’ll get a watery, grainy texture. Better to make it fresh or prep it a day ahead and refrigerate.
If you’re serving leftovers, let the cake sit at room temperature for 10 minutes before slicing. Cold desserts can feel too firm straight from the fridge. A warm knife (dipped in hot water, wiped dry) gives you clean, beautiful slices every time.
Extra Tips for Success
- Use full-fat dairy—it’s worth it for texture and flavor.
- Don’t rush the rice cooking. Low and slow = creamy, not gluey.
- Let the gelatin dissolve fully—lumps ruin the smoothness!
- Chill overnight for best results. Trust the process.
Beautiful Ways to Present Your Cake
- Dust with cinnamon in a lace pattern using a stencil.
- Top with candied lemon peel for a gourmet touch.
- Drizzle with dulce de leche just before serving.
- Serve with a dollop of whipped cream and fresh berries.
- Use edible flowers for a spring or summer gathering.
6 Healthier or Creative Variations
Want to switch things up? Try these tasty twists on your Creamy Rice Cake Bliss:
1. Coconut Dream Version
Swap half the milk for coconut milk, use shredded coconut in the crust, and top with toasted coconut flakes. Tropical, rich, and dairy-light!
2. Chocolate Swirl Delight
Melt 50g dark chocolate and swirl it into the rice mixture before chilling. The contrast of creamy rice and deep chocolate is irresistible.
3. Berry-Layered Beauty
After the crust sets, spread a thin layer of mixed berry compote, then pour the rice mix on top. When sliced, you get a gorgeous pink-and-white ripple.
4. Vegan Rice Cake
Use oat milk, coconut cream, agar-agar instead of gelatin, and vegan cookies. Sweeten with maple syrup. Just as creamy, totally plant-based!
5. Pumpkin Spice Fall Special
Add ½ cup pumpkin puree and 1 tsp pumpkin spice to the rice while cooking. Perfect for autumn gatherings—warm, cozy, and seasonal.
6. Matcha Zen Cake
Whisk 1 tsp matcha powder into the warm milk before adding rice. The earthy green tea flavor balances the sweetness beautifully—and it’s stunning to look at!
Common Mistakes to Avoid
Mistake 1: Using the Wrong Rice
Long-grain rice like basmati won’t release enough starch to get creamy. You’ll end up with separate grains floating in milk—not the lush texture we want. Always choose short- or medium-grain rice like Arborio, sushi rice, or paella rice. These types naturally thicken as they cook, giving you that signature spoonable softness. Pro tip: Rinse the rice first if you want less starch—but for this dessert, I skip rinsing to keep it extra creamy!
Mistake 2: Skipping the Chill Time
Trying to serve this after just 1 hour in the fridge? It’ll be soup, not cake! Gelatin needs time (and cold) to set properly. Rushing leads to a messy, un-sliceable puddle. Plan ahead—make it the night before. The waiting pays off with clean, elegant slices that hold their shape. Plus, the flavors marry beautifully overnight.
Mistake 3: Overheating the Gelatin
Boiling gelatin destroys its setting power. If you dump powdered gelatin straight into hot liquid without blooming, or microwave it too long, your cake won’t firm up. Always bloom it in cold water first, then gently dissolve with low heat. It should be liquid and clear—not bubbly or foamy. When in doubt, stir it into the rice mix off the heat.
Mistake 4: Not Pressing the Crust Firmly
A loose, crumbly base ruins the experience. If you just toss crumbs in the pan and barely press, it’ll fall apart when you slice. Use the back of a glass or measuring cup to press hard and evenly. Chill it before adding filling so it “sets” and holds together. Your future self (holding a perfect slice) will thank you!
Mistake 5: Forgetting to Remove Lemon and Cinnamon
Leaving the lemon peel or cinnamon stick in during chilling might seem harmless—but they’ll keep infusing, making your dessert bitter or overly spiced. Always fish them out after cooking. I even double-check with a spoon! A clean, balanced flavor is what makes this Creamy Rice Cake Bliss so addictive.
Frequently Asked Questions
Can I make this without gelatin?
Yes, but it won’t hold its shape like a cake—it’ll be more like soft rice pudding in a crust. For a set version without gelatin, use 1 teaspoon of agar-agar. Dissolve it in 2 tablespoons of hot water, then stir into the hot rice mixture. Agar needs to boil briefly to activate, so simmer 1–2 minutes after adding.
How do I know when the rice is done?
The rice should be tender but not mushy—al dente, like a good risotto. The mixture will coat your spoon, and most of the liquid will be absorbed. Stir and watch: if it leaves a trail on the pot bottom that slowly fills, it’s ready. Cooking time varies by rice type, so start checking at 30 minutes.
Can I use low-fat milk?
You can, but the texture will be thinner and less luxurious. Whole milk’s fat content is key for richness and mouthfeel. If you must use low-fat, add 2 extra tablespoons of cream or a spoonful of cornstarch slurry (1 tsp cornstarch + 1 tbsp cold milk) to help thicken.
Why is my cake watery?
Watery texture usually means the gelatin wasn’t activated properly (see Mistake 3) or the rice wasn’t cooked long enough to absorb the liquid. Also, if you added the cream while the mixture was too hot, it might have separated. Always cook until thick, cool slightly before adding cream, and use gelatin correctly.
Can I make this gluten-free?
Absolutely! Use gluten-free Maria-style cookies or graham crackers for the base. Ensure your gelatin is gluten-free (most are). Double-check rice packaging—some brands process near wheat, so choose certified GF if needed. The rest of the ingredients are naturally gluten-free.
How far in advance can I make this?
Up to 2 days ahead! Store covered in the fridge. It actually tastes better on day two as flavors blend. Just hold off on decorating with fresh zest or berries until serving day to keep them vibrant.
Can I use powdered cinnamon instead of a stick?
Yes, but use only ½ teaspoon—and add it with the sugar in Step 3. Whole sticks infuse gently; powder can make the mixture gritty or muddy if added too early. Stick to the stick for best results, but powder works in a pinch.
Why do I need to cool it before refrigerating?
Putting a hot mixture straight into the fridge causes condensation under the crust (soggy base!) and forces your fridge to work too hard. Letting it cool 30–45 minutes at room temp ensures even chilling and a crisp crust.
Can kids help make this?
Yes! They can crush cookies, mix the crust, stir the rice (with supervision), and decorate the top. It’s a great no-bake project for little hands. Just keep them away from the hot stove during cooking.
What if I don’t have a springform pan?
Use a regular cake pan lined with parchment paper (sides and bottom). Leave a parchment “handle” over the edges to lift the cake out after chilling. It’s a bit trickier to remove cleanly, but works! A pie dish is another option—just serve slices straight from it.
Wrap-Up: Your New Favorite Comfort Dessert
This Creamy Rice Cake Bliss is more than a recipe—it’s a hug on a plate, a memory in every bite, and proof that the best desserts don’t need an oven. Whether you’re feeding three or thirty, it delivers creamy comfort with minimal fuss. So grab that cinnamon stick, crush those cookies, and let your fridge do the work. You’ve got this—and your future self (and guests!) will be so glad you did.
Creamy Rice Cake Bliss
Ingredients
Equipment
Method
- Crush Maria cookies into fine crumbs and mix with melted butter; press into a springform pan and chill.
- Heat milk with cinnamon stick and lemon peel in a pot.
- Stir in rice; simmer and cook for 30-40 minutes, stirring regularly.
- Add sugar and heavy cream to the cooked rice; simmer for an additional 5 minutes.
- Remove cinnamon stick and lemon peel, then bloom and add gelatin to the mixture.
- Pour warm rice mixture over chilled cookie crust; let cool and set in the fridge for at least 4 hours.
- Once set, release the springform and decorate before serving.