Ever tried to impress guests with a dessert so pretty it belongs in a magazine—and so easy you could make it while chatting on the phone? That’s exactly what happened the first time I whipped up my Delicious Strawberry Tiramisu Cups. My niece walked into the kitchen, took one look at the ruby-red layers peeking through the glass, and whispered, “Is that edible art?” Spoiler: it’s better. It’s dessert you can eat with a spoon, share with a friend, or sneak a bite from when no one’s looking. Let me tell you why these little cups are pure magic.
The Sweet Story Behind Strawberry Tiramisu Cups
Traditional tiramisu was born in Italy—espresso-soaked ladyfingers layered with mascarpone cream, dusted with cocoa, and named “pick me up” for good reason. But life’s too short for just one version! When summer strawberries hit their peak in my garden (and my farmers’ market), I thought, “Why not give tiramisu a fruity, fresh twist?” And just like that, Strawberry Tiramisu Cups were born. No coffee, no cocoa—just layers of pillowy cake, luscious mascarpone, and ruby-bright strawberry puree. It’s a modern remix that’s become my go-to for everything from birthdays to “just because” moments.
Why You’ll Fall Head Over Heels for This Recipe
Let’s be real: not all desserts are this forgiving and this stunning. These cups come together in under 20 minutes of active work. No baking. No fancy piping. Just layer, chill, and dazzle. The blend of tart strawberries and creamy mascarpone is like a summer breeze in dessert form—light, refreshing, but still rich enough to feel indulgent. Plus, serving them in individual glasses means no slicing, no mess, and total portion control… or, let’s be honest, total portion temptation!
Perfect Moments for Strawberry Tiramisu Cups
These little beauties shine everywhere:
- Bridal or baby showers—elegant and easy to serve
- Summer dinner parties (they don’t wilt in the heat like cakes might)
- Valentine’s Day (hello, natural pink hues!)
- Farmer’s market pop-ups or bake sales (they sell like hotcakes!)
- Weeknight treat when you need a “me moment” with a spoon
Ingredients You’ll Need
- 250 g fresh strawberries (plus extra for garnish)
- 200 g Sunny cakes (or ladyfingers/sponge fingers)
- 250 g mascarpone cheese
- 1 cup heavy cream (cold)
- 1/2 cup granulated sugar
- 1/2 cup strawberry puree (see prep below)
- 1/4 cup strawberry liqueur (optional—but oh-so-good)
Smart Substitutions
No mascarpone? Use full-fat cream cheese blended with a splash of heavy cream. Prefer dairy-free? Swap in coconut cream and vegan mascarpone-style spread. Can’t find Sunny cakes? Any soft sponge cake or even vanilla wafers work. Skip the alcohol entirely—just use extra puree or a splash of orange juice for brightness. And if strawberries aren’t in season, frozen (thawed and drained) work just fine!
How to Make Delicious Strawberry Tiramisu Cups
Step 1: Whip the Creamy Dream Layer
In a large bowl, combine the mascarpone, cold heavy cream, and sugar. Beat on medium speed until smooth, thick, and cloud-like—about 2–3 minutes. Don’t overbeat, or it may turn grainy. You want a texture that holds soft peaks but still melts on your tongue. This is the heart of your dessert, so take a moment to taste it. Sweet? Creamy? Perfect. Pro tip: chill your mixing bowl and beaters for 10 minutes first—it helps the cream whip faster and fluffier.
Step 2: Prepare the Strawberry Soak
Blend 150 g of your fresh strawberries until smooth. Strain if you dislike seeds (I leave mine in for texture!). Mix the puree with the strawberry liqueur if using. The aroma alone will transport you to a sun-drenched orchard. This vibrant liquid isn’t just flavor—it’s what transforms dry cake into tender, juicy layers. If skipping alcohol, add a squeeze of lemon juice to brighten it up.
Step 3: Build the First Layer
Quickly dip each Sunny cake into the strawberry mixture—just 1–2 seconds per side. They should be moist but not soggy. Line the bottom of your serving glasses (I use 6–8 oz tumblers) with these soaked pieces, breaking them to fit if needed. Press gently so they form a snug base. This step feels like crafting edible stained glass—each glass gets its own little mosaic of pink-tinged cake.
Step 4: Layer with Cream and Repeat
Spoon or pipe a generous layer of your mascarpone cream over the cake—about 1/3 of the way up the glass. Then add another layer of soaked cake, followed by more cream. Repeat until you’re about 1/2 inch from the top. I usually get two full layers per cup. Keep your movements gentle; you don’t want to crush the cake. Chef’s tip: use a pastry bag with a wide tip for neat, restaurant-style layers.
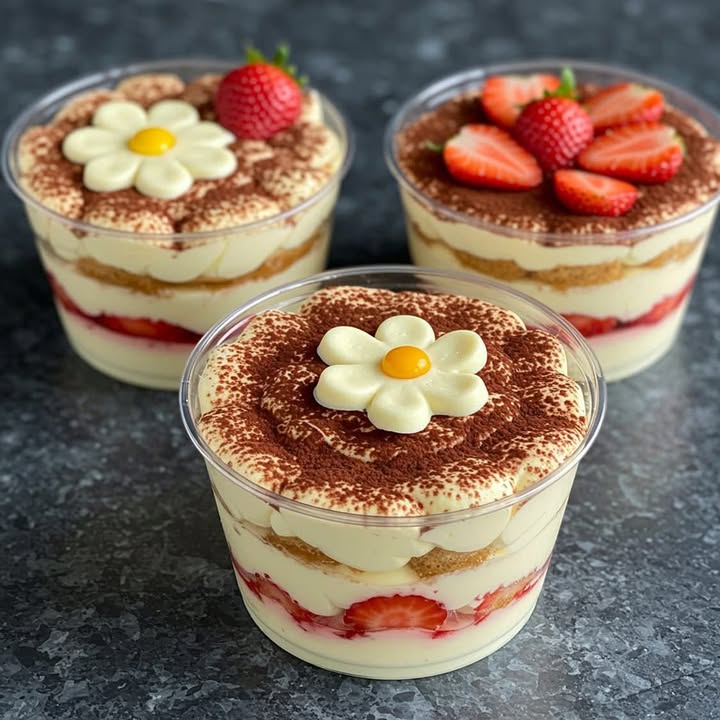
Step 5: Chill and Crown with Fresh Berries
Top each cup with a halved or whole fresh strawberry—something eye-catching and juicy. Then cover lightly with plastic wrap and refrigerate for at least 4 hours (overnight is even better!). This rest time lets the flavors marry and the texture soften into pure velvet. Don’t skip chilling—it’s when the magic truly happens. After 4 hours, you’ll uncover not just dessert, but a little masterpiece.
Timing at a Glance
- Prep time: 20 minutes
- Chill time: 4 hours (minimum)
- Total time: 4 hours 20 minutes
- Servings: 6 individual cups
Chef’s Secret for Next-Level Flavor
Add a pinch of finely grated lemon zest to your mascarpone mixture. It cuts through the sweetness and makes the strawberry flavor pop like fireworks. I started doing this after a summer trip to Italy, where nonna always added citrus to fruit desserts. Trust me—it’s the secret whisper that makes guests ask, “What’s in this?!”
Fun Fact About This Dessert
Though tiramisu means “pick me up,” my version is more “make me happy.” Italians traditionally avoid fruit in tiramisu, but modern bakers worldwide have embraced seasonal twists. My Strawberry Tiramisu Cups won “Best Dessert” at our local summer fair—not because they’re fancy, but because they taste like joy.
Tools You’ll Need
- Hand mixer or stand mixer
- Blender or food processor
- 6–8 clear glasses or mason jars (6–8 oz)
- Measuring cups and spoons
- Spatula
- Fine mesh strainer (optional, for seedless puree)
How to Store Your Strawberry Tiramisu Cups
These cups are best enjoyed within 24–48 hours. After that, the cake may get too soft, and the strawberries can weep. Always store them covered in the fridge—plastic wrap pressed directly on the surface prevents skin formation.
If you’re prepping for an event, assemble everything except the final strawberry garnish the night before. Add fresh berries just before serving to keep them bright and firm. Moisture is the enemy of crispness, so never garnish too early!
Freezing? Not recommended. The mascarpone-cream mixture can separate when thawed, and strawberries turn mushy. But hey, they’re so delicious, they rarely last long enough to consider freezing!
Extra Tips for Success
- Use ripe but firm strawberries—they yield more flavor and better puree.
- If your cream feels too soft, chill it 10 minutes before layering.
- Label and date containers if storing—these disappear fast!
- Double the recipe for crowd-pleasing ease.
Presentation That Wows
- Serve in vintage teacups for a shabby-chic vibe
- Add edible flowers on top for weddings
- Drizzle with melted white chocolate just before serving
- Wrap jars with twine and mini chalkboard tags for markets
- Layer with crushed freeze-dried strawberries for intense color
Healthier Twists on Strawberry Tiramisu Cups
Want to lighten it up without losing flavor? Try these 6 guilt-free versions:
- Greek Yogurt Swap: Replace half the mascarpone with thick Greek yogurt. You’ll get protein and tang without sacrificing creaminess.
- Coconut Cream Delight: Use full-fat coconut cream and dairy-free “cheese” for a vegan treat that’s still rich.
- Low-Sugar Berry Bliss: Sweeten with monk fruit or erythritol, and use unsweetened almond milk cake.
- Protein-Packed: Blend in unflavored collagen or vanilla protein powder into the cream layer.
- Gluten-Free Joy: Use gluten-free sponge fingers or almond cake cubes.
- Superfood Boost: Swirl in a teaspoon of acai or beet powder into the puree for antioxidants and stunning color.
Common Mistakes to Avoid
Mistake 1: Soaking the Cakes Too Long
Dunking your Sunny cakes for more than 2 seconds turns them into mush. They’ll sink into the cream and ruin your layers. The goal is moist, not soggy. Think “quick dip, like testing bathwater.” Pro tip: pour the puree into a shallow dish so you can control the soak time easily.
Mistake 2: Skipping the Chill Time
Rushing to serve right after assembly means missing the flavor fusion and texture magic. The cake needs time to soften, and the cream needs to set. Without chilling, it’s just cake in cream—not tiramisu. Set a timer or make it the night before. Patience = perfection.
Mistake 3: Overwhipping the Cream
Whipping too long or too fast can cause the mascarpone and cream to break or turn grainy. Stop as soon as you see soft peaks that hold their shape. If it curdles, gently fold in a spoonful of unwhipped cream to smooth it out.
Mistake 4: Using Underripe Strawberries
Hard, sour berries make a dull puree and lack that lush sweetness. Wait for deep red, fragrant strawberries—they should smell like summer. If in doubt, taste one raw first. No aroma? They won’t shine in your dessert.
Mistake 5: Overloading with Liqueur
Strawberry liquor adds depth, but too much makes the cakes soggy and overpowers the fruit. Stick to 1/4 cup max for the whole batch. For kids or non-drinkers, skip it—the puree alone is plenty flavorful.
Frequently Asked Questions
Can I make Strawberry Tiramisu Cups ahead of time?
Absolutely! In fact, they taste better after 4–24 hours in the fridge. The flavors meld, and the texture becomes dreamy. Just hold off on the fresh strawberry garnish until right before serving to keep it vibrant and perky.
What’s the best cake to use if I can’t find Sunny cakes?
Any soft sponge finger works—ladyfingers, Savoiardi, or even a light vanilla cake cut into strips. Avoid dense cakes like pound cake; they won’t absorb the puree well and can feel heavy in the cup.
Is mascarpone cheese essential?
It’s traditional and gives that luxurious silkiness, but you can substitute with full-fat cream cheese blended with 2 tablespoons of heavy cream. The flavor will be tangier, but still delicious in its own right.
Can I use frozen strawberries?
Yes! Thaw them completely, then drain well in a sieve to remove excess water. Pat dry with a paper towel before blending. Frozen berries are often picked at peak ripeness, so they can actually be sweeter than bland supermarket fresh ones.
How long do these last in the fridge?
Up to 2 days, but ideally serve within 24 hours. After that, the cake gets too soft and the strawberries may release water, making the layers less distinct. Cover tightly to avoid absorbing other fridge odors.
Do I really need to strain the puree?
Only if you dislike seeds. The seeds add fiber and texture, but for a super-smooth layer (especially for kids), strain it through a fine mesh sieve. I usually skip it—seeds mean real fruit!
Can I make a large batch in one dish instead of individual cups?
Yes! Use a trifle bowl or 8×8 pan. Layer the same way, then cut servings like a cake. But individual cups are easier to serve, store, and sell—plus, everyone gets their own perfect portion.
What if my cream won’t thicken?
Your cream or bowl might’ve been too warm. Chill everything and try again. You can also add 1/2 teaspoon of cornstarch while whipping to help stabilize it—but don’t overdo it, or it’ll taste chalky.
Are these kid-friendly?
Definitely! Just skip the strawberry liqueur and use a splash of apple juice or extra puree. Kids love the pink layers and creamy texture—it’s like edible confetti.
Can I add other fruits?
While strawberries are the star, you can layer in raspberries or a hint of peach puree. But stick to one fruit to keep the flavor clean. Mixing too many can muddy the delicate balance that makes Delicious Strawberry Tiramisu Cups so special.
A Final Sweet Note
These Strawberry Tiramisu Cups aren’t just dessert—they’re little hugs in a glass. They’ve helped me win bake sales, comfort friends after tough days, and turn ordinary Tuesdays into something worth celebrating. Whether you’re selling them at a market or sharing them around your kitchen table, they carry a message: life is sweet, especially when layered with love (and fresh strawberries). So gather your glasses, grab that carton of berries, and make a batch. Your future self—and everyone lucky enough to taste it—will thank you. Now go on… your spoon’s waiting! 🍓
Delicious Strawberry Tiramisu Cups
Ingredients
Equipment
Method
- In a large bowl, combine mascarpone, cold heavy cream, and sugar. Beat on medium speed until smooth and thick, about 2-3 minutes.
- Blend 150 g of strawberries until smooth, strain if desired. Mix puree with strawberry liqueur if using.
- Dip each Sunny cake into the strawberry mixture for 1-2 seconds per side and line the bottom of serving glasses with soaked pieces.
- Spoon or pipe a layer of mascarpone cream over the cake, about 1/3 of the way up the glass, then add another layer of soaked cake followed by more cream. Repeat until filling is about 1/2 inch from the top.
- Top each cup with a halved or whole fresh strawberry, lightly cover with plastic wrap, and refrigerate for at least 4 hours.