A Burst of Tropical Sunshine in Every Bite
There’s something magical about the smell of freshly baked cake mingling with the sweet tang of pineapple. I remember the first time I made this Tropical Pineapple Delight Cake. It was a rainy afternoon, and my kitchen felt like a tropical island. The vibrant aroma of pineapple juice filled the air, and when I took that first bite, it was pure bliss. This recipe is not just a dessert; it’s a celebration of simplicity and flavor. Whether you’re baking for family or friends, this cake will win hearts—guaranteed!
The Sweet Story Behind This Recipe
This cake has roots in tropical traditions where pineapples are king. Historically, pineapples symbolize warmth and hospitality, making them perfect for sharing at gatherings. Over the years, recipes have evolved from elaborate layered cakes to simpler versions like this one. My version skips the fuss but keeps the charm. When testing this recipe, I wanted something that even a beginner baker could master. And trust me, once you try it, you’ll see why it’s become a staple in my home.
Why You’ll Love This Recipe
What makes this Tropical Pineapple Delight Cake so irresistible? For starters, it’s easy enough for anyone to make, yet impressive enough to serve at parties. The juicy pineapple glaze seeps into the soft sponge, creating bursts of flavor in every bite. Plus, there’s no need for fancy layers or complicated techniques. Just mix, bake, glaze, and decorate. It’s perfect for those days when you want something delicious without hours of effort.
When to Serve This Tropical Treat
This cake shines during summer barbecues, potlucks, or cozy family dinners. Imagine slicing into it after a barbecue feast or serving it as a show-stopping dessert at brunch. It’s also ideal for birthdays or holiday gatherings because it pairs well with everything from ice cream to coffee. Honestly, any excuse to bake this beauty is a good one!
Ingredients You’ll Need
- For the cake:
- 250g (2 cups) all-purpose flour
- 300g (1 cup) granulated sugar
- 1 teaspoon sodium bicarbonate (baking soda)
- 2 large eggs
- 225ml (1 cup) sugar-free pineapple juice
- 1 teaspoon vanilla extract
- 120ml (½ cup) vegetable oil
- For the glaze:
- 200g (1 cup) powdered sugar
- 60ml (¼ cup) pineapple juice
- 2 tablespoons unsalted butter, softened
- 1 teaspoon vanilla extract
- To decorate:
- 1 cup fresh pineapple wedges
- Optional: coconut flakes, whipped cream
Substitution Options
If you’re missing an ingredient or want to tweak the recipe, here are some swaps:
- Use melted butter instead of vegetable oil for a richer flavor.
- Swap pineapple juice with orange juice for a citrus twist.
- Replace powdered sugar with honey for a sticky-sweet glaze.
- Omit dairy by using plant-based butter or oil in the glaze.
Feel free to experiment—it’s hard to go wrong with this forgiving recipe!
Step 1: Preparing Your Tools
Before diving in, preheat your oven to 175°C (350°F). Grease and flour two round molds (8-inch each) or one larger 9-inch mold. I always use nonstick spray followed by a light dusting of flour to ensure the cake slides out effortlessly later. Pro tip: Line the bottom of your pans with parchment paper for extra insurance against sticking.
Step 2: Mixing Dry Ingredients
In a large mixing bowl, whisk together the flour, sugar, and baking soda. Watching the powdery mixture come together feels oddly satisfying. Make sure to break up any lumps in the flour for a smooth batter. This base gives structure to our Tropical Pineapple Delight Cake, so don’t skip this step!
Step 3: Combining Wet Ingredients
In another bowl, beat the eggs until frothy before adding pineapple juice, vanilla extract, and vegetable oil. The golden hue of the juice adds a sunny touch to the mix. Whisk gently until combined, imagining the tropical vibes coming alive in your kitchen. Now pour this wet mixture into the dry ingredients and stir until fully incorporated.
Step 4: Baking Time
Pour the batter evenly into your prepared molds and pop them into the oven. Bake for 30–35 minutes, or until a toothpick inserted comes out clean. As the cake bakes, your kitchen will fill with the warm scent of vanilla and pineapple—a preview of the deliciousness ahead. Chef’s tip: Rotate the pans halfway through baking for even cooking.
Step 5: Glazing While Hot
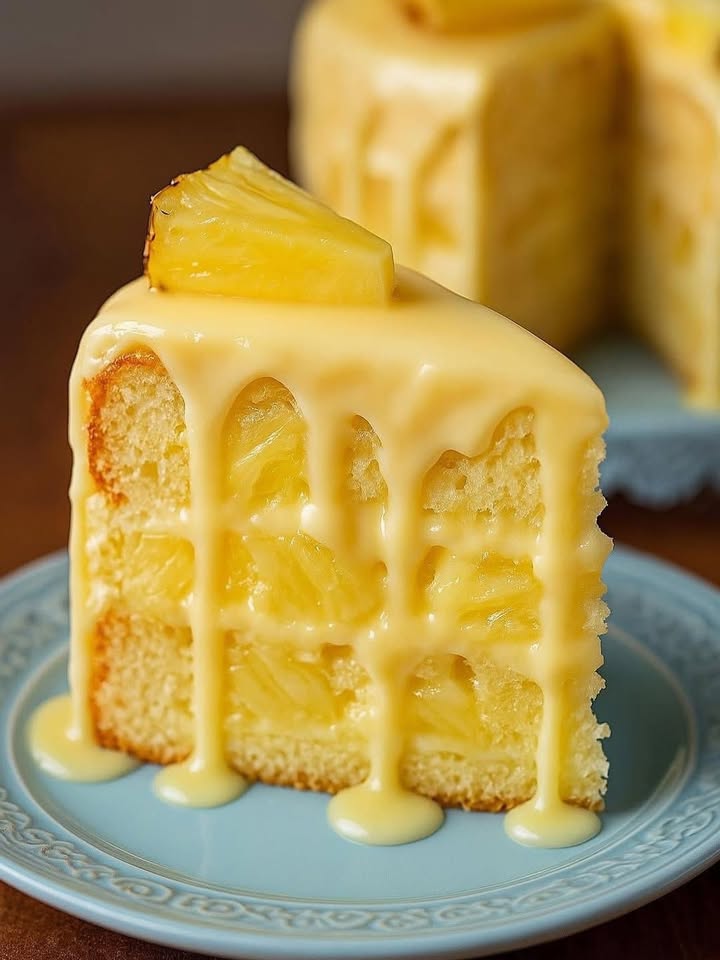
Once the cake is done, let it cool slightly in the pan. Then, while it’s still warm, grab a fork and poke holes all over the surface. Slowly drizzle the glaze over the top, letting it sink into the cake. This step transforms the texture, making it moist and decadent. Patience pays off here; resist cutting into it until it’s completely cool!
Step 6: Decorating Like a Pro
Now comes the fun part—decorating! Arrange fresh pineapple wedges on top for a pop of color. Sprinkle coconut flakes if you’re feeling fancy, or add dollops of whipped cream for extra indulgence. Presentation matters, but remember, this cake tastes amazing no matter how it looks.
Timing Breakdown
| Task | Time |
|---|---|
| Preparation | 15 minutes |
| Baking | 30–35 minutes |
| Cooling & Glazing | 20 minutes |
| Total | 65–70 minutes |
Chef’s Secret
Here’s a little trick: toast your coconut flakes before sprinkling them on top. Simply toss them in a dry skillet over medium heat until golden brown. This adds a nutty crunch that complements the soft cake beautifully.
An Interesting Tidbit About Pineapples
Did you know pineapples take nearly two years to grow? That’s dedication! No wonder their sweet, tangy flavor feels so rewarding. Next time you enjoy this cake, think about the journey those pineapples went through to reach your plate.
Necessary Equipment
- Mixing bowls
- Whisk or electric mixer
- Round cake molds (8-inch or 9-inch)
- Parchment paper
- Fork for poking holes
- Measuring cups and spoons
How to Store This Cake
Let’s talk storage. Once cooled, cover the cake tightly with plastic wrap or store it in an airtight container. It stays fresh at room temperature for up to three days. If you live in a hot climate, refrigerate it to extend its life. Just bring it back to room temperature before serving for optimal flavor.
For longer storage, freeze individual slices wrapped in foil. They’ll keep for up to two months. Simply thaw overnight in the fridge before enjoying again.
Remember, this cake doesn’t last long in my house—so I rarely need to worry about freezing it!
Tips and Advice
- Don’t overmix the batter; a few lumps are okay.
- Use room-temperature eggs for better emulsification.
- Double-check your baking soda isn’t expired—it’s key to the cake rising properly.
- Make the glaze thicker by adding more powdered sugar, or thinner with extra juice.
Presentation Ideas
- Serve slices on colorful plates for a festive touch.
- Garnish with mint leaves for freshness.
- Create a mini version using cupcake tins for individual servings.
Healthier Alternatives
Want to lighten things up? Try these variations:
- Gluten-Free Option: Swap regular flour with almond or oat flour.
- Low-Sugar Version: Reduce sugar by half and add mashed bananas for natural sweetness.
- Vegan Twist: Replace eggs with flaxseed meal mixed with water.
- Protein-Packed: Add a scoop of vanilla protein powder to the batter.
- Spiced Delight: Include cinnamon or nutmeg for warmth.
- Fruit Medley: Mix in diced mango or papaya for added fruitiness.
Mistake 1: Skipping the Poking Step
Some folks forget to poke holes in the cake before pouring the glaze. Without those holes, the glaze won’t soak in properly, leaving the cake less flavorful. Grab a fork and get pricking—it makes all the difference!
Mistake 2: Overbaking the Cake
Overbaking leads to a dry cake, which nobody wants. To avoid this, start checking for doneness around the 25-minute mark. Insert a toothpick—if it comes out clean, you’re golden. Pro tip: Ovens vary, so rely on visual cues too.
Mistake 3: Rushing the Cooling Process
Patience is key here. Pouring glaze onto a piping-hot cake might cause it to slide right off. Let the cake cool slightly before applying the glaze for best results.
Frequently Asked Questions
Can I use canned pineapple juice?
Absolutely! Just make sure it’s unsweetened to balance the flavors. Canned juice works just as well as fresh.
Do I have to use two cake molds?
Nope! One larger mold works fine. Just adjust the baking time slightly since the cake will be thicker.
What if I don’t have vanilla extract?
You can omit it, but the cake may lack depth. Almond extract is a great alternative if you have it.
Can I freeze leftovers?
Yes! Wrap slices individually in foil and freeze for up to two months. Thaw in the fridge before serving.
How do I prevent the cake from sticking?
Grease and flour your pans thoroughly, or line the bottoms with parchment paper for foolproof removal.
Is this cake kid-friendly?
Definitely! Kids love the sweet pineapple flavor and soft texture. Plus, they’ll enjoy helping decorate it.
Can I reduce the sugar?
Yes, you can cut the sugar by half without affecting the structure. The glaze provides plenty of sweetness.
What other fruits pair well with pineapple?
Mango, kiwi, and berries complement pineapple beautifully. Feel free to experiment with toppings.
Why does the recipe call for sugar-free juice?
Using sugar-free juice prevents the cake from becoming overly sweet. Regular juice works too, though.
Can I make this gluten-free?
Yes, swap regular flour with a gluten-free blend. Ensure your blend contains xanthan gum for structure.
Final Thoughts
This Tropical Pineapple Delight Cake proves that simple recipes can create unforgettable moments. From its juicy glaze to its fluffy interior, every element is designed to delight. So gather your ingredients, crank up the oven, and let this cake transport you to paradise—one slice at a time. Happy baking!
Tropical Pineapple Delight Cake
Ingredients
Equipment
Method
- Preheat your oven to 175°C (350°F) and grease and flour two round 8-inch molds or one 9-inch mold.
- In a large mixing bowl, whisk together the flour, sugar, and baking soda until smooth.
- In another bowl, beat the eggs until frothy, then add pineapple juice, vanilla extract, and vegetable oil.
- Pour the wet mixture into the dry ingredients and stir until fully incorporated.
- Pour the batter evenly into the prepared molds and bake for 30–35 minutes until a toothpick comes out clean.
- Once baked, cool the cake slightly, poke holes in the surface, and drizzle the glaze over while still warm.
- Decorate with fresh pineapple wedges, and sprinkle with coconut flakes or dollops of whipped cream if desired.