Why This Irresistibly Simple Peanut Butter Cake Will Steal Your Heart
Picture this: a slice of cake so creamy, so rich, and so peanut-buttery that it makes your taste buds do a happy dance. That’s exactly what happened when I first made this Irresistibly Simple Peanut Butter Cake. It was for my best friend’s birthday—she’s a peanut butter fanatic—and let me tell you, this cake became the star of the party. The combination of crunchy peanuts, smooth peanut butter, and decadent chocolate is pure magic. If you’re looking for a dessert that’s easy to make yet feels like a gourmet treat, this is it!
A Little History Behind the Magic
Peanut butter and chocolate are a match made in heaven, and their pairing dates back to the early 1900s. Reese’s Peanut Butter Cups, one of America’s favorite candies, inspired this cake. I wanted to recreate that same irresistible flavor combo but in cake form. Over the years, I’ve tweaked this recipe to perfection, testing it on family and friends until everyone agreed it was a winner. Now, I’m sharing it with you because life’s too short not to enjoy desserts like this!
Why You’ll Love This Recipe
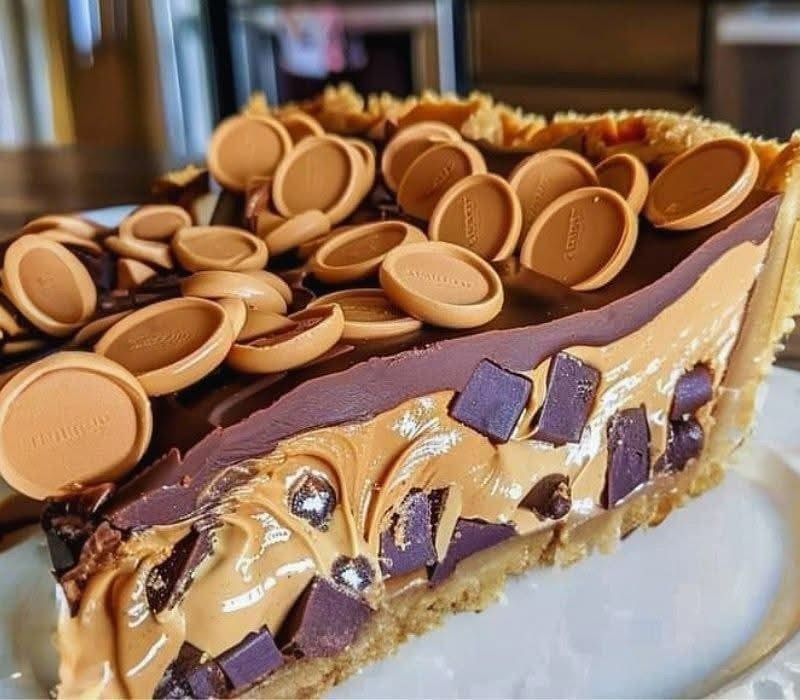
This Irresistibly Simple Peanut Butter Cake is all about balance. The graham cracker crust adds a satisfying crunch, while the creamy peanut butter filling melts in your mouth. Topped with a glossy chocolate ganache and sprinkled with chopped peanuts, every bite is a symphony of textures and flavors. Plus, it’s surprisingly easy to make—no fancy techniques or hours in the kitchen required. Whether you’re a seasoned baker or a beginner, this recipe will make you look like a pro.
Perfect Occasions for This Cake
This cake is perfect for birthdays, potlucks, or even just a cozy night in. I’ve served it at holiday gatherings, summer barbecues, and casual coffee dates with friends. It’s versatile enough to fit any occasion but special enough to feel like a celebration. Trust me, once you make it, people will start asking you to bring it everywhere!
Ingredients
- 1 1/2 cups of graham cracker crumbs
- 1/3 cup of granulated sugar
- 1/2 cup of melted butter
- 1 cup of peanut butter
- 8 oz of cream cheese
- 1 cup of powdered sugar
- 1 tsp of vanilla extract
- 1 1/2 cups of whipping cream (divided)
- 1 cup of chocolate chips
- 1/2 cup of chopped peanuts
- 1/2 cup of peanut butter chips (optional)
Substitution Options
If you’re out of an ingredient or want to switch things up, here are some ideas:
- Graham cracker crumbs: Use crushed digestive biscuits or vanilla wafers.
- Peanut butter: Swap with almond butter or cashew butter for a nutty twist.
- Whipping cream: Heavy cream works just as well.
- Chocolate chips: Dark chocolate or semi-sweet chocolate chunks are great alternatives.
Preparation
Step 1: Make the Crust
Mix the graham cracker crumbs, sugar, and melted butter in a bowl until it resembles wet sand. Press this mixture firmly into the bottom of a 9-inch springform pan. The butter should help it stick together like glue. Pop it in the fridge while you work on the filling. Pro tip: Use the bottom of a glass to press the crust evenly—it’s a game-changer!
Step 2: Whip Up the Filling
In a large bowl, beat the peanut butter, cream cheese, powdered sugar, and vanilla extract until smooth and creamy. This is where the magic happens—the peanut butter adds richness, while the cream cheese keeps it light. In another bowl, whip 1 cup of the whipping cream until stiff peaks form. Fold this into the peanut butter mixture gently to keep it airy. Pour this luscious filling over the chilled crust and smooth it out with a spatula.
Step 3: Make the Ganache
Heat the remaining 1/2 cup of whipping cream in the microwave for about 30 seconds, then pour it over the chocolate chips. Let it sit for a minute before stirring until glossy and smooth. Pour this heavenly ganache over the peanut butter layer. Sprinkle chopped peanuts and peanut butter chips on top for extra crunch and flair. Chef’s tip: Toast the peanuts lightly before sprinkling them on for an even deeper flavor.
Step 4: Chill and Serve
Refrigerate the cake for at least 4 hours, though overnight is ideal. This gives the flavors time to meld and the layers to set perfectly. When you’re ready to serve, run a knife around the edges of the pan and release the springform collar. Slice and enjoy!
Timing
Here’s how long each step takes:
- Prep time: 20 minutes
- Cooking time: 0 minutes (no baking required!)
- Resting time: 4–8 hours in the fridge
- Total time: About 5 hours (mostly hands-off)
Chef’s Secret
For an extra burst of flavor, add a pinch of salt to the peanut butter filling. The salt enhances the sweetness and balances the richness of the chocolate. Trust me, it’s a small tweak that makes a big difference!
Extra Info
Did you know that peanut butter was invented in the late 1800s as a protein-rich food for people who couldn’t chew solid foods? Fast forward to today, and it’s become a beloved staple in desserts like this Irresistibly Simple Peanut Butter Cake. Fun fact: Americans eat over 700 million pounds of peanut butter each year!
Necessary Equipment
To make this cake, you’ll need:
- A 9-inch springform pan
- A mixing bowl and electric mixer
- A spatula for smoothing layers
- A microwave-safe bowl for melting chocolate
- A sharp knife for slicing
Storage
This cake stores beautifully in the fridge. Keep it covered with plastic wrap or in an airtight container to prevent it from absorbing odors. It stays fresh for up to 5 days, though I doubt it’ll last that long!
If you want to freeze it, wrap individual slices tightly in plastic wrap and place them in a freezer-safe bag. They’ll keep for up to 2 months. Just thaw them in the fridge overnight before serving.
Pro tip: Always let the cake come to room temperature for 15–20 minutes before slicing. This ensures clean cuts and maximum flavor.
Tips and Advice
- Use full-fat whipping cream for the best texture in both the filling and ganache.
- Don’t skip chilling the cake—it’s crucial for setting the layers.
- If you’re short on time, pop the cake in the freezer for 1–2 hours instead of refrigerating it.
Presentation Tips
- Serve slices on pretty dessert plates with a dollop of whipped cream.
- Garnish with extra chocolate shavings or a drizzle of melted peanut butter.
- Add a sprig of mint for a pop of color.
Healthier Alternative Recipes
Want to lighten up this cake? Here are six variations:
- Low-Sugar Version: Use sugar-free peanut butter and a sugar substitute for the powdered sugar.
- Vegan Option: Substitute dairy-free cream cheese, butter, and whipping cream.
- Gluten-Free Twist: Use gluten-free graham crackers for the crust.
- Lightened-Up Filling: Replace half the cream cheese with Greek yogurt.
- Dark Chocolate Ganache: Use dark chocolate chips for a richer, less sweet topping.
- No-Bake Cheesecake Style: Omit the peanut butter chips and focus on the creamy filling.
Common Mistakes to Avoid
Mistake 1: Skipping the Chilling Time
One of the biggest mistakes is rushing the chilling process. Without enough time in the fridge, the layers won’t set properly, and the cake will fall apart when sliced. Be patient—it’s worth the wait!
Mistake 2: Overmixing the Whipped Cream
When folding the whipped cream into the peanut butter mixture, be gentle. Overmixing can deflate the cream, making the filling dense instead of light and airy. Pro tip: Use a spatula and fold in slow, deliberate motions.
Mistake 3: Using Old Chocolate Chips
Old or low-quality chocolate chips can seize when mixed with warm cream, ruining your ganache. Always check the expiration date and opt for high-quality chocolate for the best results.
FAQ
Can I use crunchy peanut butter?
Absolutely! Crunchy peanut butter adds extra texture to the filling. Just make sure to stir it well before measuring.
Do I have to use a springform pan?
While a springform pan makes it easier to remove the cake, you can use a regular cake pan. Line it with parchment paper for easy removal.
Can I make this ahead of time?
Yes! This cake is perfect for making a day or two in advance. It actually tastes better after resting in the fridge.
What if I don’t have a mixer?
No problem. You can whisk the ingredients by hand, though it might take a bit more elbow grease.
How do I prevent the ganache from cracking?
Let the ganache cool slightly before pouring it over the cake. This helps it set smoothly without cracking.
Can I double the recipe?
Definitely! Just use a larger pan or divide the batter between two pans.
Is this cake kid-friendly?
Yes! Kids love the combination of peanut butter and chocolate. Just ensure no one has nut allergies.
Can I use natural peanut butter?
Yes, but make sure to stir it well to combine the oils. Natural peanut butter can be thinner, so adjust accordingly.
What can I do if the crust is too crumbly?
Add a bit more melted butter to the crust mixture. It acts as a binder to hold everything together.
How do I store leftovers?
Cover the cake tightly with plastic wrap or transfer slices to an airtight container. Keep it in the fridge for up to 5 days.
Final Thoughts
This Irresistibly Simple Peanut Butter Cake is a showstopper that’s easy to make and even easier to love. With its creamy filling, crunchy toppings, and rich chocolate ganache, it’s a dessert that never fails to impress. Whether you’re baking for a special occasion or just treating yourself, this cake is sure to become a favorite. So grab your ingredients, roll up your sleeves, and get ready to create something truly unforgettable!
Irresistibly Simple Peanut Butter Cake
Ingredients
Equipment
Method
- Mix the graham cracker crumbs, sugar, and melted butter in a bowl until it resembles wet sand. Press firmly into the bottom of a 9-inch springform pan and refrigerate.
- In a large bowl, beat the peanut butter, cream cheese, powdered sugar, and vanilla extract until smooth. Whip 1 cup of whipping cream until stiff peaks form and fold into the peanut butter mixture.
- Heat the remaining 1/2 cup of whipping cream in the microwave for about 30 seconds, pour over the chocolate chips, stir until glossy, and pour over the peanut butter layer. Sprinkle with chopped peanuts and optional peanut butter chips.
- Refrigerate the cake for at least 4 hours (overnight is ideal). Run a knife around the edges and release the springform collar before slicing and serving.