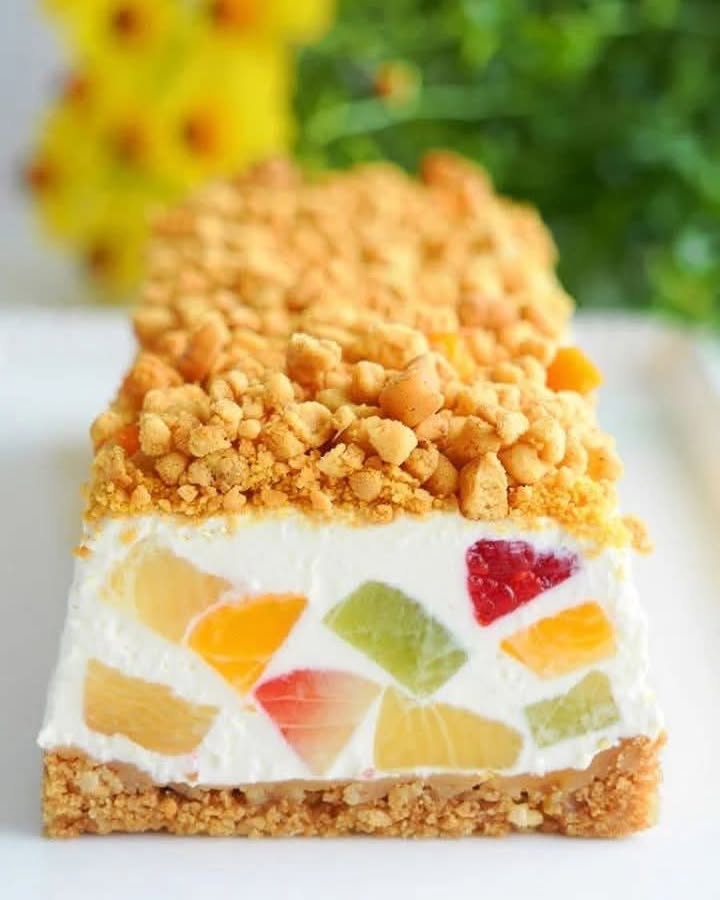
Picture this: it’s a sweltering summer afternoon, the kids are whining for dessert, and the last thing you want to do is turn on the oven. That’s when I pulled out my secret weapon—a luscious, no-bake **Chilled Fruit Delight in Minutes** that looks like it came from a fancy bakery but takes almost no effort. I first made it for my niece’s birthday party, and guess what? Everyone thought I’d spent hours in the kitchen! Nope—just 5 minutes of prep and a little patience in the fridge. And the colors? So vibrant they practically sparkle!
The Story Behind This Chilled Fruit Delight in Minutes
No-bake fruit cakes like this one have been popping up in home kitchens for decades, especially in warm climates where ovens are summer enemies. While traditional cheesecakes require baking and careful tempering, this version is all about simplicity and freshness. It borrows from classic no-bake cheesecake methods but swaps heavy crusts and dense fillings for light, airy textures and a rainbow of seasonal fruit. My version? Inspired by a beachside café in southern Spain where I once saw a similar dessert topped with local figs and peaches—and I’ve been tweaking it ever since!
Why You’ll Absolutely Love This Recipe
This **Chilled Fruit Delight in Minutes** is creamy, cool, and bursting with natural sweetness. There’s zero baking involved—just mix, layer, and chill. It’s endlessly customizable (use whatever fruit is in your fridge!), feeds a crowd, and looks stunning with almost no effort. Plus, it’s naturally gluten-free if you choose the right cookies! Whether you’re hosting or just treating yourself after a long day, this dessert delivers joy in every bite—without heating up your kitchen.
Perfect for Parties, Picnics, and “Oops-I-Need-Dessert-Now” Moments
Need a last-minute dessert for a baby shower? Done. Hosting a backyard brunch? This will steal the show. Packing a picnic for the park? It travels beautifully (just cover it well!). I even made a mini version in mason jars for a school bake sale—and they sold out in 10 minutes. Because who can resist creamy layers topped with ruby-red strawberries, golden mango, and emerald kiwi? It’s dessert magic for birthdays, potlucks, holidays, or Tuesday nights when you just deserve something sweet.
What You’ll Need: Ingredients for Chilled Fruit Delight in Minutes
- 200 g of María or Digestive cookies
- 100 g of melted butter
- 400 ml of heavy cream (for whipping)
- 200 g of cream cheese (softened)
- 100 g of granulated sugar
- Fresh fruits of your choice (kiwi, strawberries, mango, blueberries, etc.)
- 1 packet (about 7 g) of unflavored gelatin (optional, for extra firmness)
Easy Swaps & Smart Substitutions
- No María cookies? Use graham crackers, shortbread, or even vegan digestive biscuits.
- Dairy-free? Swap butter for coconut oil and use plant-based cream cheese and whipping cream.
- Prefer less sugar? Try maple syrup or agave—but reduce liquid elsewhere slightly.
- No gelatin? Skip it! The dessert will be softer but still delicious. For vegans, use agar-agar (follow package instructions).
- Out of fresh fruit? Thawed frozen berries work in a pinch—just pat them dry first.
How to Make Your Chilled Fruit Delight in Minutes
Step 1: Make the Crust
Crush those cookies into fine crumbs—I toss them in a zip-top bag and whack them with a rolling pin (my kids love helping with this part!). Mix the crumbs with melted butter until it looks like wet sand. Press this mixture firmly into the bottom of a 20 cm (8-inch) springform pan or pie dish. Don’t skip pressing it down well—you want a sturdy base that won’t crumble when sliced. Pop it into the fridge while you make the filling. Pro tip: Line the pan with parchment paper for effortless removal later!
Step 2: Whip the Cream
Pour your cold heavy cream into a large bowl. Add the sugar and start whipping—by hand or with a mixer—until soft peaks form. You’ll know it’s ready when the cream holds its shape but still looks glossy and smooth, not grainy. Keep an eye on it; over-whipping turns cream into butter! This fluffy cloud is what gives your dessert that dreamy, airy texture.
Step 3: Blend in the Cream Cheese and Gelatin
In a separate bowl, beat the softened cream cheese until smooth and creamy—no lumps! Gently fold it into your whipped cream using a spatula. If you’re using gelatin, bloom it in 2 tablespoons of cold water for 1 minute, then dissolve it in 2 tablespoons of hot water. Let it cool slightly (so it doesn’t cook your cream!), then stir it into the mixture until fully blended. This step adds just enough structure to hold your fruit without making the filling rubbery.
Step 4: Layer the Filling
Pull your chilled crust from the fridge. Pour the creamy filling over it and smooth the top with an offset spatula or the back of a spoon. Work gently to keep all that airiness intact. This layer should look velvety and inviting—like a blank canvas waiting for your fruity masterpiece.
Step 5: Arrange the Fruit
Now for the fun part! Wash, peel (if needed), and slice your fruit into thin, even pieces. I love arranging them in concentric circles—kiwi rings on the outside, strawberry fans, mango petals in the center—but feel free to get creative! Toss berries on top for a rustic look, or make a rainbow pattern. The more color, the better. Not only does it look gorgeous, but each bite offers a little burst of fresh, tangy-sweet flavor.
Step 6: Chill Until Set
Cover the pan loosely with plastic wrap and place it in the fridge. Let it chill for at least 2 hours—but honestly, 4 hours (or even overnight) gives the best texture. The filling firms up, the crust stays crisp underneath, and all the flavors meld together into something truly special. I always make this the night before a party so I’m not rushing the next day.
Timing at a Glance
- Prep time: 10 minutes
- Active time: 5 minutes
- Chilling time: 2–4 hours (or overnight)
- Total time: 2 hours 10 minutes (minimum)
- Servings: 8–10 people
Chef’s Secret: The Overnight Trick
For the slickest cuts and most elegant presentation, make your **Chilled Fruit Delight in Minutes** the night before. Not only does it save you morning stress, but the flavors deepen and the texture becomes luxuriously smooth. Plus, I run my knife under hot water, wipe it dry, and slice—clean, perfect portions every time!
Fun Fact About This No-Bake Wonder
Did you know? The no-bake cheesecake trend boomed in the U.S. during the 1930s when refrigerators became common in homes. Before that, cheesecakes were baked and dense. Once folks could chill desserts safely, creamy, cold versions took off—and never looked back! My version is a modern twist on that legacy, with fruit taking center stage.
Tools You’ll Need
- Springform pan or pie dish (20–23 cm / 8–9 inches)
- Food processor or zip-top bag + rolling pin (for crumbs)
- Mixing bowls (large and medium)
- Electric hand mixer or whisk
- Spatula
- Measuring scales or cups
- Parchment paper (optional but helpful)
Storing Your Chilled Fruit Delight
Keep your dessert covered tightly with plastic wrap or in an airtight container in the fridge. It stays fresh and delicious for up to 3 days. After that, the fruit may start to weep or lose its bright color, and the crust can soften slightly—but it’s still safe to eat!
For best results, add delicate fruits like berries or bananas just before serving if you plan to store it longer. Hardier fruits like kiwi, mango, or pineapple hold up better over time. If you’ve used gelatin, the filling will stay firmer during storage.
Freezing? Not ideal. The cream can separate and the fruit turns mushy when thawed. But if you must, freeze without fruit topping, then add fresh fruit after thawing in the fridge overnight. Still tasty—but the texture won’t be quite as dreamy.
Tips & Tricks for the Best Results
- Use very cold cream—it whips faster and holds peaks better.
- Let cream cheese soften at room temp for 30 minutes to avoid lumps.
- Pat fruit dry with a paper towel to prevent moisture from making the filling soggy.
- For extra zing, add a teaspoon of lemon zest to the filling.
- Drizzle with honey or melted white chocolate just before serving for a fancy touch!
Presentation Ideas That Wow
- Serve in individual glasses or jars for elegant portion control.
- Top with edible flowers for a garden-party vibe.
- Dust with powdered sugar or toasted coconut flakes.
- Use cookie cutters to shape fruit into hearts or stars for birthdays.
- Garnish with mint leaves for a pop of green freshness.
- Place the whole cake on a cake stand with ribbon for instant glam.
6 Healthier & Creative Variations
Love this base recipe? Try these twists to suit different diets or cravings!
1. Vegan Chilled Fruit Delight
Swap butter for coconut oil, use vegan digestive cookies, and replace dairy with coconut cream and cashew-based cream cheese. Sweeten with maple syrup, and skip the gelatin or use agar-agar. Top with seasonal fruit—perfect for plant-based gatherings!
2. Low-Sugar Berry Bliss
Use sugar-free cookies or almond flour crust, reduce sugar to 50g or use monk fruit sweetener, and load up on antioxidant-rich berries like blueberries, raspberries, and blackberries. Their natural sweetness shines through!
3. Tropical Paradise Version
Go full tropical: use crushed graham crackers with melted coconut oil for the crust, fold shredded coconut into the filling, and top with pineapple, mango, passion fruit, and kiwi. Add a splash of lime juice for brightness!
4. Chocolate-Lover’s Dream
Mix 2 tbsp cocoa powder into the crust crumbs, or use chocolate cookies. Add melted dark chocolate to the filling, and top with strawberries, banana slices, and a chocolate drizzle. Decadent but still no-bake!
5. Protein-Packed Post-Workout Treat
Add a scoop of vanilla protein powder to the filling (reduce sugar slightly). Use Greek yogurt in place of half the cream cheese for extra tang and protein. Top with banana and blueberries—delicious fuel!
6. Kids’ Rainbow Fun Cake
Let the little ones arrange fruit in rainbow order: red strawberries, orange mango, yellow pineapple, green kiwi, blueberries, purple grapes. Use colorful silicone molds for mini versions—they’ll love making (and eating!) their own.
Common Mistakes to Avoid
Mistake 1: Skipping the Crust Press
If you don’t press the cookie-butter mixture firmly into the pan, your crust will crumble when sliced. It needs to be compact and even. Use the bottom of a glass or measuring cup to press it down smoothly—this creates a solid base that holds everything together beautifully.
Mistake 2: Over-Whipping the Cream
Whipped cream should be soft and billowy—not stiff or grainy. Once it passes the soft peak stage, it can turn buttery in seconds. Stop mixing as soon as peaks hold their shape. Pro tip: Chill your bowl and beaters for 10 minutes before whipping for best results.
Mistake 3: Adding Warm Gelatin to Cold Filling
If you pour hot or warm gelatin into your whipped cream, it can melt the structure and make your filling runny. Always let the dissolved gelatin cool to room temperature (or slightly warm) before folding it in. Test it on your wrist—it should feel neutral, not hot.
Mistake 4: Using Wet Fruit
Fresh fruit straight from the wash often holds water. If you place it wet on the filling, it can create soggy spots or cause colors to bleed. Always pat fruit dry with a clean kitchen towel or paper towel before arranging. Bonus: dry fruit sticks better and looks more vibrant!
Mistake 5: Not Chilling Long Enough
Two hours is the bare minimum. If you’re in a rush, the filling won’t set properly and slices will slump. For clean cuts and that perfect creamy texture, wait at least 4 hours—or better yet, make it the night before. Patience pays off in dessert form!
Frequently Asked Questions
Can I make this without cream cheese?
Yes! Substitute with the same amount of thick Greek yogurt or mascarpone for a similar creamy texture. Greek yogurt will be tangier and slightly lighter, while mascarpone is richer and sweeter. Just make sure it’s well-drained so your filling isn’t watery.
What fruits work best on top?
Choose firm, fresh fruits that won’t release too much juice. Kiwi, strawberries, mango, pineapple, blueberries, and seedless grapes are all excellent. Avoid very juicy fruits like watermelon or overripe peaches unless you pat them extremely dry or add them just before serving.
Can I use store-bought whipped cream?
It’s not recommended. Canned whipped cream contains stabilizers and air that make it too light and unstable for this recipe. It won’t hold the structure needed for slicing. Always whip your own cream—it’s quick, fresher, and gives you control over sweetness.
Is this dessert gluten-free?
It can be! Just use certified gluten-free cookies or make a crust from gluten-free graham crackers or almond flour mixed with butter. Always check labels, as even “plain” cookies may contain hidden gluten. The filling itself is naturally gluten-free.
How do I prevent the crust from sticking to the pan?
Line the bottom of your springform pan with parchment paper before pressing in the crust. For pie dishes, a light spray of cooking oil before adding the crust helps. Also, let the cake chill completely—this firms up the butter and makes release easier.
Can I add lemon or other flavors to the filling?
Absolutely! Add 1–2 teaspoons of lemon zest or 1 tablespoon of lemon juice for a citrusy kick. You could also add vanilla extract, almond extract, or even a swirl of fruit puree. Just don’t add too much liquid, or your filling may not set properly.
Why did my filling turn lumpy?
Lumps usually come from cold or unsoftened cream cheese. Always let it sit at room temperature for 30–60 minutes before mixing. Beat it alone first until smooth, then gently fold in whipped cream. This ensures a silky, lump-free texture every time.
Can I make this ahead for a party?
Yes—this is actually one of the best make-ahead desserts! Prepare it up to 24 hours in advance. Keep it covered in the fridge, and add delicate fruits (like berries) just 1–2 hours before serving to keep them fresh and bright.
Does the gelatin affect the taste?
No! Unflavored gelatin is tasteless. Its only job is to help the filling hold its shape, especially in warm weather. If you skip it, your dessert will be softer—more like a mousse—but still delicious. Use it if you want clean slices or are serving outdoors.
How do I cut clean slices?
Use a sharp knife dipped in hot water, wiped dry, and wiped clean between cuts. This melts through the creamy layers smoothly without dragging fruit or cracking the crust. Serve chilled—warm cake is harder to slice neatly.
Final Thoughts
This **Chilled Fruit Delight in Minutes** is more than just a dessert—it’s your go-to solution for stress-free entertaining, spontaneous celebrations, and everyday indulgence. With its dreamy texture, jewel-toned fruit, and no-oven-required magic, it’s earned a permanent spot in my recipe rotation. Give it a try on a lazy Sunday or before your next gathering—you’ll be amazed how such simple ingredients can create something so stunning. And hey, if your kids ask for seconds? That’s the ultimate compliment!
Chilled Fruit Delight in Minutes
Ingredients
Equipment
Method
- Crush the cookies into fine crumbs and mix with melted butter until it resembles wet sand. Press firmly into the bottom of a 20 cm springform pan.
- Refrigerate the crust while preparing the filling.
- In a large bowl, whip the heavy cream with sugar until soft peaks form.
- In a separate bowl, beat the softened cream cheese until smooth. Fold it into the whipped cream gently.
- If using gelatin, bloom it in cold water, dissolve it in hot water, let it cool slightly, then stir into the cream mixture.
- Pour the creamy filling over the chilled crust, smoothing it out.
- Arrange the washed and sliced fresh fruit over the filling.
- Cover and refrigerate for at least 2 hours, preferably 4 hours or overnight, until set.