A Cake That Melts in Your Mouth and Stays in Your Heart
There’s something magical about a dessert that requires no baking but delivers all the gooey, chocolatey goodness you crave. I remember the first time I made this Decadent No-Bake Chocolate Delight. It was for my best friend’s birthday, and I was in a panic because my oven had decided to take an unscheduled vacation. This recipe saved the day—and everyone raved about it! It’s rich, creamy, and oh-so-easy to make. Whether you’re a seasoned baker or a kitchen newbie, this cake is sure to become your go-to treat.
The Sweet Story Behind This Recipe
This dessert reminds me of those classic no-bake cookies my grandma used to make. She always said, “If it’s chocolate, it’s worth it!” Over the years, I’ve adapted her love for simple, indulgent treats into this modern version. The combination of crunchy cookies, smooth melted chocolate, and fluffy whipped cream creates layers of texture and flavor that are simply irresistible. While the original recipes were often heavy on sugar, this one balances sweetness with a touch of sophistication—perfect for today’s dessert lovers.
Why You’ll Love This Recipe
What’s not to love? This Decadent No-Bake Chocolate Delight is a crowd-pleaser for so many reasons. First, it’s easy to make—no fancy techniques or equipment needed. Second, it’s customizable. Want more crunch? Add nuts. Prefer less sugar? Use dark chocolate. Finally, it’s a showstopper. The layers look impressive, but trust me, even beginners can nail this recipe. Plus, it’s a great way to satisfy your chocolate cravings without turning on the oven!
Perfect Occasions to Prepare This Recipe
This cake is perfect for any occasion—or no occasion at all! Whip it up for birthdays, holidays, or potlucks. It’s also a fantastic dessert for summer gatherings when you want to avoid heating up the kitchen. I’ve served it at dinner parties, family reunions, and even casual movie nights. Everyone loves it, and it’s always the first dish to disappear. Pro tip: Make two cakes if you’re feeding a crowd—it’s that good!
Ingredients
- 3 cups of whipped cream (or heavy cream, whipped)
- 1/3 cup of sugar
- 2 teaspoons of vanilla extract
- 2 tiles of sugar-free chocolate (optional, for a lighter version)
- 1 package (9 oz) of chocolate wafer cookies
- 3 cups of melted chocolate chips
- 1 cup of mini chocolate chips (for decoration)
- Additional chocolate chips to taste
Substitution Options
Not a fan of certain ingredients? No problem! Swap the sugar for honey or maple syrup if you prefer natural sweeteners. Use gluten-free cookies if you need to accommodate dietary restrictions. For a dairy-free version, try coconut cream instead of whipped cream and vegan chocolate chips. The beauty of this recipe is its flexibility—you can tweak it to suit your taste or needs.
Step 1: Whip It Good
Start by whipping the cream with sugar, vanilla, and a pinch of magic (okay, maybe that’s optional). Beat until stiff peaks form—it should look like clouds in a bowl. This step is crucial because the whipped cream acts as both a filling and a glue to hold the layers together. Pro tip: Chill your mixing bowl and beaters beforehand; cold tools help the cream whip faster and fluffier.
Step 2: Lay the Foundation
Spread a thin layer of whipped cream at the bottom of your mold. This creates a soft base for the cookies and ensures every bite has a touch of creaminess. Think of it as the foundation of a delicious chocolate skyscraper. Don’t rush this step—it sets the tone for the rest of the cake.
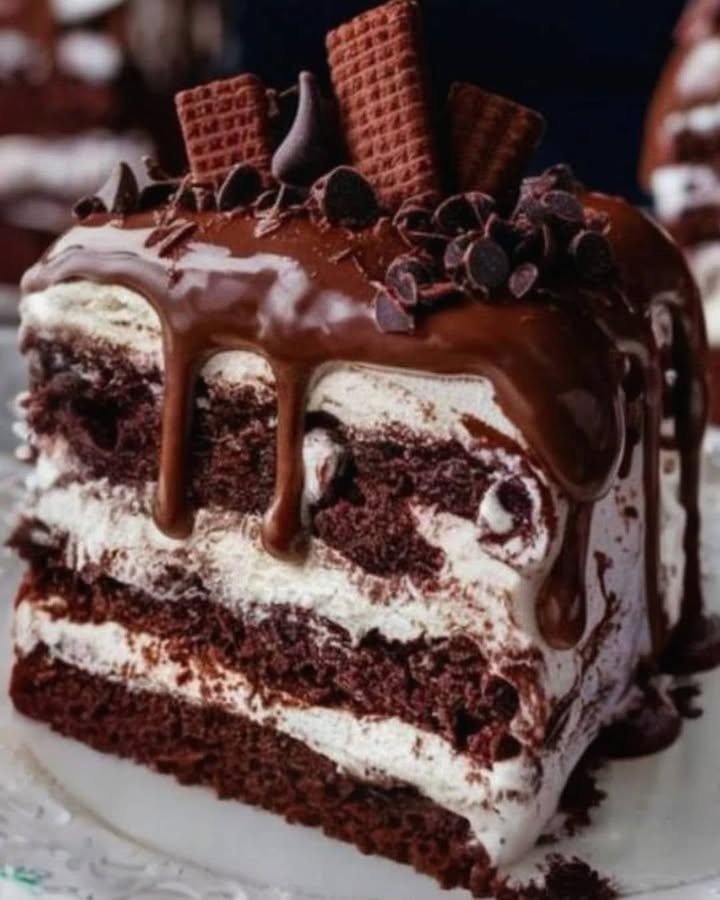
Step 3: Build Those Layers
Add a layer of chocolate wafer cookies, then drizzle melted chocolate over them. The cookies will soften in the fridge, creating a luscious texture. Repeat the layers until the mold is full, finishing with a generous dollop of whipped cream on top. Picture the layers as stripes on a zebra—alternating, beautiful, and oh-so-tasty.
Step 4: Decorate Like a Pro
Sprinkle mini chocolate chips and additional chocolate chips on top for a festive touch. This is where you can get creative—add sprinkles, cocoa powder, or even fresh berries if you’re feeling adventurous. Chef’s tip: Use a piping bag to make the whipped cream look extra fancy. Even if it’s just for your family, presentation matters!
Step 5: Chill and Wait
Pop the cake in the fridge for at least 2 hours—or overnight if you can wait that long. This resting time allows the cookies to soften and the flavors to meld together. Trust me, patience pays off here. The result is a melt-in-your-mouth masterpiece that’s worth the wait.
Timing
Prep time: 20 minutes
Resting time: 2 hours (minimum)
Total time: 2 hours and 20 minutes
Chef’s Secret
Here’s a little secret: Use high-quality chocolate. It makes a world of difference in flavor and texture. I always splurge on a good brand of chocolate chips—it’s worth every penny.
Extra Info
Did you know that chocolate has been called “the food of the gods”? Ancient civilizations like the Mayans and Aztecs revered cacao for its rich flavor and energizing properties. Today, we enjoy it in countless forms, from bars to cakes. Isn’t it amazing how something so simple can bring so much joy?
Necessary Equipment
- Mixing bowls
- Electric mixer or whisk
- Spatula
- Rectangular or square mold
- Piping bag (optional, for decoration)
Storage
Store this cake in the fridge, covered with plastic wrap or in an airtight container. It stays fresh for up to 3 days, though I doubt it’ll last that long! If you need to freeze it, wrap it tightly and thaw it in the fridge before serving. Keep in mind that freezing may slightly alter the texture of the whipped cream.
For best results, slice the cake with a warm knife. Dip the blade in hot water, wipe it dry, and cut through the layers smoothly. This trick ensures clean, Instagram-worthy slices every time.
If you’re taking this cake to a party, transport it in a chilled cooler to keep it firm. Nobody likes a melted masterpiece!
Tips and Advice
Make sure your whipped cream is perfectly stiff before assembling the cake. Soft peaks won’t hold the layers together well. Also, don’t skip the chilling step—it’s essential for achieving the right texture. Finally, taste as you go! Adjust the sweetness or chocolate intensity to suit your preferences.
Presentation Tips
- Garnish with fresh mint leaves for a pop of color.
- Dust the top with cocoa powder for an elegant touch.
- Serve on a decorative platter to make it stand out.
Healthier Alternative Recipes
Looking for lighter options? Try these variations:
- Low-Sugar Version: Use sugar-free chocolate and reduce the amount of added sugar.
- Vegan Delight: Substitute dairy products with plant-based alternatives.
- Protein-Packed Cake: Add a scoop of protein powder to the whipped cream mixture.
- Fruit-Infused Treat: Layer sliced strawberries or bananas between the cookie layers.
- Nutty Twist: Mix chopped nuts into the melted chocolate for extra crunch.
- Spiced Chocolate: Add a dash of cinnamon or chili powder to the melted chocolate for a kick.
Common Mistakes to Avoid
Mistake 1: Skipping the Chilling Time
Some folks think they can skip the chilling step, but trust me, it’s non-negotiable. Without enough time in the fridge, the cookies won’t soften, and the layers won’t set properly. Patience is key here!
Mistake 2: Using Low-Quality Chocolate
Cheap chocolate can ruin the flavor of your cake. Invest in a good brand—it doesn’t have to break the bank, but quality matters. Pro tip: Look for chocolate with a high cocoa content for a richer taste.
Mistake 3: Overloading the Layers
It’s tempting to pile on too much whipped cream or chocolate, but balance is important. Too much of either can make the cake soggy. Stick to even, moderate layers for the best results.
FAQ
Can I use store-bought whipped cream?
Yes, but homemade whipped cream tastes better and has a fresher texture. Plus, you can control the sweetness and flavor.
How do I prevent the cookies from getting too soggy?
Don’t overdo the melted chocolate drizzle. A light coating is enough to soften the cookies without making them mushy.
Can I make this cake ahead of time?
Absolutely! It’s actually better when made a day in advance, as the flavors have time to develop.
What if I don’t have a mold?
No worries! Use a loaf pan or even a deep dish. Just adjust the layer sizes accordingly.
Is this cake kid-friendly?
Definitely! Kids love the rich chocolate flavor and fun textures. Just keep an eye on the sugar content if needed.
Can I add alcohol to the recipe?
Sure thing! A splash of liqueur like Kahlúa or Baileys in the whipped cream adds a grown-up twist.
How do I know when the whipped cream is ready?
Look for stiff peaks that hold their shape when you lift the beaters. Under-whipped cream won’t hold the layers together.
Can I freeze leftovers?
Yes, but be aware that the texture might change slightly after thawing. Wrap it well to avoid freezer burn.
What size mold should I use?
A standard 8×8-inch square mold works perfectly. Adjust quantities if using a different size.
Can I use different cookies?
Of course! Graham crackers or digestive biscuits are great alternatives, though they’ll change the flavor profile slightly.
A Final Word on This Decadent Treat
This Decadent No-Bake Chocolate Delight is more than just a dessert—it’s a labor of love that brings people together. Whether you’re celebrating a special occasion or simply craving something sweet, this cake is sure to impress. So grab your ingredients, roll up your sleeves, and let the magic happen. Happy baking!
Decadent No-Bake Chocolate Delight
Ingredients
Equipment
Method
- Whip the cream with sugar, vanilla, and a pinch of magic until stiff peaks form.
- Spread a thin layer of whipped cream at the bottom of your mold.
- Add a layer of chocolate wafer cookies, then drizzle melted chocolate over them.
- Repeat the layers until the mold is full, finishing with a generous dollop of whipped cream on top.
- Sprinkle mini chocolate chips and additional chocolate chips on top for decoration.
- Chill the cake in the fridge for at least 2 hours (or overnight if possible).