A Warm Hug in Every Bite: The Delicious Apple Oatmeal Comfort Bake You’ll Make Again and Again
If your mornings feel like a race against the clock—or your evenings need a cozy, sweet pause—this Delicious Apple Oatmeal Comfort Bake is your new best friend. I first baked it on a rainy Sunday when my kids were grumpy, my coffee was cold, and I just needed something that smelled like home. The moment it came out of the oven, golden and bubbling with apple pieces, cinnamon dancing in the air, I knew I’d found a keeper. Tender, spongy, studded with fruit, and finished with a rustic sprinkle of powdered sugar—it’s the kind of bake that makes people ask, “Is that from a bakery?” Nope, just your kitchen, working magic.
The Story Behind This Rustic Apple Oatmeal Treat
This recipe isn’t fancy—it’s folk food with heart. Oatmeal and apple bakes have been staples in farmhouse kitchens for generations, especially in colder months when fresh fruit was scarce but stored apples and pantry oats weren’t. My version leans into that heritage but adds a modern twist: mascabo sugar (a type of unrefined brown sugar common in Latin kitchens) and a whisper of vanilla for depth. I’ve tweaked it over years—testing less oil, more oats, different apple types—until it hit that sweet spot: moist without being dense, sweet without being cloying, and full of texture from the oats and fruit. It’s not just a cake—it’s a memory in the making.
Why You’ll Fall Head Over Heels for This Recipe
Let’s be real: we want treats that feel indulgent but don’t make us regret breakfast. This Delicious Apple Oatmeal Comfort Bake delivers on flavor and comfort without the guilt. The oats add fiber and a gentle chew, while the apples bring natural sweetness and moisture. It’s simple enough for a weekday morning but pretty enough for weekend guests. Plus, it smells like autumn no matter the season. One slice with your coffee, and you’ll feel like you’ve wrapped yourself in a flannel blanket.
Perfect Moments for This Apple Oatmeal Bake
This bake shines in so many settings! Serve it warm for a Saturday morning family breakfast. Pack slices in lunchboxes for an after-school snack. Bring it to a potluck—it’s always a hit. It’s also brilliant with afternoon tea, paired with a dollop of Greek yogurt, or even as a light dessert after a hearty meal. And if you’ve got unexpected guests? Dust it with powdered sugar, slice it neatly, and voilà—you look like a pro.
Ingredients for Your Apple Oatmeal Comfort Bake
- 2 apples, grated or finely minced (about 2 cups)
- 2 large eggs
- 100 ml neutral oil (like canola or sunflower)
- 120 ml milk (dairy or plant-based)
- 1 teaspoon vanilla extract
- 150 g mascabo or light brown sugar
- 150 g all-purpose flour
- 80 g rolled oats (not instant)
- 1 teaspoon ground cinnamon
- 1 teaspoon baking powder
- Pinch of salt
- Optional: thin apple slices and powdered (impalpable) sugar for topping
Easy Swaps for Dietary Needs or Pantry Gaps
No mascabo sugar? Use light brown sugar—it’s nearly identical. Out of dairy milk? Almond, oat, or soy milk work perfectly. Want it egg-free? Try a flax egg (1 tbsp ground flax + 3 tbsp water per egg). For a gluten-free version, swap the all-purpose flour for a 1:1 gluten-free blend and ensure your oats are certified GF. And if you’re watching sugar, reduce it to 120 g—you’ll still get plenty of sweetness from the apples.
How to Make Your Delicious Apple Oatmeal Comfort Bake
Step 1: Mix Wet Ingredients with Love
In a large bowl, beat the eggs and sugar until pale and slightly fluffy—about 2 minutes with a hand mixer or whisk. Then gently pour in the oil, milk, and vanilla, stirring just until smooth. You’ll notice the mixture turn creamy and rich, with a warm vanilla scent already promising good things. Don’t overmix; we’re building a base, not a meringue. Pro tip: Use room-temperature eggs and milk—they blend more evenly and help the batter rise better.
Step 2: Fold in the Apples
Add your grated apples to the wet mix and stir gently with a spatula. Choose firm, sweet-tart apples like Honeycrisp, Fuji, or Gala—they hold shape and add juicy bursts without turning mushy. You’ll see flecks of pale apple throughout the batter, adding texture and moisture. The batter will thicken slightly, and that’s perfect—it means your bake will stay tender, not soggy.
Step 3: Add Dry Ingredients Gently
In a separate bowl, whisk together the flour, oats, cinnamon, baking powder, and salt. Sift this mixture over the apple batter (yes, even the oats—they’ll distribute more evenly). Then, using a spatula, fold everything together just until no dry streaks remain. Don’t stir in circles or beat it—overmixing makes the bake tough. You want a shaggy, rustic batter with visible oat flakes. That’s your spongy, homey texture right there.
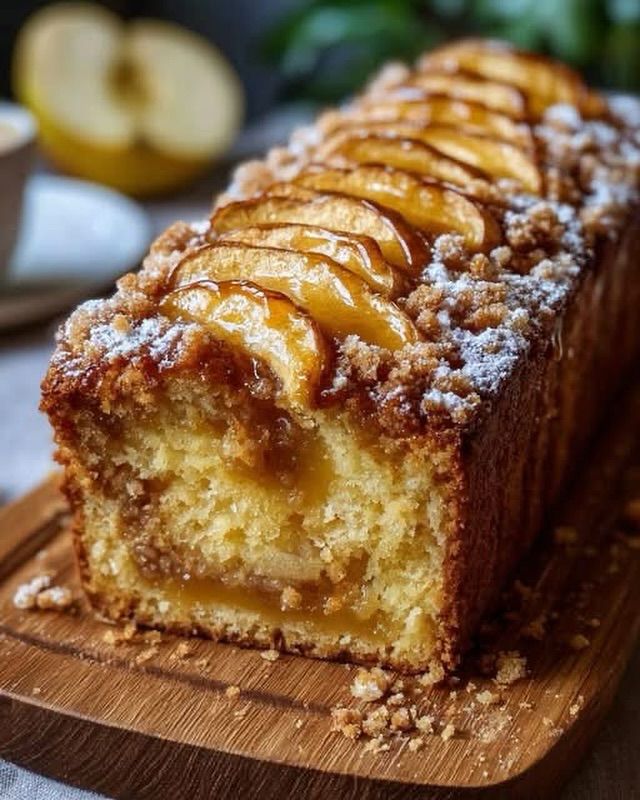
Step 4: Pour and Decorate
Pour the batter into a greased 8-inch (20 cm) round or square baking pan. Smooth the top lightly, then arrange thin apple slices in a spiral or overlapping pattern on top—it looks gorgeous and adds a caramelized edge when baked. This isn’t just pretty; it signals to everyone, “This was made with care.” Chef’s tip: Toss the apple slices in a bit of lemon juice to keep them from browning before baking.
Step 5: Bake to Golden Perfection
Slide the pan into a preheated oven at 180°C (350°F) and bake for 45–50 minutes. You’ll know it’s done when the top is deeply golden, the edges pull slightly from the pan, and a toothpick inserted in the center comes out clean (a few apple crumbs are fine). The kitchen will fill with the cozy scent of cinnamon and baked apples—resist the urge to open the oven early! Let the heat do its work for that perfect rise.
Step 6: Cool and Finish with Flair
Let the bake cool in the pan for at least 20 minutes before transferring it to a wire rack. This resting time sets the crumb so slices hold together. Once completely cool, dust the top with powdered sugar through a fine sieve for that dreamy, bakery-style finish. It’s not just decoration—it adds a delicate sweetness that contrasts beautifully with the warm spices below.
Timing at a Glance
- Prep time: 15 minutes
- Cooking time: 45–50 minutes
- Resting time: 20–30 minutes
- Total time: About 1 hour 15 minutes
Chef’s Secret: The Real Magic Ingredient
Here’s my secret: **grate one apple finely and chop the other into tiny pieces**. The fine grate melts into the batter, keeping it moist, while the small chunks stay intact, giving you those satisfying apple bites in every slice. It’s a tiny tweak that makes a huge difference in texture—and your family will never guess your trick!
Fun Fact: Oats and Apples—A Power Duo Through Time
Did you know? Oats have been cultivated for over 2,000 years, and apples for even longer! In medieval Europe, combining oats and apples was common in “hasty puddings”—quick, nourishing meals for working families. Today, that same combo delivers fiber, vitamins, and slow-release energy. So yes, your cozy bake is actually rooted in ancient wisdom.
Tools You’ll Need
- 8-inch round or square baking pan
- Mixing bowls (one large, one medium)
- Hand whisk or electric mixer
- Spatula
- Box grater or food processor
- Cooling rack
- Measuring cups and spoons
How to Store Your Apple Oatmeal Comfort Bake
Store your cooled bake in an airtight container at room temperature for up to 2 days. The oats help retain moisture, so it stays tender longer than most cakes. Just keep it away from direct sunlight or heat sources to prevent drying.
For longer freshness, refrigerate it for up to 5 days. Wrap individual slices in parchment paper before placing them in a sealed container—this prevents sticking and flavor transfer. When ready to eat, let it sit at room temperature for 15 minutes or warm it gently in the microwave for 10–15 seconds.
You can even freeze the whole bake or individual slices for up to 3 months. Wrap tightly in plastic wrap, then aluminum foil, and thaw overnight in the fridge. Reheat in a 160°C (325°F) oven for 10 minutes to restore that just-baked texture and aroma.
Extra Tips to Make It Even Better
- Add a handful of chopped walnuts or pecans for crunch.
- Swap 1 tablespoon of flour for ground flaxseed for extra fiber.
- Drizzle with a light caramel or maple glaze instead of powdered sugar.
- Use apple butter in place of 2 tablespoons of oil for deeper apple flavor.
Wow-Worthy Presentation Ideas
- Serve warm with a scoop of vanilla ice cream for dessert.
- Top with a dollop of whipped cream and a cinnamon stick.
- Cut into small squares for a brunch platter alongside coffee and fruit.
- Plate with a drizzle of honey and a sprinkle of toasted coconut.
- Use mini loaf pans for individual portions—perfect for gifting!
Healthier Twists on Your Apple Oatmeal Comfort Bake
Want to lighten it up or try something new? Here are six inspired variations:
- Whole Wheat Wonder: Replace half the all-purpose flour with whole wheat flour. You’ll get more fiber and a nuttier taste—still tender, thanks to the apples.
- Yogurt-Powered Bake: Swap half the oil for plain Greek yogurt. It adds protein and tang while keeping the crumb soft.
- Vegan Version: Use flax eggs, plant-based milk, and coconut oil. Replace sugar with coconut sugar for a lower glycemic option.
- Spiced Autumn Bake: Add a pinch of nutmeg and cloves along with the cinnamon for a holiday vibe.
- Apple-Berry Blend: Fold in ½ cup of fresh or frozen blueberries with the apples. They burst into juicy pockets of flavor.
- Protein-Packed Oats: Stir in 2 tablespoons of unflavored protein powder (replace 2 tbsp flour) for a post-workout snack that tastes like dessert.
Common Mistakes to Avoid
Mistake 1: Using Watery Apples Without Draining
Some apples (like Red Delicious) release a lot of liquid when grated. If you add them straight to the batter, your bake can turn gummy or sink in the middle. To avoid this, after grating, squeeze the apples gently in a clean kitchen towel to remove excess moisture. You’ll keep all the flavor but none of the sogginess. Pro tip: Firmer apples like Granny Smith or Honeycrisp hold up better.
Mistake 2: Overmixing the Batter
It’s tempting to whisk everything until smooth, but that develops gluten in the flour, leading to a tough, rubbery texture. Once you add the dry ingredients, fold just until combined—lumps are okay! The oats and apples will hide any imperfections, and your bake will stay light and spongy. Remember: gentle hands make tender cakes.
Mistake 3: Skipping the Resting Time
Cutting into the bake too soon causes it to crumble or stick to the pan. Letting it cool for 20–30 minutes allows the structure to set. This is especially important with oat-based bakes, which are more delicate when hot. Be patient—it’s worth the wait for clean, beautiful slices.
Mistake 4: Baking at the Wrong Temperature
Ovens vary, and if yours runs hot or cold, your bake may undercook or burn. Always preheat fully and use an oven thermometer if possible. Baking at too high a temperature browns the top too fast while leaving the center raw. At too low, it dries out. Stick to 180°C (350°F) and check at 40 minutes.
Mistake 5: Forgetting to Grease the Pan Properly
Oats can stick like glue if the pan isn’t well-greased. Use butter, oil, or non-stick spray—and don’t skip the corners. For extra insurance, line the bottom with parchment paper. This ensures your rustic beauty slides out cleanly, ready for its powdered sugar moment.
Frequently Asked Questions
Can I use instant oats instead of rolled oats?
It’s not recommended. Instant oats are finely ground and will turn your bake gummy or dense. Rolled oats (also called old-fashioned oats) keep their texture and give that lovely chewy, rustic bite that defines this recipe. If you only have quick oats, use them sparingly—replace no more than half the amount—and expect a softer crumb.
How do I know when the bake is fully cooked?
Look for three signs: the top should be golden brown and slightly cracked around the edges, the sides should pull away from the pan, and a toothpick or skewer inserted into the center should come out clean or with just a few moist apple crumbs—not wet batter. If the top is browning too fast, loosely tent it with foil for the last 10 minutes.
Can I make this recipe ahead of time?
Absolutely! This bake tastes even better the next day as the flavors meld. Bake it the night before, let it cool completely, then cover and store at room temperature. In the morning, warm individual slices for 10 seconds in the microwave or serve at room temperature with your coffee. It’s a busy parent’s secret weapon for stress-free mornings.
What’s the best apple for this recipe?
Choose apples that are sweet but hold their shape when baked. Honeycrisp, Fuji, Gala, and Braeburn are excellent choices. Avoid McIntosh or Red Delicious—they turn mushy. A mix of two varieties (one sweet, one tart) adds complexity. I often use one Honeycrisp and one Granny Smith for balance!
Can I reduce the sugar?
Yes! You can lower the sugar to 120 g without sacrificing texture, thanks to the natural sweetness of the apples. If you go below that, the bake may become dry or bland. For a natural alternative, try coconut sugar—but note it will darken the color slightly and add a mild caramel note.
Is this recipe kid-friendly to make?
Very! Kids love grating apples (with supervision), mixing batter, and arranging apple slices on top. It’s a great way to teach basic baking skills. Just keep them away from the hot oven, and let them dust the powdered sugar—that’s always the fun part. My 7-year-old calls it “apple cloud cake.”
Can I add protein powder to this bake?
Yes, but carefully. Replace only 2–3 tablespoons of the flour with unflavored or vanilla protein powder. Too much can make the bake dry or rubbery. Also, reduce the milk by 1–2 tablespoons if the batter seems too thick. This small boost makes it great for athletes or growing kids.
Why did my bake sink in the middle?
This usually happens from underbaking, too much moisture from apples, or opening the oven door too early. Make sure your baking powder is fresh (it loses power after 6 months), squeeze excess liquid from grated apples, and resist peeking before the 40-minute mark. A steady oven temperature is key for even rising.
Can I use this batter for muffins?
Definitely! Divide the batter into a greased or lined muffin tin, top with apple slices or a sprinkle of oats, and bake at 180°C (350°F) for 20–25 minutes. Muffins are perfect for portion control and freezing. They make excellent lunchbox treats or grab-and-go breakfasts.
Does this bake contain gluten?
The original recipe uses all-purpose flour, which contains gluten. But it’s easily made gluten-free by using a trusted 1:1 gluten-free flour blend (like Bob’s Red Mill or King Arthur) and certified gluten-free oats. Always check labels, as oats can be cross-contaminated during processing.
Your New Go-To Comfort Bake Awaits
This Delicious Apple Oatmeal Comfort Bake isn’t just a recipe—it’s your kitchen’s answer to “What can I make that’s easy, wholesome, and makes everyone smile?” Whether you’re feeding tired kids, impressing brunch guests, or treating yourself after a long day, it delivers warmth, flavor, and that unbeatable home-baked charm. So grab those apples, dust off your mixing bowl, and let your oven fill the house with love. One slice in, you’ll wonder why you didn’t make it sooner. And trust me—you’ll be making it again next week.
Delicious Apple Oatmeal Comfort Bake
Ingredients
Equipment
Method
- In a large bowl, beat the eggs and sugar until pale and slightly fluffy.
- Gently pour in the oil, milk, and vanilla, stirring just until smooth.
- Add the grated apples to the wet mix and stir gently with a spatula.
- In a separate bowl, whisk together the flour, oats, cinnamon, baking powder, and salt.
- Sift this mixture over the apple batter and fold until no dry streaks remain.
- Pour the batter into a greased 8-inch baking pan and smooth the top.
- Arrange thin apple slices on top of the batter.
- Bake in a preheated oven at 180°C (350°F) for 45–50 minutes.
- Let the bake cool in the pan for at least 20 minutes before transferring to a wire rack.
- Once cool, dust with powdered sugar.