Have you ever taken a bite of something so soft, so creamy, and so perfectly sweet that you just had to close your eyes and sigh? That’s exactly what happens every time I serve my Deliciously Light Dulce de Leche Delight. It’s one of those recipes passed down through giggles and kitchen messes—my abuela used to make it for Sunday gatherings, and now, it’s my go-to when I want to impress without spending all day in the kitchen. Fluffy like a cloud, filled with that irresistible white dulce de leche, and ready in under an hour? Yes, please!
The Sweet Story Behind the Deliciously Light Dulce de Leche Delight
This dessert goes by many names—“Gypsy Manjar,” “Swiss Roll Dulce de Leche,” or even just “that magical jelly roll everyone loves.” While its exact origin is a bit mysterious (some say Eastern Europe, others argue South America), what’s certain is that it traveled across continents and landed perfectly in Latin kitchens, where dulce de leche became its soulmate. In my family, we call it “Gypsy Manjar” because my tía Rosa swore a Romani neighbor taught her the technique in Buenos Aires. Whether that’s true or just part of the charm, I don’t know—but the love in every bite is real.
Why You’ll Absolutely Fall for This Dulce de Leche Cake Roll
This recipe is a dream for anyone who wants big flavor with minimal fuss. The sponge cake is light enough to float away if you blink, yet sturdy enough to hold that luscious white dulce de leche without tearing. It’s not overly sweet, just perfectly balanced. Plus, it’s naturally gluten-light (thanks to minimal flour), and you only need one bowl and a baking tray! I’ve tested this recipe more times than I can count—once with kids helping (flour everywhere!), once for a birthday, and once at 10 p.m. because I just needed comfort. Every time, it turned out perfect.
Perfect Moments for Your Deliciously Light Dulce de Leche Delight
Think of this dessert as your culinary superhero—it saves the day at last-minute guests, birthday parties, afternoon tea with friends, or even as a fancy finish to a simple weeknight dinner. I once brought it to a potluck, and someone asked if I bought it from a bakery (flattering, but nope—just eggs, sugar, flour, and love!). It’s also stunning for holidays like Christmas or Mother’s Day, especially when dusted with powdered sugar or drizzled with extra dulce de leche in swirls.
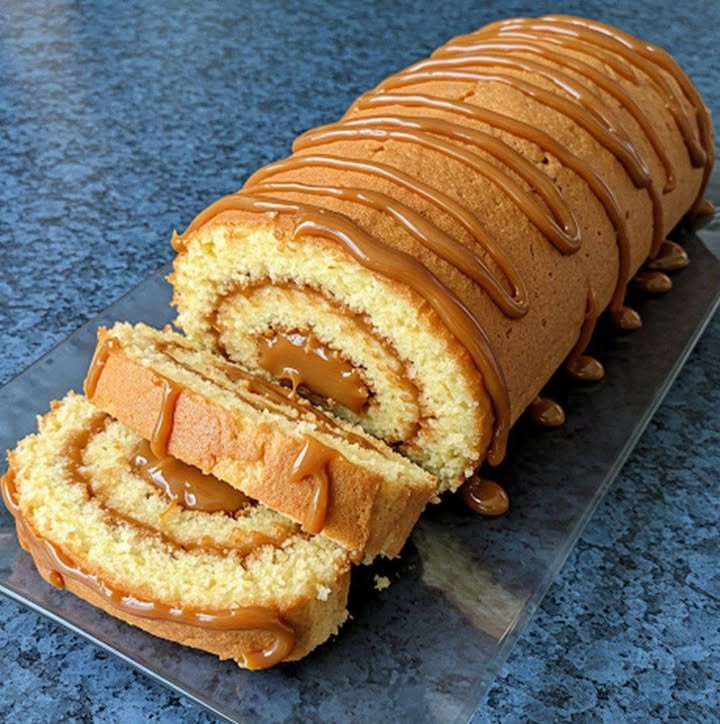
Ingredients You’ll Need
- 6 large eggs
- 150 g (¾ cup) granulated sugar
- 120 g (1 cup) all-purpose flour, sifted
- 400 g (about 1¾ cups) white delicacy dulce de leche (also called “dulce de leche blanco” or “manjar blanco”)
Easy Substitutions if You’re Missing Something
- Eggs: For a slightly denser but still tasty version, you can use 5 extra-large eggs—but 6 large is ideal for that airy lift.
- Flour: Swap all-purpose for cake flour for an even lighter crumb (use 110 g if substituting).
- Dulce de leche: If you can’t find white dulce de leche, regular dulce de leche works—but it’s darker and richer. For a lighter option, mix regular dulce de leche with a spoonful of whipped cream.
- Sugar: Organic cane sugar gives a lovely depth, but regular white sugar works just fine.
How to Make Your Deliciously Light Dulce de Leche Delight
Step 1
Preheat your oven to 180°C (350°F). Line a standard 15×10-inch jelly roll pan with parchment paper—no butter or oil needed! The paper should go up the sides so you can lift the cake easily later. While the oven heats, your kitchen will start to feel like a bakery, and trust me, that’s half the joy. Pro tip: Tear off a second sheet of parchment—it’ll come in handy when rolling the warm cake.
Step 2
In a large bowl, beat the eggs and sugar together with a hand mixer or stand mixer on medium-high speed for 5–7 minutes. You’ll know it’s ready when the mixture turns pale yellow, thick, and triples in volume—it should leave a ribbon trail when you lift the beaters. This aeration is what gives the cake its cloud-like texture. Don’t rush this step! My first attempt failed because I stopped too early—lesson learned.
Step 3
Gently fold in the sifted flour using a rubber spatula. Use big, slow, enveloping motions—like you’re tucking the flour into bed. Overmixing here deflates all that beautiful air you just whipped in, and we can’t have that! Stop as soon as no streaks of flour remain. The batter should be glossy and smooth, like liquid silk.
Step 4
Pour the batter into your prepared pan and tilt it gently to spread evenly into the corners. Tap the pan once on the counter to release any large air bubbles. The surface should be perfectly smooth—a quiet canvas waiting for its sweet destiny. Pro tip: Use an offset spatula or the back of a spoon for an ultra-even layer.
Step 5
Bake for 10–12 minutes, or until the top springs back when lightly touched and the edges just begin to turn golden. The cake will puff up beautifully in the oven—don’t open the door too early, or it might collapse! When it’s done, it smells like warm vanilla heaven. Set a timer—you don’t want to overbake, or the roll will crack.
Step 6
As soon as it comes out of the oven, flip the cake onto a clean kitchen towel dusted lightly with powdered sugar (or use that second parchment sheet). Carefully peel off the original parchment. Then, while the cake is still hot, gently roll it up from the short end, using the towel or paper to help. This “memory roll” sets the shape so it won’t crack later. Let it cool completely on a wire rack—this step is non-negotiable! I learned this the hard way when I tried skipping it… and ended up with a dulce de leche sandwich instead of a roll.
Step 7
Once the cake is totally cool, unroll it carefully. Spread the white dulce de leche evenly over the surface, leaving a ½-inch border around the edges so it doesn’t ooze out when you re-roll. The filling should be thick but spreadable—if it’s too stiff, warm it slightly. Then, gently roll it back up—this time without the towel. The cake will feel soft and yielding, like it was made for this moment.
Step 8
Now for the fun part—decorating! You can drizzle extra white dulce de leche on top in elegant swirls, dust with powdered sugar (my kids love making snowstorm patterns), or even sprinkle with cocoa powder for a bittersweet contrast. For parties, I sometimes add edible gold flakes or fresh berries on the side. Serve chilled—it tastes even better after resting in the fridge for an hour!
Timing at a Glance
- Prep time: 15 minutes
- Cooking time: 12 minutes
- Cooling & resting time: 60–90 minutes
- Total time: About 1 hour 30 minutes
Chef’s Secret for the Perfect Roll
Here’s my abuela’s trick: after rolling the warm cake in the towel, place it seam-side down and drape a second clean, damp towel over it while it cools. This keeps the surface flexible and prevents drying—guaranteed no cracks! Also, always use room-temperature eggs—they whip up fluffier and faster.
A Sweet Little Fact
White dulce de leche (often called “manjar blanco” in Chile or “arequipe blanco” in Colombia) is made with sweetened condensed milk but cooked gently to avoid browning—keeping its ivory color and delicate flavor. It’s less caramelized than traditional dulce de leche, which makes it perfect for this light dessert. Fun fact: in Argentina, many families have their own secret recipe passed down for generations!
What You’ll Need to Make It
- 15×10-inch jelly roll pan
- Parchment paper
- Hand mixer or stand mixer
- Rubber spatula
- Clean kitchen towels (2)
- Wire cooling rack
- Offset spatula or butter knife (for spreading filling)
How to Store Your Deliciously Light Dulce de Leche Delight
This dessert is best enjoyed within 24–48 hours. Wrap it tightly in plastic wrap or place it in an airtight container and store it in the refrigerator. The cold helps the filling set and enhances the sponge’s tenderness. I actually think it tastes even better the next day—the flavors meld beautifully overnight.
If you plan to keep it longer, you can freeze it! Wrap the unfrosted roll (without extra topping) in two layers of plastic wrap, then place it in a freezer bag. It will keep for up to 1 month. Thaw overnight in the fridge, then add your final decorations before serving. Never freeze it with powdered sugar or cocoa—it’ll get soggy.
Avoid storing it at room temperature for more than 2 hours, especially in warm climates. The dairy in the dulce de leche can spoil, and we want your treat to stay safe and scrumptious!
Tips and Advice for the Best Results
- Always sift your flour—it prevents lumps and keeps the cake airy.
- Don’t skip the “memory roll” step—it’s the key to a crack-free dessert.
- Use a kitchen scale for accuracy—150 g of sugar is not the same as 150 ml!
- If your dulce de leche is too thick, warm it in the microwave for 10 seconds to make spreading easier.
- Chill the rolled cake for 30 minutes before slicing—it cuts cleaner and looks more professional.
Presentation Ideas That Wow
- Slice into thick rounds and serve with a dollop of whipped cream and fresh raspberries.
- Drizzle with melted dark chocolate and flaky sea salt for a sweet-salty twist.
- Plate on a slate board with a dusting of matcha powder for a modern look.
- Top with toasted coconut flakes for texture and tropical vibes.
- Use a stencil to sprinkle powdered sugar in hearts or stars for themed parties.
- Serve with a side of warm café con leche—it’s a match made in heaven.
Healthier Twists on the Classic Recipe
Want to enjoy your Deliciously Light Dulce de Leche Delight with a few less calories or special dietary needs? Try these fun variations!
- Gluten-Free Version: Replace the all-purpose flour with a 1:1 gluten-free baking blend (like Bob’s Red Mill). Add ¼ tsp xanthan gum if your blend doesn’t include it. The texture stays tender and rolls beautifully.
- Lower-Sugar Option: Use half the sugar (75 g) and add 1 tsp vanilla extract for depth. For the filling, mix white dulce de leche with Greek yogurt (1:1) to cut sweetness while keeping creaminess.
- Coconut Flour Sponge: Not a direct swap—but for adventurous bakers, try a base of eggs, coconut flour, and a touch of honey. It’s denser but delicious with coconut dulce de leche.
- Protein-Packed Roll: Add 1 scoop of unflavored whey protein to the egg-sugar mixture. Reduce flour to 100 g. The cake stays spongy and gains extra staying power for post-workout treats.
- Vegan Adaptation: Use aquafaba (chickpea brine) whipped with sugar instead of eggs, and a vegan dulce de leche made from coconut milk. It’s trickier but doable—just bake at 170°C to avoid drying.
- Fruit-Infused Delight: Layer thin slices of banana or strawberry over the dulce de leche before rolling. Add a splash of lemon zest to the batter for brightness. Perfect for summer gatherings!
Common Mistakes to Avoid
Mistake 1: Skipping the Memory Roll
Rolling the warm cake right after baking is crucial—it “teaches” the sponge to bend without breaking. If you wait until it’s cool, the structure sets and becomes brittle. I’ve seen so many home bakers skip this and end up with a crumbly mess instead of a smooth spiral. Pro tip: Roll it gently but confidently—don’t hesitate! The cake is more flexible than you think.
Mistake 2: Overbaking the Sponge
Even one extra minute in the oven can dry out the cake, making it prone to cracks. The perfect sponge is springy, moist, and just barely golden at the edges. If the top browns too much, it’s already too late. Always use an oven thermometer—many home ovens run hot! Set a timer, and start checking at 9 minutes.
Mistake 3: Spreading Filling on a Warm Cake
If you roll the cake while it’s still warm the second time (after adding filling), the heat can melt the dulce de leche, causing it to leak out or make the sponge soggy. Always let the unrolled cake cool completely before spreading. Patience pays off with clean slices and a neat appearance.
Mistake 4: Overmixing the Batter
Once you add the flour, treat the batter like a sleeping baby—gentle folds only! Vigorous stirring knocks out the air bubbles created during whipping, leading to a dense, flat cake. Use a spatula, not a mixer, and fold just until combined. If you see a few tiny flour streaks, that’s okay—they’ll vanish during baking.
Mistake 5: Using Cold Eggs
Cold eggs don’t whip as high or as fast as room-temperature ones. The result? Less volume, less fluff. To warm eggs quickly, place them in a bowl of warm (not hot) water for 5 minutes. You’ll gain precious lift and a lighter texture—worth the extra minute!
Frequently Asked Questions
What is white delicacy dulce de leche?
White delicacy dulce de leche (also called manjar blanco or dulce de leche blanco) is a creamy, ivory-colored sweet made by slowly cooking sweetened condensed milk without letting it caramelize. It has a milder, milkier flavor than traditional brown dulce de leche and a smooth, spreadable texture—perfect for delicate desserts like this sponge roll.
Can I use regular dulce de leche instead?
Yes, you can! But keep in mind that regular dulce de leche is darker, thicker, and more caramel-forward. It will change the look and taste of your dessert slightly. If using it, warm it gently to make it easier to spread, and consider reducing the amount by 50 g to avoid overwhelming the light sponge.
Why did my cake crack when I rolled it?
Cracking usually happens when the cake is overbaked (too dry), not rolled while warm the first time, or the flour was overmixed. Make sure to follow the memory roll step, bake just until set, and fold the flour gently. A slightly underbaked cake is better than an overbaked one for rolling!
How far in advance can I make this dessert?
You can prepare it up to 2 days ahead. Store it well-wrapped in the fridge. Wait to dust with powdered sugar or add delicate toppings until just before serving to keep them fresh and pretty. The flavors actually deepen overnight, making day-two slices extra delicious.
Can I freeze the finished roll?
Yes! Freeze it without powdered sugar or cocoa topping. Wrap tightly in plastic, then foil, and place in a freezer bag. It keeps for up to 1 month. Thaw overnight in the fridge, then decorate as desired. Freezing helps the filling firm up, making it easier to slice cleanly.
Is this recipe gluten-free?
Not as written—it uses all-purpose flour. But you can easily make it gluten-free by substituting a 1:1 gluten-free baking flour blend. Avoid almond or coconut flour alone—they absorb moisture differently and may cause the cake to crack.
Why is it called “Gypsy Manjar”?
The name likely comes from European traditions where “gypsy” was used (though outdated and inaccurate today) to describe dishes with mysterious origins or rich, nomadic influences. “Manjar” means “delicacy” in Spanish. Many families in Argentina, Uruguay, and Chile use this name affectionately, though modern kitchens often prefer “dulce de leche roll” or “sponge cake delight.”
Can I add flavor to the sponge?
Absolutely! Try adding 1 tsp vanilla extract, 1 tbsp lemon zest, or 2 tbsp cocoa powder (reduce flour by 15 g if using cocoa). Just don’t add too much liquid—it can weigh down the delicate batter. I love vanilla for its warmth and how it complements the dulce de leche.
What size pan should I use?
A standard 15×10-inch (38×25 cm) jelly roll pan is ideal. If your pan is smaller, the cake will be thicker and may need longer baking—check early! If it’s larger, the cake will be too thin and may tear. Parchment paper is a must for easy removal.
How do I get clean slices when serving?
Chill the roll for at least 30 minutes before cutting. Use a sharp, thin-bladed knife, and wipe it clean between slices. A warm knife (dipped in hot water and dried) also glides through the filling smoothly. Serve immediately for the best texture contrast—cool cake, creamy center!
Your New Favorite Dessert Awaits
There’s something magical about a dessert that’s both simple and spectacular—and this Deliciously Light Dulce de Leche Delight delivers on both. Whether you’re baking for family, friends, or just yourself after a long day, it’s a reminder that joy can come in the form of a soft, creamy roll. So preheat that oven, crack those eggs, and get ready to hear those happy sighs. After all, the best recipes aren’t just eaten—they’re remembered. Happy baking! 🍰
Deliciously Light Dulce de Leche Delight
Ingredients
Equipment
Method
- Preheat your oven to 180°C (350°F) and line a standard 15x10-inch jelly roll pan with parchment paper.
- In a large bowl, beat the eggs and sugar together with a mixer on medium-high speed for 5–7 minutes until pale yellow and thick.
- Gently fold in the sifted flour using a rubber spatula until no streaks of flour remain.
- Pour the batter into the prepared pan and spread evenly, tapping the pan to remove air bubbles.
- Bake for 10–12 minutes until the top springs back when touched and the edges are lightly golden.
- Flip the cake onto a clean kitchen towel dusted with powdered sugar and peel off the parchment.
- While hot, gently roll the cake up from the short end using the towel to help, and let it cool completely on a wire rack.
- Once cool, unroll the cake and spread the white dulce de leche evenly, then roll it back up without the towel.
- Decorate with additional dulce de leche, powdered sugar, or cocoa powder as desired and serve chilled.