Let me tell you a little secret: the first time I made this No-Bake Oreo Cheesecake Delight, my kids thought I’d ordered it from a fancy bakery. Nope—it was me, my trusty mixing bowl, and a box of Oreos! There’s something magical about a creamy, dreamy dessert that needs zero oven time but still feels like a celebration. Whether you’re hosting a birthday party or just treating yourself after a long week, this cheesecake delivers big flavor with almost no fuss.
A Sweet Slice of Modern Dessert History
While traditional cheesecake dates back to ancient Greece, the Oreo version is a deliciously modern twist. Oreos themselves were invented in 1912 by Nabisco, but it wasn’t until the late 20th century that home bakers started crushing them into bases and folding them into fillings. The no-bake style became especially popular in warmer climates (or for busy moms like me!) who wanted rich, creamy desserts without heating up the kitchen. Today, the No-Bake Oreo Cheesecake Delight is a global favorite—especially at potlucks, school events, and summer BBQs.
Why You’ll Absolutely Love This No-Bake Oreo Cheesecake
Imagine a dessert that’s velvety smooth, studded with crunchy cookie bits, and layered on a chocolatey Oreo crust—all chilled to perfection. This recipe is crazy easy, requires no oven, and uses just one mixing bowl (okay, maybe two). It’s crowd-pleasing, kid-approved, and ready in under 20 minutes of active work. Plus, that contrast between the cool filling and the crisp base? Pure bliss in every bite.
Perfect for Parties, Birthdays, and Lazy Sundays
This No-Bake Oreo Cheesecake Delight shines at birthday parties (especially for kids!), baby showers, or even as a last-minute dessert for unexpected guests. I once made it for a neighborhood potluck and came home with an empty dish and three recipe requests! It’s also perfect for summer gatherings since it’s served cold and won’t melt like ice cream. And honestly? It’s my go-to comfort dessert when I need a little treat after bedtime—the kids are asleep, the kitchen is quiet, and that last slice is all mine.
Ingredients for Your No-Bake Oreo Cheesecake
Here’s everything you’ll need for a creamy, cookie-packed dessert that serves 8:
- For the base:
- 16 Oreo cookies (with filling)
- 4 tablespoons melted butter
- For the filling:
- 2 tablespoons unflavored gelatin (optional, for extra firmness)
- 16 Oreo cookies, roughly crushed into small pieces
- 500 ml (about 2 cups) heavy whipping cream
- 200 g (about 7 oz) cream cheese, softened
- 6 tablespoons icing (powdered) sugar
- 1 teaspoon vanilla extract
- For decoration:
- Extra Oreo cookies, whole or halved
Easy Ingredient Swaps
No heavy cream? Use cold whipping cream with at least 30% fat—it whips better. Dairy-free? Swap butter for coconut oil and use plant-based cream cheese and whipping cream (just check they’re cold and firm). Prefer less sugar? Reduce the icing sugar to 4 tablespoons—it’s still sweet enough thanks to the Oreos. And if you’re skipping the gelatin, chill the cheesecake longer (at least 4 hours) for a firmer set.
How to Make Your No-Bake Oreo Cheesecake Delight
Step 1: Make the Oreo Crust
Grab your 16 Oreo cookies—yes, with the creamy filling!—and crush them into fine crumbs using a food processor or a zip-top bag and rolling pin. Mix the crumbs with melted butter until it looks like wet sand. Press this mixture firmly into the bottom of an 18 cm (7-inch) springform pan, using the back of a spoon or a flat glass to smooth it evenly. Pop it into the fridge while you make the filling—this base needs to chill and set so it holds together when sliced. Pro tip: Don’t skip pressing it hard—loose crust = crumbly slices!
Step 2: Whip the Cream and Cream Cheese
Pour your cold heavy cream into a large bowl and beat it with an electric mixer until soft peaks form—it should double in volume and look fluffy, like clouds. In another bowl, beat the softened cream cheese with icing sugar and vanilla until smooth and creamy, with no lumps. Gently fold the whipped cream into the cream cheese mixture using a spatula and big, sweeping motions. This keeps the air in the cream so your filling stays light and airy. Chef’s tip: Make sure your cream cheese is truly room temperature—cold cream cheese won’t blend smoothly and leaves lumps.
Step 3: Add Gelatin (Optional)
If you’re using gelatin for extra stability (great for warm days or long serving times), sprinkle the powder over 10 tablespoons of cold water and let it bloom for 2 minutes. Then heat it in the microwave for 10–15 seconds until fully dissolved—it should be clear, not cloudy. Let it cool slightly, then stir it into your cream cheese mixture until fully blended. This step isn’t necessary for flavor, but it helps the cheesecake hold its shape beautifully when sliced.
Step 4: Fold in the Oreo Pieces and Assemble
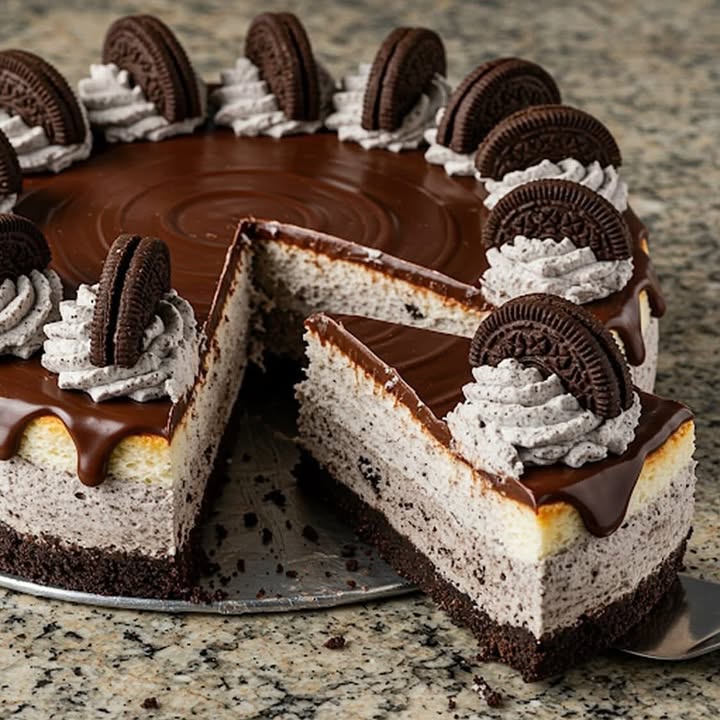
Take your 16 crushed Oreos (just broken into small, bite-sized bits—not powder!) and gently fold them into the creamy filling. Don’t overmix; you want those cookie chunks to stay intact for texture. Pour this mixture over your chilled crust, spreading it evenly with a spatula. Press down lightly to remove air bubbles, then decorate the top with whole or halved Oreos—get creative! I like to press a few into the sides too for a bakery-style look.
Step 5: Chill Until Perfectly Set
Cover the pan loosely with plastic wrap and slide it into the fridge. Let it chill for **at least 3 hours**, but 4–6 hours is even better. Overnight? Even more perfect! This resting time lets the flavors marry and the filling firm up into that iconic creamy-yet-sliceable texture. Resist the urge to peek too often—patience makes the best cheesecake!
Timing Breakdown
- Prep time: 15 minutes
- Chill time: 3 hours (minimum)
- Total time: 3 hours 15 minutes
- Servings: 8 generous slices
Chef’s Secret Trick
Here’s my magic move: freeze the assembled cheesecake for 20 minutes before slicing. It firms up just enough to give you clean, picture-perfect cuts every time—no smushing, no crumbling. Use a hot knife (dip it in hot water, wipe dry) for ultra-smooth edges. Trust me, your guests will think you’re a pro!
Fun Fact About Oreos and Cheesecake
Oreos are the best-selling cookie in the U.S., and it’s no wonder they pair so well with cheesecake! The original Oreo filling was made with lard, but today’s version is vegan-friendly (check your local brand). And fun fact: the world’s largest no-bake cheesecake weighed over 6,000 pounds—but yours will taste even better because it’s made with love!
Tools You’ll Need
- 18 cm (7-inch) springform pan
- Food processor or zip-top bag + rolling pin
- Electric hand mixer or stand mixer
- Large mixing bowls (2)
- Spatula
- Measuring spoons and cups
How to Store Your No-Bake Oreo Cheesecake
Once set, keep your cheesecake covered in the fridge. Use the pan’s sides if it’s a springform, or transfer slices to an airtight container with parchment between layers. It stays fresh and creamy for up to 5 days.
Avoid freezing unless necessary—while it can be frozen for up to 1 month, the texture may soften slightly upon thawing. If you do freeze it, wrap the whole cake tightly in plastic and foil, then thaw overnight in the fridge before serving.
Never leave it out at room temperature for more than 2 hours. Cream cheese and whipped cream are dairy-based, so they spoil quickly in warm conditions. When in doubt, keep it cold!
Top Tips to Make It Even Better
- Use full-fat ingredients—they whip better and taste richer.
- Chill your mixing bowl and beaters before whipping cream for faster, fluffier results.
- Crush Oreos by hand for varied textures—some fine, some chunky.
- Add a pinch of salt to balance sweetness.
- Let cream cheese soften on the counter for 30–60 minutes before mixing.
Presentation Ideas That Wow
- Drizzle with melted white or dark chocolate before serving.
- Pipe whipped cream rosettes around the edge.
- Sprinkle with chocolate shavings or rainbow sprinkles for birthdays.
- Serve on a cake stand with fresh berries on the side.
- Use mini Oreo halves to create a mosaic design on top.
- Dust lightly with cocoa powder for a bakery-fresh look.
Healthier Twists on the No-Bake Oreo Cheesecake
Want a lighter version without losing that Oreo magic? Try these smart swaps:
- Low-Sugar Oreo Cheesecake: Use sugar-free or reduced-sugar Oreos and cut the icing sugar in half. The cream cheese provides enough body, and the cookies still add sweetness.
- High-Protein Version: Blend in 1–2 scoops of vanilla or chocolate protein powder with the cream cheese. Use Greek yogurt whipped with a bit of cream for extra protein and tang.
- Vegan No-Bake Cheesecake: Swap in dairy-free cream cheese, coconut cream (chilled), vegan butter, and Oreo-style vegan cookies. Many brands now make plant-based versions that taste nearly identical.
- Gluten-Free Option: Use certified gluten-free chocolate sandwich cookies (like KinniToos) and ensure all other ingredients are GF-friendly. The texture stays just as rich!
- Keto-Friendly Cheesecake: Use keto chocolate cookies (made with almond flour and erythritol), keto powdered sweetener, and full-fat dairy. Keep portions small for best results.
- Fruity Oreo Swirl: Fold in ½ cup of mashed raspberries or strawberry puree into half the filling, then marble it with the Oreo mixture for a tangy twist.
Common Mistakes to Avoid
Mistake 1: Using Warm or Soft Cream
Heavy cream must be very cold—straight from the fridge—to whip properly. Warm cream won’t hold air and will stay runny, making your cheesecake too soft. Always chill your cream, mixing bowl, and beaters for at least 15 minutes before whipping. If your kitchen is hot, place the bowl over ice while mixing.
Mistake 2: Overmixing the Filling
Vigorous stirring or using a blender can deflate the whipped cream, turning your light filling dense and gluey. Always fold gently with a spatula using wide, slow motions from the bottom up. Stop as soon as no streaks remain—those Oreo pieces should stay chunky, not crushed.
Mistake 3: Skipping the Chill Time
Three hours isn’t just a suggestion—it’s essential. Cutting into the cheesecake too soon leads to a soupy mess. The gelatin (if used) and the fat in the cream need time to set. Plan ahead: make it the night before for best results. Your future self (and your guests) will thank you.
Mistake 4: Not Pressing the Crust Firmly Enough
A loose crust falls apart when sliced, no matter how perfect the filling is. Press the buttery Oreo crumbs down hard with the back of a glass or measuring cup. You should hear a slight crunch—it means it’s compact and ready to hold that creamy layer.
Mistake 5: Using Low-Fat Cream Cheese
Light or whipped cream cheese has extra water and stabilizers that prevent proper setting. Stick to full-fat, block-style cream cheese (like Philadelphia). It’s richer, blends smoother, and gives your cheesecake that luxurious, dense-yet-creamy texture we all crave.
Frequently Asked Questions
Can I make this No-Bake Oreo Cheesecake without gelatin?
Absolutely! The gelatin is optional and mainly adds firmness for warm days or neat slicing. Without it, the cheesecake will still set beautifully in the fridge—it’ll just be slightly softer, like a mousse. Just chill it at least 4 hours for best results.
How do I crush Oreos without a food processor?
No problem! Place the Oreos (with filling) in a sturdy zip-top bag, seal it tightly, and crush them with a rolling pin, wine bottle, or even the bottom of a heavy mug. Bang, twist, and roll until you get the texture you want—fine for the crust, chunky for the filling.
Why is my cheesecake too runny?
Usually, this happens if the cream wasn’t whipped enough, the cream cheese was cold, or you used low-fat dairy. Make sure your cream forms soft peaks before folding, and always use full-fat ingredients. Also, give it enough chill time—rushing leads to soup!
Can I use Cool Whip instead of whipping cream?
You can, but the texture won’t be as rich or stable. Cool Whip is lighter and contains stabilizers that can make the filling less creamy. For best flavor and mouthfeel, whip your own cream—it takes just 3 minutes and tastes infinitely better.
How far in advance can I make this cheesecake?
You can make it up to 3 days ahead and store it covered in the fridge. The flavors actually deepen over time, and the Oreos soften slightly, creating a fudgy texture. Just add fresh Oreo decorations right before serving to keep them crunchy.
What size pan should I use?
An 18 cm (7-inch) springform pan is ideal. If you only have a 20 cm (8-inch) pan, the cheesecake will be thinner—reduce the chill time slightly, but note it may be harder to slice neatly. Avoid using regular cake pans unless they’re lined with parchment for easy removal.
Can I freeze this No-Bake Oreo Cheesecake?
Yes, but with caution. Wrap it tightly in plastic and foil, then freeze for up to 1 month. Thaw overnight in the fridge. The texture may soften a bit, and the Oreo pieces can become chewy, so it’s best enjoyed fresh—but it’s a great option for make-ahead parties.
Why do I need to soften the cream cheese?
Cold cream cheese won’t blend smoothly and leaves lumpy pockets in your filling. Let it sit at room temperature for 30–60 minutes until slightly soft to the touch. You can speed this up by cutting it into cubes—but never microwave it, or it’ll turn oily.
Can I use a different cookie for the base?
Sure! Chocolate graham crackers, Biscoff, or even digestive biscuits work well. But Oreos (with filling) give that iconic flavor and perfect balance of sweetness and chocolate. If you go with plain cookies, add 1–2 tablespoons of sugar to the crust.
How do I get clean slices every time?
Use a sharp, thin-bladed knife dipped in hot water, then wiped dry before each cut. Wipe the blade clean between slices. For extra neatness, freeze the cheesecake for 20 minutes before slicing—it firms up just enough to hold its shape.
Final Thoughts
This No-Bake Oreo Cheesecake Delight isn’t just a dessert—it’s a hug in cake form. Creamy, crunchy, chocolatey, and oh-so-easy, it’s the kind of recipe that becomes a family legend. Whether you’re baking for a crowd or sneaking a midnight slice, it never fails to impress. So grab that Oreo box, clear some fridge space, and get ready for your new signature dessert. You’ve got this—and your taste buds will thank you!
No-Bake Oreo Cheesecake Delight
Ingredients
Equipment
Method
- Crush 16 Oreo cookies into fine crumbs and mix with melted butter.
- Press the mixture into the bottom of an 18 cm (7-inch) springform pan and refrigerate.
- Whip the cold heavy cream until soft peaks form in a large bowl.
- In another bowl, beat cream cheese with icing sugar and vanilla until smooth.
- Gently fold the whipped cream into the cream cheese mixture.
- If using gelatin, bloom it in cold water, dissolve in the microwave, and add to the cream cheese mixture.
- Fold in 16 crushed Oreos gently into the filling.
- Pour the filling over the chilled crust and smooth it out.
- Cover and refrigerate for at least 3 hours, preferably 4–6 hours or overnight.