Let me tell you a little secret: the first time I served this No Bake Pineapple Coconut Cream Cake at a summer BBQ, my neighbor literally came back for a second slice—and then asked for the recipe before she’d even finished the first! I knew right then I had a winner. There’s just something magical about the way the tangy pineapple dances with the creamy coconut and velvety cream cheese. No oven needed, minimal mess, and maximum flavor—this dessert is the kind of easy-breezy treat that feels like a tropical vacation on a plate. If you’ve been searching for a dessert that wows without the work, say hello to your new best friend: Pineapple Coconut Cream Bliss.
The Sweet Story Behind Pineapple Coconut Cream Bliss
This dreamy no-bake cake isn’t tied to one specific country, but its ingredients tell a global tale. Pineapple was once a rare luxury in colonial America—so rare that displaying one at a party showed off your wealth! Coconut, on the other hand, has long been a staple in Southeast Asian and Caribbean desserts. Combine the two, add cream cheese (a 20th-century American fridge favorite), and you’ve got a modern mash-up that’s refreshingly familiar yet excitingly new. I first tried a version of this in a beachside café in Florida, where it was simply called “Island Dream Cake.” At home, I tweaked it—swapped the store-bought crust for a homemade graham-cracker-coconut base, and now it’s my go-to for potlucks, birthdays, and even “just because” Tuesdays.
Why You’ll Absolutely Love This Pineapple Coconut Cream Cake
Picture this: a buttery, slightly chewy crust studded with toasted coconut, topped with a cloud-like filling that’s both creamy and fruity, with just the right hint of sweetness. And the best part? You don’t even turn on your oven! Perfect for hot summer days when your kitchen feels like a sauna. Plus, it’s incredibly forgiving—even if you’re not a “baker,” you’ll nail this. The flavors are bright, balanced, and nostalgic all at once. And honestly? It looks way fancier than it is to make. One bite, and your guests will think you spent all day in the kitchen—you can smile and say, “Oh, this old thing? Took me 20 minutes!”
Perfect Occasions for Your Pineapple Coconut Cream Bliss
This cake is a chameleon of celebration! Serve it at a baby shower for a light, cheerful dessert. Bring it to a pool party—it pairs perfectly with sunshine and laughter. Planning a luau? Skip the fancy catering and let this be your star. It’s also ideal for Easter brunch, Mother’s Day (my mom requests it every year!), or even as a post-graduation treat. And if you’re like me and celebrate “Friday” as its own holiday? This cake makes the weekend start right.
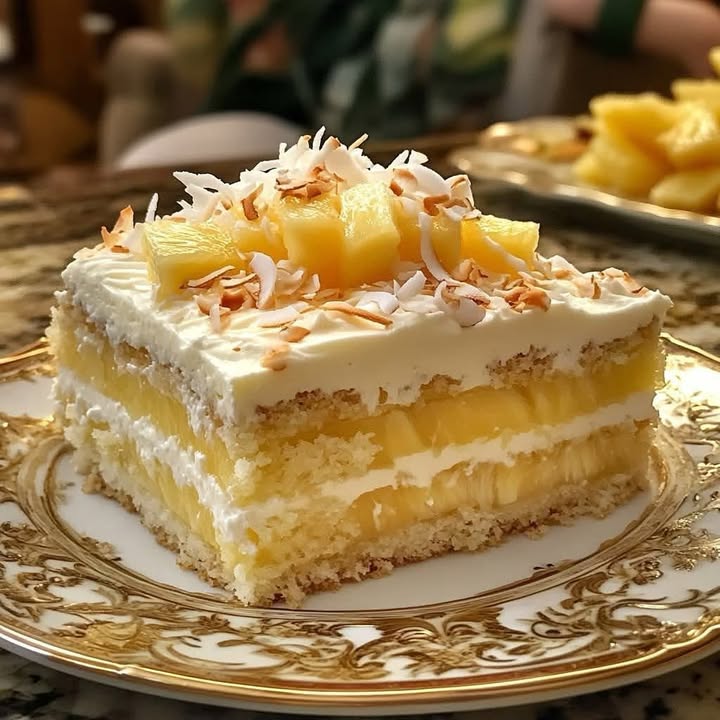
Ingredients for No Bake Pineapple Coconut Cream Cake
- 2 cups crushed graham crackers
- 1/2 cup unsalted butter, melted
- 1 cup sweetened shredded coconut
- 1 can (20 oz) crushed pineapple, well drained
- 1 package (8 oz) cream cheese, softened
- 1/2 cup powdered sugar
- 1 teaspoon vanilla extract
- 1 can (14 oz) sweetened condensed milk
- 1 cup heavy cream
- Whipped cream and extra shredded coconut for garnish
Easy Substitutions & Swaps
No graham crackers? Use vanilla wafers, digestive biscuits, or even crushed shortbread cookies. Dairy-free? Swap butter for coconut oil, cream cheese for a plant-based version, and heavy cream for chilled coconut cream. For a less sweet version, use unsweetened shredded coconut and reduce the powdered sugar by half. And if you only have canned pineapple in juice (not syrup), that’s fine—just drain it really well. Want a boozy twist? Add 1–2 tablespoons of coconut rum to the filling. Go ahead—make it your own!
How to Make Pineapple Coconut Cream Bliss Step by Step
Step 1
Start by making the crust—this is your flavor foundation! In a medium bowl, mix the crushed graham crackers, melted butter, and shredded coconut until it looks like wet sand. You should be able to pinch it, and it holds together. Press this mixture firmly into the bottom of a 9-inch springform pan. Don’t skip pressing it down well—you want it sturdy enough to hold all that creamy goodness. Pro tip: Use the bottom of a heavy glass or measuring cup to get an even, compact layer. Pop it in the fridge while you make the filling so it firms up.
Step 2
Now, let’s build that dreamy filling. In a large bowl, beat the softened cream cheese until it’s smooth and lump-free—this usually takes about 2 minutes with a hand mixer. Add the powdered sugar and vanilla extract, and blend until fully combined. Slowly pour in the sweetened condensed milk while mixing on low, then increase speed and beat until silky and uniform. The mixture should look glossy and thick, like a rich pudding. Chef’s tip: Make sure your cream cheese is truly softened—cold cream cheese leads to lumps, and no one likes a lumpy bliss!
Step 3
Time for the airy lift! In a separate bowl (make sure it’s clean and dry), whip the heavy cream until stiff peaks form. You’ll know it’s ready when you lift the beaters and the peaks stand straight up without drooping. Using a spatula, gently fold the whipped cream into the cream cheese mixture. Don’t stir—fold! Cut through the center, sweep around the edge, and flip the mixture over itself. This keeps all that fluffiness intact. The result? A light, billowy base that melts in your mouth.
Step 4
Now for the star of the show: the pineapple. Drain your crushed pineapple really well—squeeze it gently in a fine-mesh strainer or pat it with paper towels. You don’t want extra moisture making your cake soggy. Stir the pineapple into the cream mixture until evenly distributed. You’ll see golden specks throughout, and it’ll smell like sunshine and summer vacations. Pour this tropical cloud over your chilled crust and smooth the top with an offset spatula or the back of a spoon.
Step 5
Patience, my friend! Slide the springform pan into your fridge and let it chill for at least 4 hours—overnight is even better. This rest time lets the layers set, the flavors marry, and the texture turn perfectly sliceable. Trust me, the wait is worth it. I once tried cutting into it after just 2 hours… let’s just say my slice looked more like soup than cake. Don’t be like past me!
Step 6
Right before serving, add the finishing touches: a swirl of whipped cream (homemade or store-bought—no judgment here!) and a sprinkle of shredded coconut on top. You can even add a few pineapple chunks or a maraschino cherry for extra flair. Run a knife around the edge of the pan, release the springform clasp, and voilà—your Pineapple Coconut Cream Bliss is ready to impress!
Timing at a Glance
- Prep Time: 20 minutes
- Chill Time: 4 hours (or overnight)
- Total Time: 4 hours 20 minutes
- Servings: 8–10 generous slices
Chef’s Secret for Ultimate Pineapple Coconut Cream Bliss
Here’s my golden trick: **toast the shredded coconut before mixing it into the crust**. Spread it on a baking sheet and bake at 325°F for 5–7 minutes until golden and fragrant. Let it cool, then use it in the crust and for garnish. Toasted coconut adds a deep, nutty aroma that takes this cake from “yummy” to “unforgettable.” It’s the little things!
Fun Fact About This Tropical Treat
Pineapple was once called the “fruit of kings” in Europe because it was so rare and expensive! In the 1700s, wealthy hosts would rent a pineapple just to display it at dinner—then return it to the shop! Today, we’re lucky to enjoy it in desserts like this one without needing a royal budget. And fun fact: sweetened condensed milk was invented during the Civil War as a way to preserve milk without refrigeration. So in a way, this cake is a delicious time capsule!
Equipment You’ll Need
- 9-inch springform pan
- Medium mixing bowls (2–3)
- Hand mixer or stand mixer
- Spatula
- Measuring cups and spoons
- Fine-mesh strainer or paper towels (for draining pineapple)
- Offset spatula or butter knife (for smoothing)
How to Store Your Pineapple Coconut Cream Bliss
This cake must stay refrigerated—it’s not just recommended, it’s essential. The cream cheese and heavy cream base can spoil quickly at room temperature. Keep it in the springform pan with a loose cover of plastic wrap, or transfer slices to an airtight container.
Stored properly, it stays fresh and delicious for up to 5 days in the fridge. The crust may soften slightly over time, but the flavor actually improves as the pineapple infuses the cream. I often make it the night before a party—it’s one less thing to worry about on the big day!
Can you freeze it? Yes! Wrap the whole pan tightly in plastic, then in foil, and freeze for up to 1 month. Thaw overnight in the fridge before serving. Avoid freezing individual slices—they tend to weep when thawed. And whatever you do, don’t refreeze once thawed!
Top Tips for Perfect Results Every Time
- Drain the pineapple thoroughly—excess liquid = soggy cake.
- Use full-fat cream cheese and heavy cream for the richest texture.
- Let cream cheese soften on the counter for 30–60 minutes before mixing.
- Chill your mixing bowl before whipping cream—it whips faster and holds peaks longer.
- For clean slices, dip your knife in hot water and wipe between cuts.
Beautiful Ways to Present Your Cake
- Serve on a cake stand lined with banana leaves for a tropical vibe.
- Add edible flowers or mint leaves for a pop of color.
- Drizzle with melted white chocolate or caramel just before serving.
- Top with toasted coconut flakes and pineapple wedges on the side.
- Use individual dessert cups for portion-controlled elegance.
6 Healthier & Creative Variations of Pineapple Coconut Cream Bliss
Love this cake but want to try something new? Here are six tasty twists:
- Lighter Version: Use Neufchâtel cheese (lower-fat cream cheese), light coconut milk whipped to soft peaks, and unsweetened pineapple. Sweeten with a touch of honey or maple syrup.
- Vegan Dream: Swap all dairy for plant-based alternatives—vegan cream cheese, coconut whipped cream, and coconut oil in the crust. Use agave instead of condensed milk (mix with coconut milk to mimic consistency).
- Gluten-Free Crust: Replace graham crackers with gluten-free cookies or almond flour mixed with coconut and butter.
- Tropical Fusion: Add 1/2 cup chopped mango or passion fruit pulp to the filling for a layered fruit experience.
- Protein-Packed: Blend 1 scoop of vanilla protein powder into the cream cheese mixture before adding other liquids.
- Keto-Friendly: Use almond flour and unsweetened coconut for the crust, sugar-free cream cheese, and a low-carb sweetener like erythritol. Replace condensed milk with a homemade keto version (heavy cream + sweetener, reduced slightly).
Common Mistakes to Avoid
Mistake 1: Skipping the Pineapple Drain Step
It’s tempting to dump the whole can in, but excess pineapple juice will make your filling runny and prevent it from setting properly. I learned this the hard way when my cake oozed out of the pan like a creamy lava flow! Always drain the pineapple in a colander, then press it gently with a spoon or paper towels to remove every drop. Pro tip: Save that pineapple juice—it’s perfect for smoothies or cocktails!
Mistake 2: Using Cold Cream Cheese
Cold cream cheese doesn’t blend smoothly—it creates lumps that no amount of mixing can fully fix. Those lumps stay in your finished cake, ruining the silky texture. Always let your cream cheese sit at room temperature for at least 30 minutes before using. If you’re in a rush, microwave it in 10-second bursts (unwrapped!) until soft but not melted.
Mistake 3: Overmixing the Whipped Cream
When you fold whipped cream into the filling, treat it like a delicate cloud—gentle and respectful! Stirring too hard or too long deflates the air bubbles, leaving your cake dense instead of light. Use a spatula, not a whisk, and fold slowly in big, sweeping motions. Stop as soon as no white streaks remain.
Mistake 4: Not Chilling Long Enough
This isn’t a “set-in-30-minutes” dessert. The filling needs time to firm up and bind with the crust. Cutting into it too soon leads to messy, sliding layers. Set a timer for 4 hours—or better yet, make it the night before. Your future self (and your guests) will thank you.
Mistake 5: Forgetting to Grease the Pan (If Needed)
While springform pans usually release well, if your crust sticks, you’ll lose that beautiful base. To be safe, lightly grease the bottom of the pan before pressing in the crust—especially if you plan to remove the cake completely for serving.
Frequently Asked Questions
Can I use fresh pineapple instead of canned?
Yes, but you’ll need to cook it first. Fresh pineapple contains an enzyme (bromelain) that prevents gelatin—and dairy-based fillings—from setting properly. To use fresh, chop 2 cups, simmer with 1/4 cup sugar for 5–7 minutes until soft, then cool and drain thoroughly. Canned pineapple is already heat-treated, so it’s safe and more convenient for this recipe.
Why is my cake too sweet?
Sweetened condensed milk and sweetened coconut both add sugar, so the dessert leans sweet by design. If you prefer less sweetness, use unsweetened shredded coconut and reduce the powdered sugar to 1/4 cup. You can also balance it with a squeeze of lime juice in the filling—just 1 teaspoon brightens everything up!
Can I make this in a regular cake pan?
Technically yes, but it’s much harder to remove cleanly. A springform pan’s removable sides make slicing and serving effortless. If you must use a regular 9-inch round pan, line the bottom with parchment paper and grease the sides well. Run a knife around the edge before chilling to help release it later.
How do I get clean slices?
Dip a sharp knife in hot water, wipe it dry, and slice. Repeat between each cut. The heat helps the blade glide through the creamy layers without dragging or smearing. Also, make sure the cake is fully chilled—warm cake = messy slices.
Can I add gelatin to help it set faster?
You don’t need to! The combination of cream cheese, whipped cream, and condensed milk sets beautifully on its own. Adding gelatin can make the texture rubbery and alter the flavor. Trust the recipe—it works as written.
Is this recipe gluten-free?
Not as written—graham crackers contain gluten. But you can easily make it gluten-free by using certified GF graham crackers or cookies (like Schär or Kinnikinnick brands). Always check labels, as some shredded coconut is processed in facilities with wheat.
Can I use coconut milk instead of heavy cream?
Only the thick cream from a can of full-fat coconut milk (chilled overnight) will work. Regular coconut milk is too thin and won’t whip. Scoop out the solid white layer, whip it like heavy cream, and fold it in. It adds a lovely coconut flavor but may make the cake slightly less firm.
Why did my crust fall apart when I cut it?
That usually means it wasn’t pressed down firmly enough, or there wasn’t enough butter to bind it. Make sure you use the full 1/2 cup melted butter, and really pack the crust into the pan. Chilling it before adding the filling also helps it hold together.
Can I prepare this cake 2 days ahead?
Absolutely! In fact, it’s better on day 2—the flavors meld, and the texture becomes even creamier. Just keep it covered in the fridge, and add the whipped cream garnish right before serving to keep it fresh and fluffy.
What’s the best way to drain crushed pineapple?
Pour it into a fine-mesh strainer over a bowl and let it sit for 10 minutes. Then press gently with the back of a spoon or fold it into a paper towel and squeeze lightly. You should end up with about 1 cup of drained pineapple—any extra liquid is your enemy here!
Final Thoughts on This Tropical No-Bake Wonder
If you’re looking for a dessert that’s easy, impressive, and bursting with vacation vibes, this No Bake Pineapple Coconut Cream Cake is your answer. It’s the kind of recipe that brings people together—whether it’s your kids begging for “that pineapple cake again” or friends asking for your secret. With no baking, minimal cleanup, and maximum joy, it’s no wonder I call it Pineapple Coconut Cream Bliss. So grab that can of pineapple, fire up your mixer (not your oven!), and treat yourself to a slice of paradise. You deserve it!
Pineapple Coconut Cream Bliss
Ingredients
Equipment
Method
- In a medium bowl, mix the crushed graham crackers, melted butter, and shredded coconut until it resembles wet sand. Press into the bottom of a 9-inch springform pan and refrigerate.
- Beat the softened cream cheese in a large bowl until smooth. Add powdered sugar and vanilla extract, and mix until combined. Slowly pour in sweetened condensed milk while mixing, then beat until silky.
- In a separate bowl, whip the heavy cream until stiff peaks form. Gently fold the whipped cream into the cream cheese mixture until combined.
- Drain the crushed pineapple well. Stir it into the cream mixture and pour over the chilled crust, smoothing the top.
- Chill in the fridge for at least 4 hours, preferably overnight, to allow it to set.
- Before serving, add whipped cream and garnish with shredded coconut. Release the springform clasp and serve.