Why These Zesty Mini Lemon Cheesecakes Delight Are a Must-Try
Picture this: you’re at a family gathering, and everyone’s raving about these tiny, tangy treats that melt in your mouth. That was me last summer, standing in my kitchen, whisk in hand, determined to nail the perfect bite-sized dessert. And oh, did I succeed! These Zesty Mini Lemon Cheesecakes Delight are creamy, citrusy, and utterly irresistible. Whether you’re looking for a refreshing snack or a show-stopping dessert, this recipe has got you covered.
A Little History Behind the Magic
Cheesecake has been around for centuries, with its roots tracing back to ancient Greece. But let’s be honest—mini versions? That’s a modern twist we can all thank Pinterest for. I first stumbled upon mini cheesecakes when I needed a dessert that was easy to share. The lemon addition? Pure serendipity. One day, I had a surplus of lemons from my neighbor’s tree, and voilà! A star was born. The zesty kick of lemon takes this classic dessert to a whole new level.
Why You’ll Love This Recipe
This recipe is a winner for so many reasons. First, it’s simple enough for even beginner bakers. Second, the flavors are spot-on—creamy, tangy, and just sweet enough. Plus, the mini size means no cutting or serving stress. Just grab and go! I’ve made these Zesty Mini Lemon Cheesecakes Delight dozens of times, and they never fail to impress. Trust me, one bite, and you’ll be hooked.
Perfect Occasions to Whip Up These Cheesecakes
Need a dessert for a summer picnic? Check. Hosting a book club meeting? Double check. Want to surprise your coworkers with something sweet? Done and done. These Zesty Mini Lemon Cheesecakes Delight are versatile enough for any occasion. They’re also great for holidays like Easter or Mother’s Day, where light, fresh flavors steal the spotlight.
Ingredients for Your Cheesecake Adventure
Here’s what you’ll need to make these little wonders:
- Base:
- 150 g of María-type cookies
- 70 g of melted butter
- Filling:
- 250 g of cream cheese
- 100 g of sugar
- 1 egg + 1 yolk
- 1 tsp vanilla extract
- Zest of 1 lemon
- Juice of 2 lemons
- Decoration:
- Fine lemon slices
Substitution Options
Not everyone has the same pantry staples, so here are some swaps:
- Use graham crackers instead of María cookies for the base.
- Swap regular sugar for honey or maple syrup if you prefer natural sweeteners.
- If you’re out of lemons, try limes for a tropical twist.
Step 1: Preheat and Prep
Start by preheating your oven to 170°C (340°F). Grab a muffin tin and line it with cupcake liners—trust me, this makes cleanup a breeze. Now, crush those cookies into fine crumbs. I like using a food processor, but a ziplock bag and rolling pin work just as well. Mix the crumbs with melted butter until it resembles wet sand. Press this mixture firmly into the bottom of each liner. Pop them in the oven for 5 minutes, then let them cool while you tackle the filling.
Pro tip: Use the bottom of a glass to press the crust evenly—it’s a game-changer!
Step 2: Make the Filling
In a mixing bowl, beat the cream cheese and sugar together until smooth and creamy. Add the egg, yolk, vanilla, lemon zest, and juice. The aroma of fresh lemon will fill your kitchen, making you want to sneak a taste. Mix until everything is well combined, but don’t overbeat—this keeps the texture light and airy.
Pro tip: Room-temperature ingredients blend better, so take them out of the fridge ahead of time.
Step 3: Assemble and Bake
Pour the luscious filling over the cooled crusts. Fill each cup about three-quarters full to avoid spills. Bake for 15–18 minutes, or until the centers are almost set but still slightly jiggly. Let them cool completely before refrigerating for at least 2 hours. Patience is key here—the chilling enhances the flavors.
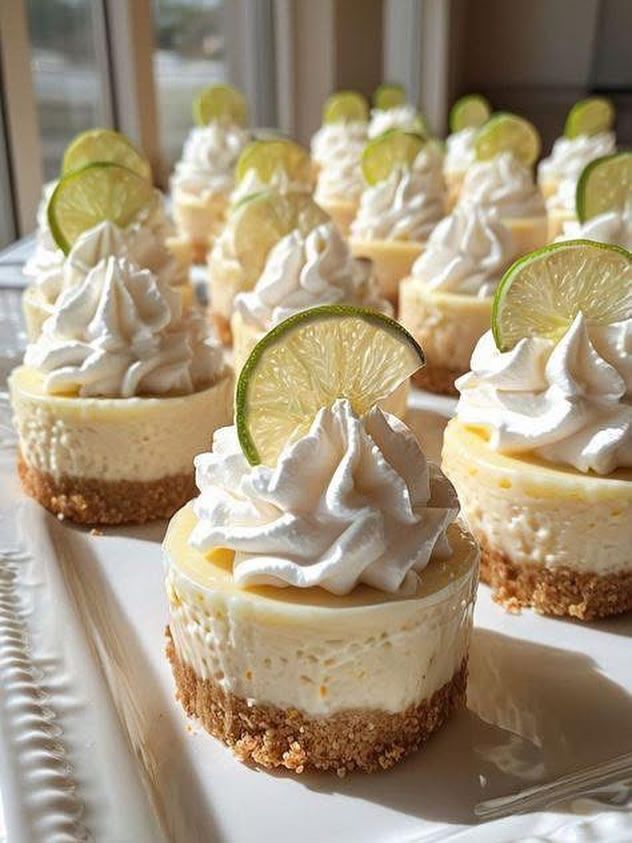
Chef’s tip: For extra pizzazz, garnish with thin lemon slices before serving.
Timing Breakdown
Here’s how long you’ll need:
- Prep time: 15 minutes
- Cooking time: 20 minutes
- Resting time: 2 hours
- Total time: About 2 hours and 35 minutes
Chef’s Secret
To prevent cracks on top, avoid opening the oven door while baking. Sudden temperature changes can ruin the texture. Also, adding a teaspoon of cornstarch to the filling helps stabilize it.
Extra Info
Did you know lemons are packed with vitamin C? They’re not just delicious—they’re good for you too! Plus, their bright color adds a cheerful touch to any dessert spread.
Necessary Equipment
You’ll need:
- Muffin tin and cupcake liners
- Mixing bowls
- Whisk or electric mixer
- Measuring cups and spoons
- Zester or grater
Storage Tips
Store these Zesty Mini Lemon Cheesecakes Delight in an airtight container in the fridge for up to 5 days. Keep them away from strong-smelling foods to preserve their delicate flavor. If you’re freezing them, wrap each one individually in plastic wrap, then place them in a freezer-safe bag. They’ll last up to 2 months.
When thawing frozen cheesecakes, transfer them to the fridge overnight. Never microwave them—it ruins the texture. Lastly, always bring them to room temperature before serving for the best taste experience.
Tips and Advice
For a smoother filling, sift the sugar before mixing. Don’t skip the chilling step—it firms up the cheesecakes beautifully. And remember, less is more when it comes to baking time. Overbaking leads to dry cheesecakes, and nobody wants that!
Presentation Ideas
Serve these beauties on a tiered dessert stand for a fancy touch. Pair them with sprigs of mint or edible flowers for a pop of color. Or, arrange them on a rustic wooden board for a cozy vibe. Presentation matters!
Healthier Alternatives
Want to tweak the recipe? Here are six ideas:
- Low-Sugar Version: Replace sugar with stevia or monk fruit sweetener.
- Vegan Option: Use vegan cream cheese and substitute eggs with flax eggs.
- Gluten-Free Base: Swap María cookies for gluten-free biscuits.
- Dairy-Free Delight: Opt for coconut cream instead of cream cheese.
- Protein-Packed: Add a scoop of vanilla protein powder to the filling.
- No-Bake Treat: Skip the oven and use a mix of cream cheese and whipped cream for a lighter texture.
Mistake 1: Overmixing the Filling
Overmixing incorporates too much air, causing cracks during baking. To avoid this, mix just until the ingredients are combined. Tip: Use a spatula for the final fold to keep things gentle.
Mistake 2: Skipping the Chill Time
Chilling sets the cheesecakes and intensifies the flavors. Rushing this step results in a soggy texture. Be patient—it’s worth it!
Mistake 3: Using Cold Ingredients
Cold cream cheese won’t blend smoothly, leaving lumps in your filling. Always bring ingredients to room temperature first.
Mistake 4: Overbaking
Overbaked cheesecakes turn dry and crumbly. Look for a slight jiggle in the center as your cue to pull them out.
Mistake 5: Forgetting to Grease the Pan
Even with liners, greasing the pan ensures easy removal. A light spray of cooking oil does the trick.
Can I use other citrus fruits?
Absolutely! Oranges, limes, or even grapefruits work wonderfully. Each brings its unique flavor profile, so feel free to experiment.
How do I know when they’re done?
The edges should look set, but the center will still jiggle slightly. They’ll firm up as they cool.
Can I freeze these cheesecakes?
Yes, they freeze beautifully. Just wrap them tightly and thaw in the fridge overnight.
What if I don’t have a muffin tin?
No problem! Use a small baking dish and cut the cheesecake into squares once chilled.
Why is my crust soggy?
A soggy crust usually happens if the butter ratio is off or if the crust wasn’t baked long enough. Double-check your measurements.
Can I make these ahead of time?
Definitely! They’re perfect for making a day in advance. Just keep them chilled until ready to serve.
Do I need a mixer?
Not necessarily. A good old-fashioned whisk works fine, though a mixer speeds things up.
Why add lemon zest?
Zest adds a burst of citrus flavor without extra liquid, enhancing the overall taste.
What’s the best way to zest a lemon?
Use a microplane or fine grater. Avoid the white pith underneath—it’s bitter.
Can I use store-bought crusts?
Of course! It’s a great shortcut if you’re short on time.
There you have it—a complete guide to mastering Zesty Mini Lemon Cheesecakes Delight. With their creamy texture, zesty tang, and adorable size, these treats are sure to become a favorite. So grab your apron, gather your ingredients, and get ready to wow everyone at your next gathering. Happy baking!
Zesty Mini Lemon Cheesecakes Delight
Ingredients
Equipment
Method
- Preheat your oven to 170°C (340°F) and line a muffin tin with cupcake liners.
- Crush the María cookies into fine crumbs and mix with melted butter until it resembles wet sand.
- Press the cookie mixture firmly into the bottom of each liner and bake for 5 minutes. Let cool.
- In a mixing bowl, beat the cream cheese and sugar until smooth, then add egg, yolk, vanilla, lemon zest, and juice, mixing until well combined.
- Pour the filling over the cooled crusts, filling each cup about three-quarters full.
- Bake for 15–18 minutes until the centers are slightly jiggly. Let them cool completely before refrigerating for at least 2 hours.